How to Replace Icemaker Kit W10583817 on a Whirlpool Fridge
Steven E / Monday June 2, 2025
Is your Whirlpool fridge leaving you high and dry without ice? Don’t worry—swapping out the icemaker is a straightforward task that can put you back in the chill zone quickly. Check out the how-to video below for step-by-step guidance to keep your freezer stocked with perfect ice cubes.
Looking for the right part? Enter your appliance model number below to find the exact match and get your appliance running like new again!
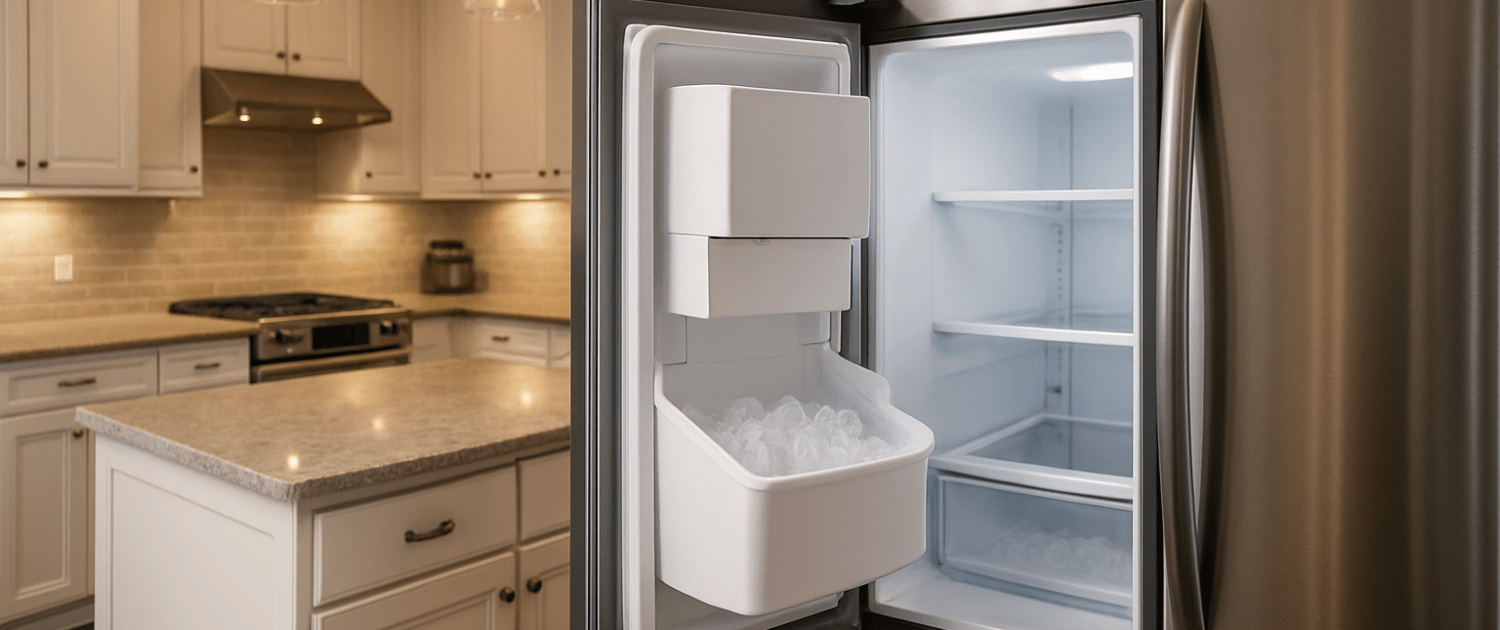
If your Whirlpool fridge has stopped making ice or the cubes are looking a little off, it might be time to replace the icemaker. Installing a new kit (part W10583817) is easier than you might think and can have you scooping fresh ice again in no time.

Watch Here: How to replace an icemaker
The information in this article may not apply to your specific appliance model. We recommend consulting your manufacturer’s documentation or contact us with any questions.
What You’ll Need
- New icemaker kit – This repair requires a replacement W10583817 kit which includes all necessary components. Take your model number to AppliancePartsPros.com to make sure you have the correct part for your model.
- Phillips screwdriver
- 1⁄4 inch nut driver
- Long, flathead screwdriver
- Towel
Safety First
Safety comes first when working on any appliance. Here are some practical tips to help keep you safe:
- Always turn off the power by unplugging the appliance or switching off the circuit breaker before starting. This protects you from the risk of electric shock.
- Wear insulated gloves to protect your hands from sharp edges, pinching hazards, or debris.
- Take your time and work at a steady pace to avoid accidents or injuries.
- Make sure your workspace is well-lit so you can clearly see and access the parts you’re working on.
- Keep your area organized and free of clutter, and ensure children and pets are kept away from the workspace.
- Never handle internal parts with wet hands. Make sure both your hands and the work area are completely dry.
- Check your appliance’s user manual for specific instructions or safety guidelines related to your repair.
- Handle parts gently to prevent damaging the appliance or injuring yourself by using too much force.
- Wear safety glasses if you’re dealing with chemicals, dust, or large debris to protect your eyes.
- If the appliance was recently used, give it time to cool down before working on any heated components.
- Take photos or notes of wiring connections before disconnecting anything. This makes reassembly much easier.
- Avoid touching exposed wires or terminals. If you need to handle wires, use non-conductive tools or wear insulated gloves to reduce the risk of electrical shock.
Removal and Disassembly Steps
Make sure both power and water are off before beginning any repairs.
- Open the left refrigerator door to access the ice bucket.
- Press the release button at the bottom to detach the ice bucket. Lift it out fully once released.
- Locate the cover panel over the icemaker assembly along the rear freezer wall. There will be a small locking tab hole.
- Insert a flathead screwdriver into this hole at an upward angle, pressing down to release the tab.
- With the tab unlocked, pull back fully on the cover panel to detach it. Set this panel aside.
- You’ll see the wiring harness connecting to the rear of the icemaker assembly. Gently pull the icemaker out a few inches – this gives you slack to work with in disconnecting this harness.
- Look for a locking tab in the middle of the harness that joins the two halves. Press this tab with your flathead screwdriver.
- With the tab released, you can separate the two sides of the wiring harness. Make sure the harness routes over the side, out of your way.
- Carefully pull the icemaker assembly out from the refrigerator guides.
- Set the icemaker assembly upside down to access the underside.
- Using a Phillips screwdriver, remove the three screws holding the airbox to the icemaker proper. Set screws aside.
- Rotate the front of the assembly up on its side to reveal the wiring harness connector.
- Like earlier, look for the locking tab to release and detach this harness. Make sure the wires slide free.
- Lifting upwards, carefully slide out the plastic icemaker piece from the airbox/mounting bracket. Set the old icemaker aside.
- Next, release the airbox assembly by lifting it up and away to detach it from the snapped mounts. Set this aside with other removed components.
Installation and Reassembly Steps
- Install the rocker switch into the square port on the new icemaker’s side, wires facing downward. Snap firmly into place.
- Connect both wiring harness plug connectors to the switch ports. Make sure you have a tight fit.
- Route the wiring through the plastic holders, pressing down with a flathead screwdriver until locked securely.
- Replace the protective cover over the wiring, sliding it into place until it snaps on securely.
- Feed the wiring harness male plug through the cover’s porthole. Connect the harness to the ice maker wiring plug.
- Make sure the thermal fuse wire routes properly, held tight within its mounting clip.
- Stand the auger motor assembly upright and lower the replacement airflow box into place. Rotate downward when aligned until the lower clip mounts snap securely.
- Carefully slide the new icemaker component into the airflow box housing, feeding wires into place.
- Reconnect this ice maker wiring harness, tucking wires to avoid pinch points.
- Holding the unit together, rotate the assembly onto its screws to drive mounts home with a Phillips screwdriver.
- Slowly slide the entire icemaker assembly back into the refrigerator unit along its rear wall guides.
- Reach the wiring harness back in and reconnect the two halves. Make sure you have a tight, snapped connection.
- Push the assembly firmly back until fully seated in the appropriate position.
- Carefully shift the wiring harness off to the side walls, out of the way.
- Replace the plastic cover panel, pressing until its locking tab clicks securely.
- Reinsert the ice bucket, sliding back until the release button clicks firmly.
- Close the refrigerator door.
- Give the compressor a few minutes to kick on and the freezer to recalibrate and drop to the appropriate temperature.
- Ice production can take up to 24 hours to start up after a replacement. Allow overnight freezing before rechecking.
- Initiate test mode to speed up the process: hold down the button/switch on the icemaker for 5+ seconds. The unit will run a full cycle.
- Make sure you see/hear ice dropping into the bucket within several minutes. Harvesting cycles happen roughly every 75 minutes.
- Allow the bucket to fill and verify at least 8-10 cycles successfully produce ice mounds.
More Information
Thanks for reading! We hope this article helped you replace the icemaker in your Whirlpool, KitchenAid or Maytag refrigerator.
If you still need some replacement parts, grab your model number and head over to AppliancePartsPros.com. We offer over two million parts and most orders arrive in two business days. If you need some help with finding the right part or placing an order, you can contact our team at 1 (877) 477-7278.
While you’re waiting for your new part to arrive, you can explore our DIY blog and watch thousands of video tutorials on our YouTube channel.
Be sure to follow us on Facebook, Twitter and Instagram to see our latest repair guides!
 https://www.appliancepartspros.com/b/wp-content/uploads/2025/09/groovetopia_macro_shot_of_frost_crystals_forming_irregular_patt_37deb777-ed26-4ba3-927c-946d5393a753.png
816
1456
appthr
https://www.appliancepartspros.com/b/wp-content/uploads/2020/11/app-logo-std.png
appthr2025-09-24 13:04:442025-09-25 06:50:45Refrigerator Sealed Systems: Where DIY Stops and Gauges Begin
https://www.appliancepartspros.com/b/wp-content/uploads/2025/09/groovetopia_macro_shot_of_frost_crystals_forming_irregular_patt_37deb777-ed26-4ba3-927c-946d5393a753.png
816
1456
appthr
https://www.appliancepartspros.com/b/wp-content/uploads/2020/11/app-logo-std.png
appthr2025-09-24 13:04:442025-09-25 06:50:45Refrigerator Sealed Systems: Where DIY Stops and Gauges Begin https://www.appliancepartspros.com/b/wp-content/uploads/2025/06/20250618_1202_Refrigerator-Door-Gasket-Issue_simple_compose_01jy1wbpw8fxvvpx4nn5ejvsk3.png
1024
1536
Steven E
https://www.appliancepartspros.com/b/wp-content/uploads/2020/11/app-logo-std.png
Steven E2025-06-20 06:21:482025-08-20 12:16:14How to Replace Door Gasket W10355582 on a Whirlpool Fridge
https://www.appliancepartspros.com/b/wp-content/uploads/2025/06/20250618_1202_Refrigerator-Door-Gasket-Issue_simple_compose_01jy1wbpw8fxvvpx4nn5ejvsk3.png
1024
1536
Steven E
https://www.appliancepartspros.com/b/wp-content/uploads/2020/11/app-logo-std.png
Steven E2025-06-20 06:21:482025-08-20 12:16:14How to Replace Door Gasket W10355582 on a Whirlpool Fridge https://www.appliancepartspros.com/b/wp-content/uploads/2025/06/20250617_1527_Refrigerators-Ice-Maker_simple_compose_01jxznp0v6ebzsggaqpx90xtq8.png
1024
1536
Steven E
https://www.appliancepartspros.com/b/wp-content/uploads/2020/11/app-logo-std.png
Steven E2025-06-20 06:06:492025-06-20 06:06:58Whirlpool Fridge Not Making Ice? How To Troubleshoot the Sensor
https://www.appliancepartspros.com/b/wp-content/uploads/2025/06/20250617_1527_Refrigerators-Ice-Maker_simple_compose_01jxznp0v6ebzsggaqpx90xtq8.png
1024
1536
Steven E
https://www.appliancepartspros.com/b/wp-content/uploads/2020/11/app-logo-std.png
Steven E2025-06-20 06:06:492025-06-20 06:06:58Whirlpool Fridge Not Making Ice? How To Troubleshoot the SensorWith nearly a decade of experience in providing top-notch customer service regarding appliance parts and repair, Steven enjoys sharing practical advice, troubleshooting tips, and interesting information to help readers stay informed.