How to Make a Sound Dampening Enclosure for an AC Condenser
Steven E / Tuesday June 24, 2025
Central air conditioners are great for keeping your home comfortable, but their outdoor condenser units can be noisy and visually unappealing. Whether it’s the hum of the compressor or the whoosh of the fan, a loud AC unit can interrupt backyard relaxation, disturb light sleepers, and annoy close neighbors.
Fortunately, you don’t need to spend a fortune on fancy enclosures or industrial soundproofing. With the right design and materials, you can build a sound enclosure that significantly reduces noise while maintaining airflow, efficiency, and service access.
This guide walks you through how to design and build a sound-reducing condenser enclosure that suits your yard’s layout, complements your outdoor aesthetics, and keeps your AC system running at its best.
The information in this article may not apply to your specific appliance model. We recommend consulting your manufacturer’s documentation or contact us with any questions.

Why Build a Sound Enclosure?
Before diving into the how-to, it helps to understand the benefits of building your own condenser enclosure.
- Noise Reduction: Properly designed enclosures can reduce the volume of condenser noise by 30 to 60 percent. That’s enough to make a noticeable difference, especially near patios, decks, or bedroom windows.
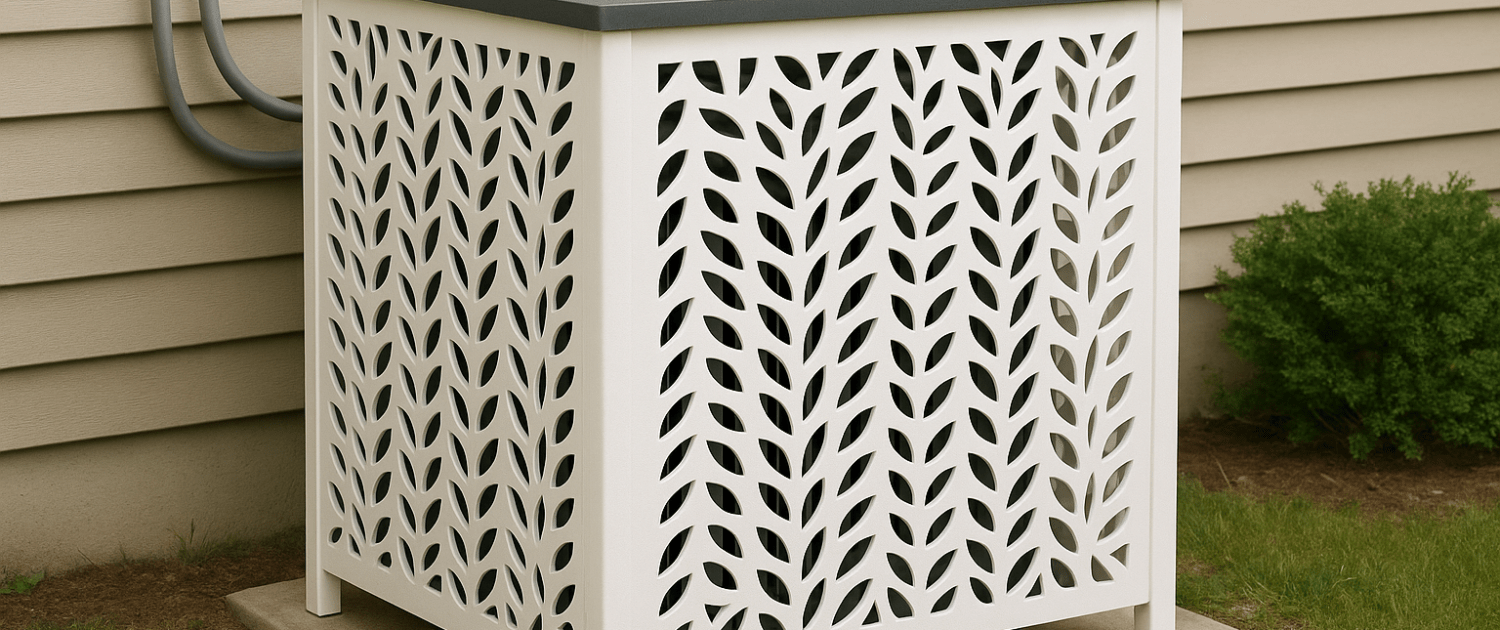
- Improved Aesthetics: AC units aren’t known for their beauty. An enclosure adds a polished, integrated look to your yard or garden and can complement fencing, landscaping, or home color schemes.
- Protection from Debris: A barrier around your unit helps keep leaves, branches, grass clippings, and other debris from blowing into the coils or fan, which can reduce performance and increase maintenance needs.
- Custom Fit and Style: Unlike store-bought barriers, a DIY build lets you customize the design to your exact space, noise level, and aesthetic preferences.
Key Considerations Before You Build
It’s tempting to think you can just box in your AC unit and call it a day. But air conditioners require proper ventilation to function correctly. Trapping heat or restricting airflow can reduce efficiency, shorten your system’s life, and even void the warranty.
Here are the most important factors to keep in mind:
- Maintain Proper Clearance: Most AC manufacturers recommend a minimum of 12 to 24 inches of space on all sides of the condenser for airflow. Leave at least 4 to 6 feet of open space above the unit to allow hot air to escape upward.
- Don’t Block the Top: Never build a cover or lid that fully encloses the top of the condenser. Air is expelled through the top grille, and restricting this airflow can cause the unit to overheat.
- Use Sound-Absorbing Materials: Solid panels alone won’t absorb sound. To actually reduce noise, you’ll need to line the inside of the panels with acoustic materials like mass-loaded vinyl (MLV), rubber sheeting, recycled cotton insulation, or acoustic foam.
- Ensure Service Access: Build at least one removable or hinged panel so a technician can easily access the coils, wiring, or fan for maintenance and repair. Avoid permanent barriers that block airflow or access.
Tools and Materials You’ll Need
The exact list depends on your design, but here are the most common items:
- Treated wood, composite, or PVC boards for frame and slats
- Galvanized screws and hardware
- Hinges or latches for the access panel
- Mass-loaded vinyl or acoustic insulation
- Landscape fabric or rubber sheeting (optional moisture barrier)
- Concrete pavers or gravel base (if building on soil)
- Exterior-grade paint or sealer (if using wood)
- Circular saw or hand saw
- Power drill and driver
- Measuring tape
- Level
- Staple gun (for attaching acoustic liner)
- Safety gear (gloves, goggles)
Steps to Design and Build the Enclosure
Step 1: Measure Your AC Unit and Space
- Start by measuring your condenser unit, including any refrigerant lines or electrical boxes that protrude from the side. Add a minimum of 12 to 24 inches of clearance to each dimension to determine the interior size of your enclosure.
- Decide whether the enclosure will go around three sides (leaving the back open for airflow) or all four sides (with ventilation slats and one removable panel).
- Also, measure the available space around the unit, making sure you don’t interfere with walkways, fences, or landscaping.
Step 2: Design the Frame and Layout
- Draw a simple sketch of your design. Most DIY sound enclosures are built like a three-sided box, using vertical posts and horizontal slats or solid panels. You can choose a square, rectangular, or even L-shaped layout depending on your yard.
- For airflow, leave at least 1- to 2-inch gaps between slats or install louvered panels. Make sure the top remains fully open or is covered by a wide-spaced pergola-style top that allows rising heat to escape.
- Decide which side will serve as your access panel. Hinges and latches make future maintenance much easier.
Step 3: Prepare the Ground
- If your condenser is placed directly on soil or grass, consider building a stable base with pavers, gravel, or concrete to keep the enclosure level and secure. A gravel base also helps with drainage and reduces moisture exposure to the wood.
- If your unit already sits on a concrete pad, you can build around it without altering the base.
Step 4: Build the Frame
- Using treated lumber or composite posts, build the vertical corner posts and horizontal supports for each wall. Fasten everything securely with galvanized screws.
- Make sure the frame is level and square, especially if you’re planning to install slatted panels or doors. Add bracing or corner blocks for additional support if needed.
Step 5: Install Panels or Slats
- Attach your panels or slats to the frame using exterior screws or brackets. If you’re using wood, space the slats evenly to allow for airflow. For solid panels, drill ventilation holes or cut in louvered vents.
- Line the interior of each panel with your chosen sound-absorbing material. Mass-loaded vinyl is one of the most effective and weather-resistant options. Attach it using staples, adhesive, or screws with large washers.
- To prevent water damage, consider adding a layer of landscape fabric or rubber sheet between the acoustic layer and the exterior wall.
Step 6: Add the Access Panel
- Install a hinged panel or removable wall section with easy-to-use latches. This will allow access to the fan motor, coils, and electrical panel for routine service.
- Test the door to make sure it opens smoothly and doesn’t obstruct airflow or interfere with refrigerant lines.
Step 7: Finish and Seal
- If you’re using wood, paint or seal all surfaces with exterior-grade stain or sealant to protect from sun, rain, and humidity. Composite and PVC materials are more weather-resistant but still benefit from occasional cleaning.
- Double-check that the top is open, airflow is unobstructed, and all panels are secure.
Final Thoughts
Building your own sound-reducing AC condenser enclosure is a satisfying DIY project that can enhance your home’s comfort and curb appeal. By combining thoughtful design with the right materials, you’ll create a barrier that quiets the hum of your outdoor unit while still giving it the ventilation and access it needs to function safely and efficiently.
Whether your goal is peace and quiet, a cleaner look in the yard, or simply protecting your investment, a well-designed DIY sound enclosure checks all the boxes. Take your time with measurements, don’t cut corners on materials, and remember: airflow is just as important as noise reduction.
With a bit of planning and weekend effort, you’ll enjoy a cooler, quieter summer, and a yard that looks better too.
Where To Find Us
If you need any replacement parts for your appliances, you can enter your model number at AppliancePartsPros.com to locate and order them quickly. Most orders arrive in just two business days, and we have tons of great information in our repair help section and YouTube videos to help you troubleshoot.
Stay connected with the latest DIY tips, tutorial videos, and repair guides by following us on Facebook, Instagram, and Twitter. We love hearing about your repair stories and successes. If you need more help or want personalized guidance, feel free to reach out. We’re ready to help you take on your next project with confidence!
 https://www.appliancepartspros.com/b/wp-content/uploads/2022/04/shutterstock_561895921.jpg
1000
1500
APP Expert
https://www.appliancepartspros.com/b/wp-content/uploads/2020/11/app-logo-std.png
APP Expert2022-04-15 12:46:042025-07-18 11:06:32What is a Ductless Mini-Split Air Conditioner And How Does it Work?
https://www.appliancepartspros.com/b/wp-content/uploads/2022/04/shutterstock_561895921.jpg
1000
1500
APP Expert
https://www.appliancepartspros.com/b/wp-content/uploads/2020/11/app-logo-std.png
APP Expert2022-04-15 12:46:042025-07-18 11:06:32What is a Ductless Mini-Split Air Conditioner And How Does it Work? https://www.appliancepartspros.com/b/wp-content/uploads/2022/03/Untitled-design5-6.png
846
1495
Steven E
https://www.appliancepartspros.com/b/wp-content/uploads/2020/11/app-logo-std.png
Steven E2022-03-23 16:55:002025-07-18 09:53:20How to install a 3rd generation MRCOOL ductless mini split AC
https://www.appliancepartspros.com/b/wp-content/uploads/2022/03/Untitled-design5-6.png
846
1495
Steven E
https://www.appliancepartspros.com/b/wp-content/uploads/2020/11/app-logo-std.png
Steven E2022-03-23 16:55:002025-07-18 09:53:20How to install a 3rd generation MRCOOL ductless mini split ACWith nearly a decade of experience in providing top-notch customer service regarding appliance parts and repair, Steven enjoys sharing practical advice, troubleshooting tips, and interesting information to help readers stay informed.