How to safely light the pilot on your gas furnace
Steven E / Wednesday January 22, 2025
Without a working pilot light, your furnace won’t be able to generate heat. It’s important to know how to safely relight the pilot when it goes out, especially during colder months when you rely on your furnace to keep your home warm. Lighting the pilot is typically a simple process, but following the correct steps is essential to avoid any safety hazards. We will walk you through the steps to safely relight your gas furnace’s pilot light.
Please note: The information provided here may not align perfectly with your specific appliance model. While we strive to offer helpful tips for a wide range of DIY appliance repairs, different models and setups may require unique troubleshooting steps, error codes, or part replacements. For the most accurate guidance, we recommend consulting the user manual for your appliance or contacting us with any questions.
Safety precautions before you begin
Before you roll up your sleeves, here are some safety steps to keep in mind:
- Always power off and unplug your appliance or switch off the circuit breaker before attempting any maintenance or replacement work. This keeps you safe by preventing any risk of injury from electric shock.
- Wear insulated work gloves to protect your hands from sharp metal parts, pinching hazards and debris.
- Take your time and don’t rush while working to prevent accidents and personal injuries.
- Work in a well-lit area so you can clearly see and access the interior parts.
- Clear your workspace of clutter and other obstacles. Keep children and pets away from the work area.
- Never work on internal parts with bare wet hands. Make sure the work area is completely dry.
- Check your user manual to see if there are specific installation or safety instructions for your part or appliance.
- Be gentle when handling or removing parts. Excessive force might damage the appliance or cause injury.
- Wear safety glasses when working with chemicals, dust or cleaning large debris to prevent injury.
- If the appliance has recently been used, give it plenty of time for any heating parts to cool down before working on it.
- Take pictures or make a note of wiring terminals or other connections before disconnecting to prevent any problems with reassembly.
- When working with wires, avoid touching any exposed wires or terminals. If you need to touch a wire, use a non-conductive tool or wear insulating gloves to prevent electrical shock.
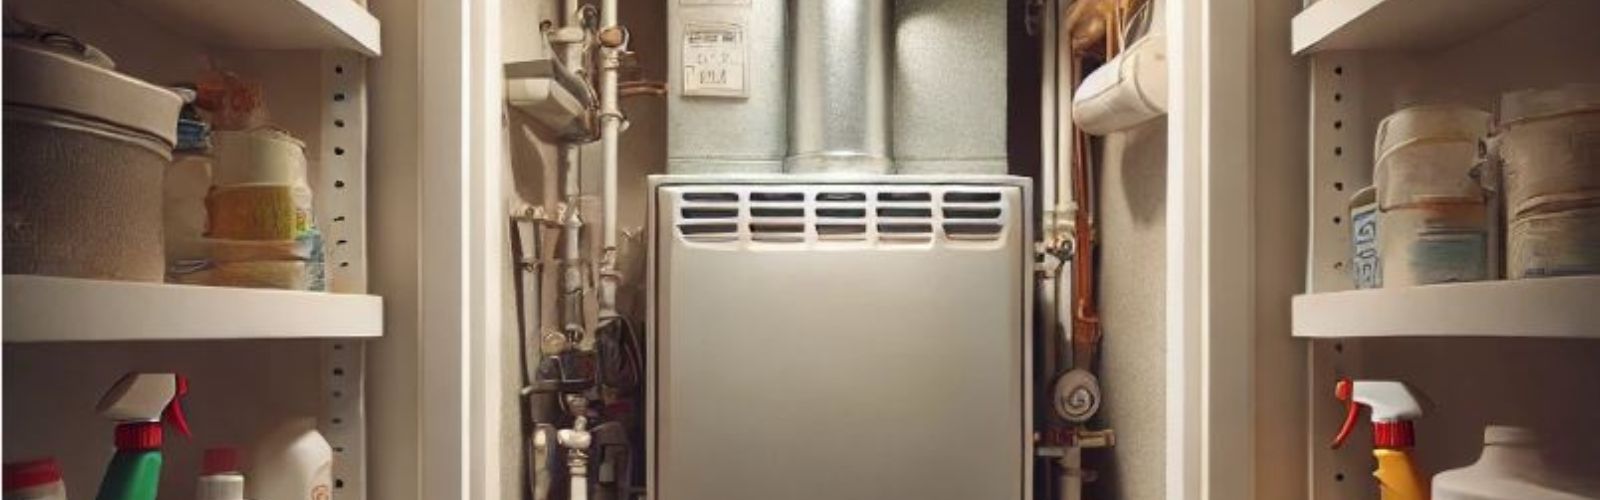
Pilot light location
The pilot light assembly is usually hidden behind a small access panel on the furnace. You may need to use a screwdriver to remove screws securing the panel or pull off a clip, depending on the furnace model.

- The gas control valve is typically near the pilot light assembly. It will have labels for “off,” “pilot,” and “on.” The pilot light is located near this control valve.
- The pilot light is a small tube with a flame. It’s usually positioned near the burner area, at the bottom of the furnace. You may see a small window or glass sight to confirm the presence of the flame if it’s lit.
- You should see the pilot light tube, which connects to the gas supply, and the ignition system that helps the flame stay lit.
Relighting the pilot light
Now that you’ve located the pilot light assembly, it’s time to safely relight the pilot. Follow these steps to get the furnace running again:
- Begin by turning the gas control valve to the “off” position. This stops the flow of gas to the pilot light and ensures no gas is released when you’re preparing to light it.
- After turning the gas off, wait for at least 5 minutes. This allows any remaining gas to dissipate and reduces the risk of a gas buildup, which could cause an explosion if ignited.
- Once you’ve waited, turn the gas control valve to the “pilot” position. This allows gas to flow to the pilot light, but not to the main burners yet.
- Use a long lighter or match to ignite the pilot light. Hold the flame near the pilot light opening while pressing and holding the gas control button or knob. If using a match, be sure to hold it to the pilot light tube until it ignites.
- Continue holding the gas control button down for about 30 seconds after the pilot light ignites. This allows the thermocouple (a safety sensor) to heat up and signal that the pilot light is stable.
- After 30 seconds, release the gas control button. The pilot light should remain lit. If it goes out, repeat the process. If it continues to go out, there may be an issue with the thermocouple or another part of the system.
Once the pilot light is successfully lit and stays on, the furnace should be ready to run.
Read more: 12 simple space heater safety tips for this winter
Check the pilot flame
The pilot light should burn with a steady blue flame This indicates that the furnace is getting the proper amount of gas. The flame should be steady, not flickering, and should have a blue color with a slight orange tip. If the flame is yellow or orange, it may indicate that the pilot is not burning efficiently. This could be caused by a dirty pilot light tube or debris in the combustion area. If you notice a yellow flame, you can clean the pilot light assembly with a small brush or compressed air to remove any debris. If the issue persists, the pilot light tube or orifice may need to be replaced.
The flame should be large enough to stay stable but not too high. If the flame is too high or too low, the gas flow might not be properly regulated. Adjust the flame size by turning the control knob slightly, or check for a dirty or clogged pilot light opening that may need cleaning.
Once the pilot light flame is steady and blue, your furnace should be good to go. If you continue to see issues with the flame, further cleaning or adjustments might be needed.
Read more: 12 things you should know about portable space heaters
Troubleshooting if the pilot light won’t stay lit
If the pilot light goes out after you’ve relit it, there could be several underlying issues causing this. Here’s how to troubleshoot and resolve some of the most common problems:
- Check the thermocouple: The thermocouple is a safety device that detects whether the pilot light is on. If it’s faulty, it may shut off the gas supply, causing the pilot light to go out. Sometimes, cleaning the thermocouple with a soft cloth or fine-grit sandpaper can help improve its function. Dust or soot buildup can interfere with its ability to sense the pilot flame.
- Make sure the pilot light is positioned correctly: The pilot light should be aimed directly at the thermocouple. If it’s too far away, the thermocouple won’t get hot enough to keep the gas flowing.
- Adjust the pilot flame: You can adjust the pilot flame by using the control knob. Ensure that the flame is pointing directly at the thermocouple. If the flame is too weak, it may not stay on.
- Check for a dirty pilot orifice: Over time, the pilot orifice (where the gas flows into the pilot light) can get clogged with dirt or debris, which can affect the pilot light’s ability to stay lit. Use compressed air or a small, soft brush to gently clean the pilot orifice. Be careful not to damage any parts when cleaning it.
- Replace the gas control valve: If all else fails and the pilot light continues to go out, the issue may lie with the gas control valve itself. A faulty valve may not allow the right amount of gas to reach the pilot light, causing it to shut off. Replacing the gas control valve can be a bit more involved, but it’s something you can do if you’re comfortable with DIY repairs.
Read more: Your guide to choosing a space heater
Additional information
Thank you for reading! We hope this guide helped you get your furnace working again.
If you have any other appliance repair needs or projects, don’t hesitate to explore our other troubleshooting guides and videos.
If you need replacement parts or some extra help with ordering them, grab your model number and head over to AppliancePartsPros.com, where you can chat with a pro, read our DIY blog and more.
Be sure to subscribe to us on YouTube and follow us on Facebook, Twitter and Instagram!
With nearly a decade of experience in providing top-notch customer service regarding appliance parts and repair, Steven enjoys sharing practical advice, troubleshooting tips, and interesting information to help readers stay informed.