How to Replace a Microwave Turntable Coupler (with Video!)
APP Expert / Monday May 3, 2021
Is your microwave’s turntable refusing to spin, leaving you with unevenly heated meals? Don’t worry—fixing this common issue is simpler than you might think! Dive into our step-by-step guide and how-to video below to effortlessly replace a faulty turntable coupler and ensure your microwave is back to optimal performance in no time.
You’ve just popped some veggies in the microwave to steam and the bowl isn’t turning at all. What now? Well, thankfully, that steamed broccoli will still cook for the moment. You’ll just need to check on it more to avoid cold spots. But you’re still going to need to fix that broken turntable, which is a fairly simple repair.
While several different things can go wrong with the microwave turntable, the two components most likely to cause trouble in this instance are the turntable’s motor itself and the coupling that connects the motor to the microwave’s glass plate. In this article, we’ll take a look at how to tell whether it’s your microwave’s turntable coupler that needs replacing, and how to go about doing that once you know it’s the problem. Luckily, this is a super easy repair, and doing it yourself will save you a good chunk of change! Keep reading and use this guide and the video below to learn how to replace your microwave turntable coupler yourself.
What is a Microwave Turntable Coupler?
That glass plate in your microwave sits on a small plastic part that, in turn, connects with a small motor (the turntable motor) installed in the bottom of the microwave. This small plastic component is the turntable coupler, or turntable support.

How to Tell if a Microwave Turntable Coupler is Broken
The surest sign of a broken turntable coupler is a glass plate that isn’t turning anymore. Of course, if the glass plate in your microwave isn’t turning, that doesn’t immediately mean it’s the coupler causing problems. To make sure that it’s the coupler that’s bad, you’ll want to check a few things.
- Make sure the turntable is not disabled. Some models of microwave allow you to disable the turntable feature with the press of a button. Consult your microwave’s manual and check the front panel to make sure this feature hasn’t accidentally been turned off.
- Check the turntable plate and guide. Lift the glass plate, checking for any breaks or gunk that might be disrupting contact with the coupler. Then, remove the turntable guide — that’s a plastic or metal ring with three plastic wheels that’s slightly smaller than the glass plate, also called a support ring. You’ll be checking the wheels, in particular, to see if they are cracked, melted, or so gunked up that they can’t spin freely. A missing or damaged support ring could be the cause of your troubles!
- Listen to the turntable motor. If you’re hearing a strange noise while the microwave is in use, or if the microwave seems quieter than usual, it’s possible that the turntable motor, itself, is going bad or is not receiving adequate power.
- Check the coupler. You’ve checked on the easiest bits and they all seem to be in working order, so now you should be pretty sure it’s the coupler that’s damaged. Aside from very obvious damage like visible breakage, the coupler may have cracked or melted somewhere between the motor and the turning plate.
Checking the turntable coupler could be as simple as pulling the plastic part in the very center of your microwave out and having a look at it, but on some models of microwave, this piece is glued into place and you’ll have to open the bottom panel to get access. Don’t worry, we’ve walked you through how to do that below!
Safety Precautions to Take before Working on a Microwave
It is vitally important that you take proper safety precautions before doing any repair work on a microwave. You should never take the cover off of the microwave and work on the inside. There are a number of components inside that could be dangerous even if the microwave has been unplugged for hours, or even days. Wear work gloves (preferably rubberized!) to protect against both the microwave’s sharp edges and potential shocks, and be sure to unplug the microwave and let it sit for at least sixty seconds before beginning any repairs. This job will have you working almost entirely in either the main cabinet of the microwave or accessing the area beneath the bottom panel, which means you shouldn’t be coming near any of the microwave’s more dangerous parts.
The Tools You Will Need to Replace a Microwave Turntable Coupler
This is a quick fix that shouldn’t require many tools. Here’s a list of what to have ready to go:
- The replacement coupler. Not sure where to find the part you need? Search by microwave model number on AppliancePartsPros.com to find the correct replacement microwave turntable coupler for your microwave.
- A Phillips head screwdriver. Most microwaves use Phillips head — or crosshead — screws in their construction, and you will likely need to get past a few to access the underside of the microwave. Since it is easy to lose screws in the microwave cabinet, having a screwdriver with a magnetic head isn’t a bad idea. It’ll be easier to keep track of the screws that way.
- A flathead screwdriver. This will allow you to carefully pry a few parts away from their seating.
- Work gloves. The edges of the bottom panel may be sharp. Rubberized work gloves will also protect from shock.
How to Replace a Microwave Coupler
-
- Check to make sure the microwave’s turntable motor isn’t just disabled. If you haven’t done this already while diagnosing the problem, it’s worth doing it now, just in case. This could be a super easy fix!
- Ensure the microwave is completely disconnected from its power source and let it stand for at least sixty seconds before starting any repairs. You can unplug the microwave or flip its circuit breaker, but you should never do any repairs on any appliance while it is still receiving power.
- Remove the glass tray and the guide ring it’s sitting on and set them aside for now. You will need to do this both to keep them from rattling around and because it gives you access to the coupler.
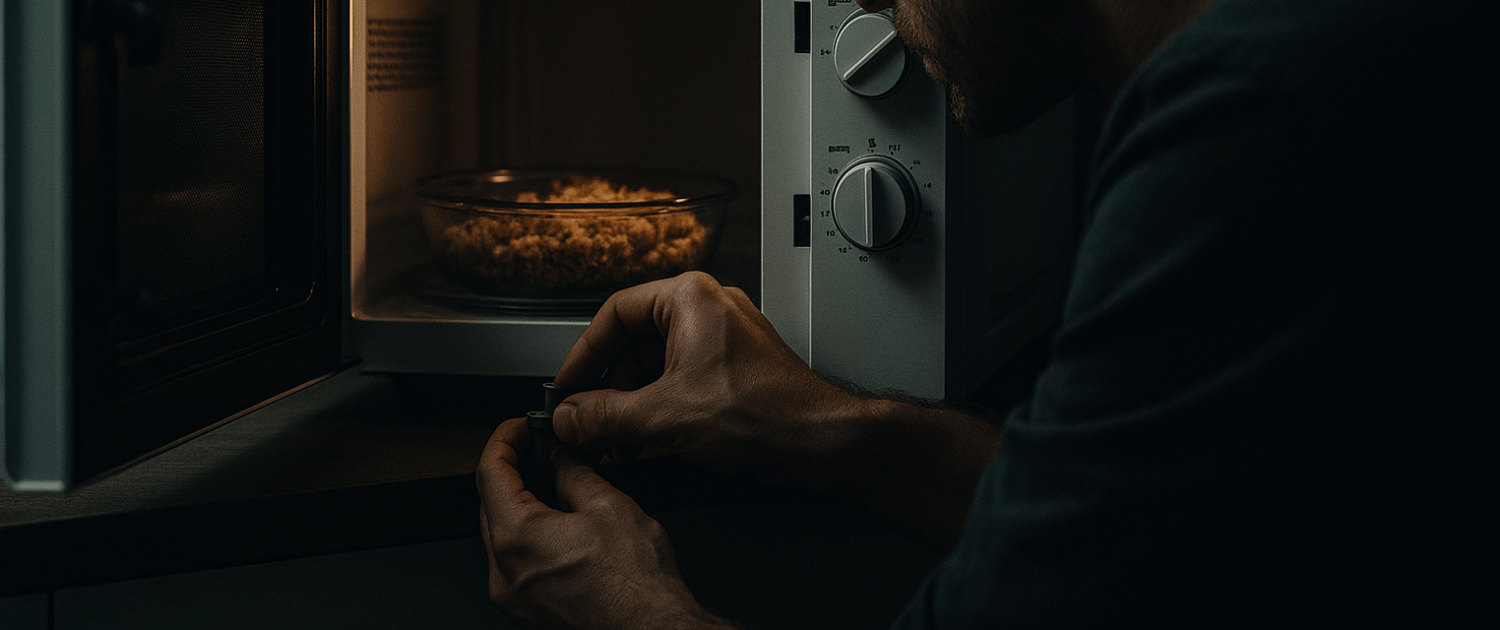
- Try removing the coupler from here. The turntable coupling is that plastic part in the very center of your microwave. Depending on the make and model of your appliance, your replacement job may be as simple as pulling the old coupling out and installing the new one. Turntable couplers usually have a D-shaped shaft, so you may have to rotate it until it aligns correctly before it will drop into place. If this worked for you, you can reassemble your microwave, plug it back in, and test it out!
If the coupler won’t come out by hand, try carefully sliding a flathead screwdriver underneath of it and working it around the edge. This may be enough to dislodge the coupler so that you can pull it free. Failing that, you will need to access the microwave’s bottom panel. It’s not too difficult! Just keep following each step. - Access and open the microwave’s bottom panel. Whether your microwave is wall mounted or countertop, it will have an access panel on the bottom that is typically held in place by 3 – 4 mounting screws or tabs. Unthread those screws and carefully lower the bottom panel. There may be a light fixture or other part attached to the bottom panel, so be mindful of the wires. They will need to be disconnected to fully remove the panel.
Now may be a good time to snap a photo of the underside of your microwave. The meal part in the center is the turntable motor, and you’ll want to make sure you get it in the picture. This will give you a quick photo reference for reinstalling the motor exactly as it had been before.
- Remove the turntable drive motor. There should be two wires connected to the motor via a wire harness. Remove the wire harness. The motor may also be held in place by a few mounting screws. Unthread those with a Phillips screwdriver, holding onto the motor as you remove the final screw. You may need to turn the motor clockwise to fully remove it.
- Remove the damaged turntable coupler. Now the turntable coupler should come free easily. If you’re still running into trouble, slide a flathead screwdriver beneath its edge and carefully work it around to pry it free. Once it’s out, you can discard this part.
At this point, it’s worth checking to make sure that there isn’t any dirt or old food matter clogging up the shaft that the coupler was installed in. - Install the new turntable coupler by setting it into place. Place one hand on the coupler to hold it steady, and then reinsert the turntable motor’s shaft through the base. You may have to turn it clockwise to get it to lock into place.
- Resecure the turntable motor by screwing it into place with its mounting hardware. Do not over-tighten the screws. Don’t forget to reconnect the turntable motor wires! If you took a photo earlier, you can reference it now to make sure everything has been reinstalled correctly.
- Reassemble, clean, and test. Screw the bottom panel back into place and then clean the floor of the microwave’s interior cabinet, making sure there’s no dirt or debris in the track for the turntable’s guide ring before putting both the guide ring and the turntable plate back in place. With everything reassembled, you can now return power to your microwave and test it out! If there are any issues with the microwave after you have replaced the microwave coupler, give us a call or LiveChat at AppliancePartsPros.com. We are always here to help!
- Check to make sure the microwave’s turntable motor isn’t just disabled. If you haven’t done this already while diagnosing the problem, it’s worth doing it now, just in case. This could be a super easy fix!
Wrapping Up
Congratulations! You’ve just repaired your microwave! We hope you’re feeling accomplished after completing this fix, and that you consider coming back our way for all of your other appliance repair needs. Whether you’re just looking for parts or seeking a specialized do-it-yourself guide, check out AppliancePartsPros.com.
Hi! I’m Matt H., and I’m thrilled to be your guide through the world of appliance repair with over 25 years of invaluable experience in the industry.
From the early days of my career, I have been deeply passionate about appliances and their inner workings. Over the years, I’ve seen it all – from vintage models to the latest cutting-edge technology – and I’ve dedicated myself to mastering the art of repair. With a toolbox in one hand and a wealth of knowledge in the other, I’ve tackled every challenge that has come my way, learning and growing with each repair.
Join me as we dive into the intricacies of appliance repair. From step-by-step repair guides to explanations of common problems and their solutions, I’ll be here to simplify the repair process and empower you with the knowledge you need to keep your appliances running smoothly.
Feel free to explore our blog, ask questions, and leave comments – this platform is a space for learning, sharing, and growing together. Let’s work together to ensure that your appliances continue to serve you for years to come.
Thank you for joining me on this journey, and I look forward to being your go-to resource for all things related to appliance repair!