GE Range Oven Control Board WB27T11312 Replacement Tips
Steven E / Thursday June 19, 2025
Is your GE electric range causing you headaches by refusing to heat up or respond to your commands? If error codes and unresponsive buttons are making dinner time difficult, your oven control board could be to blame. But don’t worry; you can easily replace it yourself! Just below, our step-by-step guide and accompanying how-to video will make this a job you can tackle with confidence.
Looking for the right part? Enter your appliance model number below to find the exact match and get your appliance running like new again!
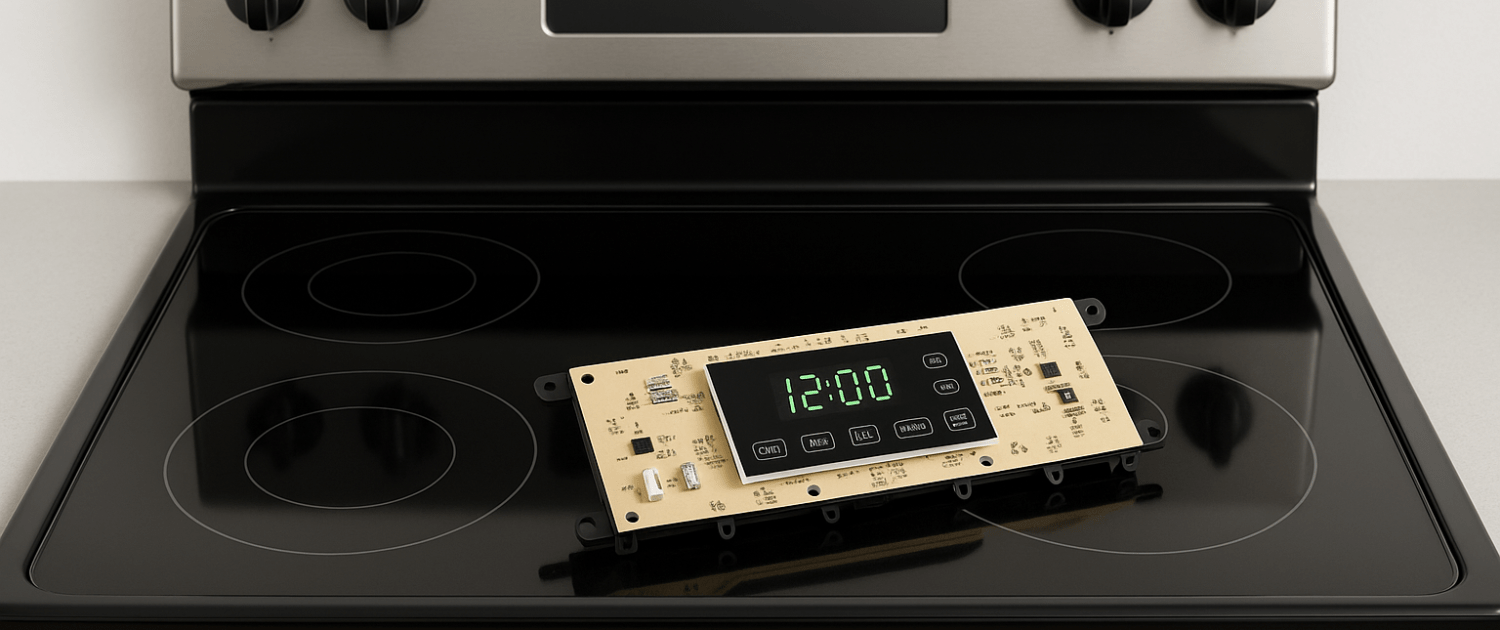
If your GE electric range isn’t heating properly, won’t respond to button presses, or shows error codes on the display, the oven control board might be the issue. Part number WB27T11312 manages oven functions like temperature regulation and timing. When it goes bad, your range can start acting unpredictably or stop working altogether. Luckily, replacing the control board is a straightforward repair you can handle with a few tools and some care. In this guide, we’ll walk you through the steps to remove the old board and install a new one. Let’s get started.

Watch here: How to replace control board on a GE range
The information in this article may not apply to your specific appliance model. We recommend consulting your manufacturer’s documentation or contact us with any questions.
What’s the Control Board?
The oven control board is basically the “brain” of your oven—it manages all of its functions including temperature regulation, bake, broil, timers, and more. If your oven isn’t working properly (no display, unresponsive controls, or inconsistent heating), this part might be the issue.
Safety first
When working on any appliance, remember to keep safety first. Here are some tips to keep in mind:
- Always power off and unplug your appliance or switch off the circuit breaker before you attempt any maintenance or replacement work. This keeps you safe by preventing any risk of electric shock.
- If the appliance has recently been used, give it plenty of time to cool down before working on it.
- Take your time while working to prevent accidents and personal injuries. Rushing is the enemy of precision.
- Work in a well-lit area so you can clearly see and access appliance parts.
- Keep your workspace free of clutter and other obstacles. Keep children and pets away from the work area.
- Never work on internal parts with wet hands. Make sure the work area is completely dry.
- Check the user manual to see if there are specific installation or safety instructions related to your appliance or replacement part.
- Be gentle when handling or removing parts. Excessive force might damage the appliance or cause personal injury.
- Wear insulated work gloves to protect your hands from sharp metal parts and debris.
- When working with wires, avoid touching any exposed wires or terminals. If you need to touch a wire, use a non-conductive tool or wear insulating gloves to prevent electrical shock.
- Consider wearing safety glasses and/or a dust mask when working with chemicals, dust or a large amount of debris to prevent irritation or injury.
Tools and materials needed
Before you start, make sure you have the following items ready to go:
- Flathead screwdriver or small pry tool
- 1/4-inch nut driver
- Needle nose pliers
- Heat gun
- Oven control board WB27T11312-Take your model number to AppliancePartsPros.com to locate the correct part for your unit.
Replacement Steps
Always unplug your appliance or turn off the circuit breaker before working on it. You’ll be dealing with electrical components here, so this is critical to avoid any risk of electric shock.
Step 1: Access the Control Board
- Pull the range away from the wall so you can access the back.
- Using your 1/4-inch nut driver, remove the two black screws on each side of the rear panel.
- Then remove the two silver screws on the top of the panel.
- Carefully lift the panel up and off the range to reveal the control board.
Step 2: Remove the Old Control Board
- Use your 1/4-inch nut driver again to remove the four screws that hold the control board in place.
- Take a clear photo of the wiring before unplugging anything. This will be your reference when reconnecting wires to the new board.
- Unplug the main harness and gently disconnect the wires using needle-nose pliers. Be careful not to pull directly on the wires—use the connector ends.
Step 3: Remove the Overlay
- Grab your heat gun and putty knife.
- Carefully heat the overlay sticker on the old control board.
- Keep the heat gun moving constantly to avoid melting or burning the plastic.
- Once the adhesive softens, slide your putty knife under the edge of the overlay and gently peel it off.
- Be patient, this step takes a steady hand to avoid damaging the overlay.
Step 4: Install the Overlay on the New Board
- Line up the overlay with the new control board and press it down smoothly, removing any bubbles.
- Your new control board might look slightly different. That’s okay! GE has standardized some of the connections.
Step 5: Reconnect the Wiring
- Match each wire to the correct terminal using your photo reference and/or the colored dots on the board near each connector.
- Reconnect the red P200 plug and white P100 plug into their designated slots.
- Make sure everything is firmly connected before proceeding.
Step 6: Mount the New Control Board
- Line up the screw holes on the new board with the mounting spots on the range.
- Use the 1/4-inch nut driver to reinstall the four screws.
Tip: Don’t overtighten, this can crack the plastic board frame.
Step 7: Reattach the Rear Cover Panel
- Position the back panel and start by securing the right-side screw first.
- Then align the left side and insert that screw.
- Reinstall the two top screws to finish securing the cover.
Step 8: Final Steps
- Plug the range back into the outlet.
- Turn the breaker back on.
- Run a quick test, try setting the oven temperature, turning on bake/broil, and checking the display panel.
More information
Thanks for reading! We hope this guide helped you replace the oven control board in your GE electric range.
If you still need some replacement parts, grab your model number and head over to AppliancePartsPros.com. We offer over two million parts and most orders arrive in two business days. If you need some help with finding the right part or placing an order, you can contact our team at 1 (877) 477-7278.
While you’re waiting for your new part to arrive, you can explore our DIY blog and watch thousands of video tutorials on our YouTube channel.
Be sure to follow us on Facebook, Twitter and Instagram to see our latest repair guides!
 https://www.appliancepartspros.com/b/wp-content/uploads/2025/12/20250429_1559_Early-Morning-Kitchen_simple_compose_01jt1j32s1fttttheyf8zzt359.png
1024
1536
Steven E
https://www.appliancepartspros.com/b/wp-content/uploads/2020/11/app-logo-std.png
Steven E2025-12-16 12:47:252025-12-16 12:47:32How to Fix a JennAir Slide-In Electric Downdraft Range That Won’t Broil
https://www.appliancepartspros.com/b/wp-content/uploads/2025/12/20250429_1559_Early-Morning-Kitchen_simple_compose_01jt1j32s1fttttheyf8zzt359.png
1024
1536
Steven E
https://www.appliancepartspros.com/b/wp-content/uploads/2020/11/app-logo-std.png
Steven E2025-12-16 12:47:252025-12-16 12:47:32How to Fix a JennAir Slide-In Electric Downdraft Range That Won’t Broil https://www.appliancepartspros.com/b/wp-content/uploads/2025/10/20250618_1508_Country-Kitchen-Oven_simple_compose_01jy26zs6rf9esjy9e3tgff7et.png
1024
1536
Steven E
https://www.appliancepartspros.com/b/wp-content/uploads/2020/11/app-logo-std.png
Steven E2025-10-31 07:42:172025-10-31 07:42:49Easy Way to Troubleshoot Whirlpool Oven Broil Element Issues
https://www.appliancepartspros.com/b/wp-content/uploads/2025/10/20250618_1508_Country-Kitchen-Oven_simple_compose_01jy26zs6rf9esjy9e3tgff7et.png
1024
1536
Steven E
https://www.appliancepartspros.com/b/wp-content/uploads/2020/11/app-logo-std.png
Steven E2025-10-31 07:42:172025-10-31 07:42:49Easy Way to Troubleshoot Whirlpool Oven Broil Element Issues https://www.appliancepartspros.com/b/wp-content/uploads/2025/09/20250618_1508_Country-Kitchen-Oven_simple_compose_01jy26zs6tfz49rvn6pf1w94ev.png
1024
1536
Steven E
https://www.appliancepartspros.com/b/wp-content/uploads/2020/11/app-logo-std.png
Steven E2025-09-26 12:20:062025-09-26 12:20:17Is Your Samsung Oven Baking Element Dead? Find Out Now!
https://www.appliancepartspros.com/b/wp-content/uploads/2025/09/20250618_1508_Country-Kitchen-Oven_simple_compose_01jy26zs6tfz49rvn6pf1w94ev.png
1024
1536
Steven E
https://www.appliancepartspros.com/b/wp-content/uploads/2020/11/app-logo-std.png
Steven E2025-09-26 12:20:062025-09-26 12:20:17Is Your Samsung Oven Baking Element Dead? Find Out Now!With nearly a decade of experience in providing top-notch customer service regarding appliance parts and repair, Steven enjoys sharing practical advice, troubleshooting tips, and interesting information to help readers stay informed.