How to Fix Clothes Falling in Laundry Steam Closet During Use
Steven E / Wednesday July 9, 2025
Nothing’s more frustrating than loading up your laundry steam closet, only to find clothes falling off or hanging all wrong mid-cycle. The good news? Keeping garments secure and properly positioned is usually an easy fix. Here’s how to adjust your setup so clothes stay in place and get perfectly steamed every time.
The information in this article may not apply to your specific appliance model. We recommend consulting your manufacturer’s documentation or contact us with any questions.
Why Clothes Fall or Hang Poorly in a Steam Closet
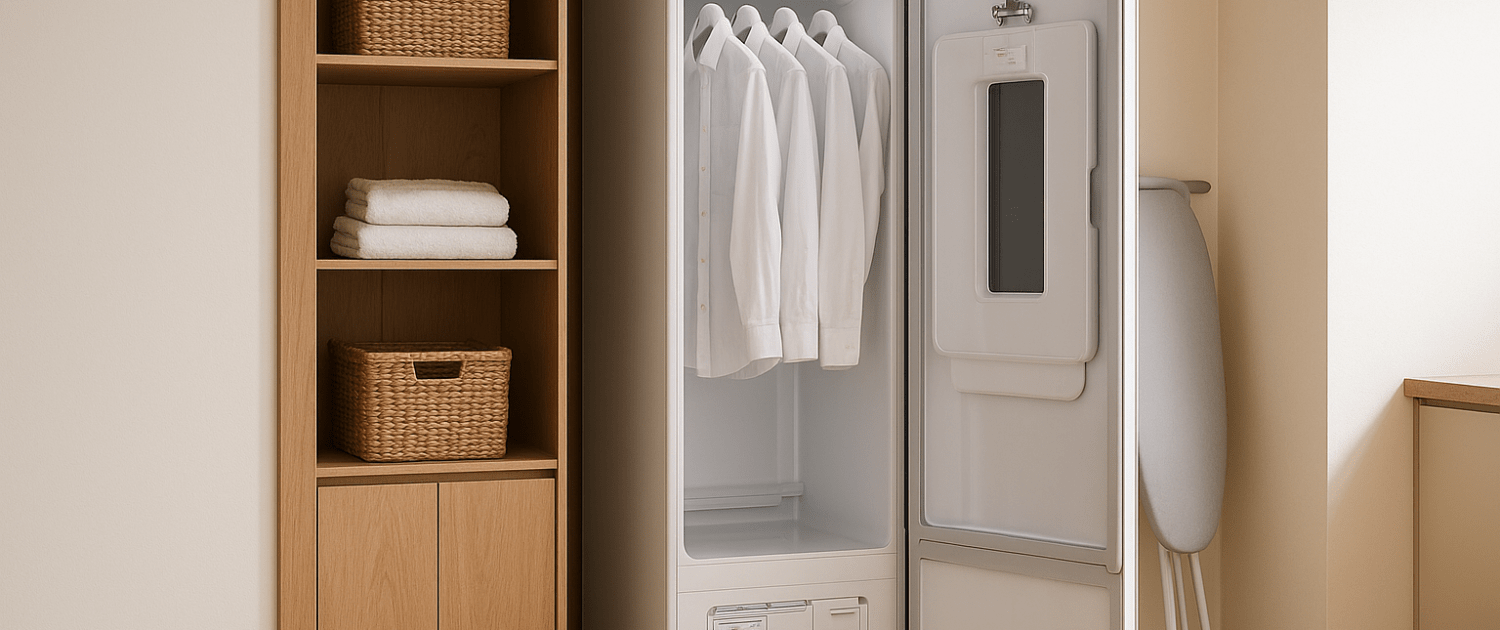
The steam closet relies on garments hanging properly so that the steam can penetrate evenly and remove wrinkles effectively. If clothes are sliding off or twisting up during a cycle, it’s usually due to one or more of these reasons:
- Worn, missing, or misaligned hangers
- Damaged or loose hanger bar
- Excess weight or overloading
- Improper use of the clips or brackets
- A tilted or uneven unit
Fortunately, these are all issues you can easily address yourself.

Tools and Supplies You Might Need
Before you start, gather a few simple tools and materials:
- Screwdrivers
- Level
- Replacement hangers (specific to your steam closet model)
- Microfiber cloths
- Warm, soapy water
- Replacement hanger bar (if necessary)
Step 1: Inspect the Hangers
Start with the most obvious, the hangers themselves. Steam closets often come with specially designed hangers that fit securely on the hanger bar and hold garments properly during steaming.
What to check:
- Are you using the original hangers or replacements that don’t fit well?
- Do the hangers sit snugly on the bar, or are they loose and able to slide off?
- Are the clips or notches on the hangers intact and able to grip garments?
If the hangers are worn, bent, or missing components, replace them with the correct type designed for your model. Using the wrong hangers is a common reason clothes slide or fall during a cycle.
Step 2: Clean the Hanger Bar
Over time, the hanger bar can accumulate lint, dust, or even a slick film from moisture and fabric softener residue. That makes it harder for hangers to grip properly.
How to clean:
- Wipe the entire hanger bar with a damp microfiber cloth and a little warm, soapy water.
- Dry thoroughly before reloading garments.
A clean bar provides a better grip and prevents hangers from sliding.
Step 3: Check for Damage or Looseness
If clothes are falling despite using the correct hangers and a clean bar, the bar itself may be loose, bent, or damaged.
How to inspect:
- Look closely at the ends of the hanger bar where it attaches to the cabinet.
- Gently try to wiggle the bar; it should be solid and level.
- Check for stripped screws, bent brackets, or cracked mounts.
If the bar is loose:
- Tighten the screws holding it in place.
- Replace stripped screws with new ones of the same size.
- If the mounting bracket is cracked or the bar is bent, order a replacement part and install it.
Step 4: Don’t Overload the Closet
Steam closets are designed for a certain number of garments per cycle, usually 3 to 5, depending on size and thickness. Overloading can cause hangers to bump into each other or press against the door, making them slip off.
Best practices:
- Hang garments with at least an inch of space between them.
- Avoid placing bulky coats next to delicate shirts in the same cycle.
- Use clips or straps (if provided) for smaller items like scarves or pants.
Step 5: Adjust Clips and Brackets
Many steam closets include clips, brackets, or hooks designed for specific garment types. If clothes are falling, make sure you’re using them properly.
Tips:
- Use the provided clips to secure skirts, pants, or other items that tend to slide.
- Hang long garments in the center to keep them balanced.
- Make sure clips are positioned so garments hang straight and don’t twist.
Step 6: Level the Unit
If your steam closet is tilted forward or to the side, gravity will naturally pull hangers toward the lowest point.
How to check:
- Place a level on top of the unit and check both front-to-back and side-to-side.
- If it’s not level, adjust the feet at the base until it sits evenly.
- Retest by closing the door and checking that hangers remain in place during a short cycle.
Step 7: Run a Test Cycle
After cleaning, adjusting, and replacing what’s needed, load a few garments properly spaced and run a short cycle. Watch through the window (if applicable) to see if clothes stay in place and hang properly throughout.
If everything looks good, no slipping, no twisting, you’re done!
Where To Find Us
If you need any replacement parts for your appliances, you can enter your model number at AppliancePartsPros.com to locate and order them quickly. Most orders arrive in just two business days, and we have tons of great information in our repair help section and YouTube videos to help you troubleshoot.
Stay connected with the latest DIY tips, tutorial videos, and repair guides by following us on Facebook, Instagram, and Twitter. We love hearing about your repair stories and successes. If you need more help or want personalized guidance, feel free to reach out. We’re ready to help you take on your next project with confidence!
 https://www.appliancepartspros.com/b/wp-content/uploads/2025/09/20250902_1604_Cozy-Country-Laundry_simple_compose_01k460chwnemn9kxzss4s0w8yr.png
1024
1536
Steven E
https://www.appliancepartspros.com/b/wp-content/uploads/2020/11/app-logo-std.png
Steven E2025-09-05 10:33:302025-09-05 10:33:38When and How to Clean Your Steam Closet’s Water Tank
https://www.appliancepartspros.com/b/wp-content/uploads/2025/09/20250902_1604_Cozy-Country-Laundry_simple_compose_01k460chwnemn9kxzss4s0w8yr.png
1024
1536
Steven E
https://www.appliancepartspros.com/b/wp-content/uploads/2020/11/app-logo-std.png
Steven E2025-09-05 10:33:302025-09-05 10:33:38When and How to Clean Your Steam Closet’s Water Tank https://www.appliancepartspros.com/b/wp-content/uploads/2025/09/20250626_1532_Luxury-Laundry-Retreat_simple_compose_01jypvj1sye128rnzdeje9fzse.png
1024
1536
Steven E
https://www.appliancepartspros.com/b/wp-content/uploads/2020/11/app-logo-std.png
Steven E2025-09-05 10:21:462025-09-05 10:21:54How to Fix Lint Buildup in a Laundry Steam Closet
https://www.appliancepartspros.com/b/wp-content/uploads/2025/09/20250626_1532_Luxury-Laundry-Retreat_simple_compose_01jypvj1sye128rnzdeje9fzse.png
1024
1536
Steven E
https://www.appliancepartspros.com/b/wp-content/uploads/2020/11/app-logo-std.png
Steven E2025-09-05 10:21:462025-09-05 10:21:54How to Fix Lint Buildup in a Laundry Steam Closet https://www.appliancepartspros.com/b/wp-content/uploads/2025/09/20250905_1121_Elegant-Laundry-Room_simple_compose_01k4d7e16qe33aqsnbg4pgwtwh.png
1024
1536
Steven E
https://www.appliancepartspros.com/b/wp-content/uploads/2020/11/app-logo-std.png
Steven E2025-09-05 10:13:342025-09-05 10:14:09How to Descale and Flush the Water System in a Steam Closet
https://www.appliancepartspros.com/b/wp-content/uploads/2025/09/20250905_1121_Elegant-Laundry-Room_simple_compose_01k4d7e16qe33aqsnbg4pgwtwh.png
1024
1536
Steven E
https://www.appliancepartspros.com/b/wp-content/uploads/2020/11/app-logo-std.png
Steven E2025-09-05 10:13:342025-09-05 10:14:09How to Descale and Flush the Water System in a Steam ClosetWith nearly a decade of experience in providing top-notch customer service regarding appliance parts and repair, Steven enjoys sharing practical advice, troubleshooting tips, and interesting information to help readers stay informed.