How To Replace A GE Refrigerator Lower Drawer Gear
APP Expert / Wednesday August 10, 2022
Ever open your freezer only to find the door sticking and refusing to slide smoothly? A malfunctioning lower drawer gear could be the culprit, putting a damper on your summer ice cream plans. Don’t worry—replace it in just 10 minutes with our handy step-by-step guide and expert how-to video below, and get your GE refrigerator back on track!
Need a replacement lower drawer gear for your refrigerator? Search below using your fridge model number to identify the exact part needed:
During the summer months, it’s common to use your freezer more than usual. (Ice cream, anyone?) After some time, you may notice that the freezer door has stopped sliding properly. In this case, your lower drawer gear may be broken or worn down, causing the door to malfunction.
Luckily, replacing the lower drawer gear for your GE refrigerator is a straightforward repair that will take 10 minutes or less! Simply follow the guide below from our experts at AppliancePartsPros.com on how to install your new lower drawer gear and get your freezer door back up and running with the correct GE refrigerator parts.


How to buy the correct lower drawer gear
Today, we’ll be installing the GE Refrigerator Lower Drawer Gear WR02X13629. However, you can find the gear part you need for your specific refrigerator on AppliancePartsPros.com. Just type in your refrigerator’s part number or model number below to get the correct one.
If you can’t find the exact part number in your operator’s manual, remember that AppliancePartsPros.com has full diagrams for popular appliances. With only the refrigerator model number, you can:
- Type in your model number into the search bar.
- Find your part on the easy-to-read diagram.
- Match it to the numbered parts listed below.
- Click on the item for photos and a repair video.
- Click “Add to Cart,” purchase the item and receive it within 1-2 business days!
If you prefer, you can also browse around in our refrigerator parts section to discover what you’re looking for. Take advantage of the filters on the left-hand side to narrow down your options.
What you’ll need to replace your lower drawer gear
Time: 10 minutes or less
Parts
- GE Refrigerator Lower Drawer Gear WR02X13629 or the correct gear part for your refrigerator
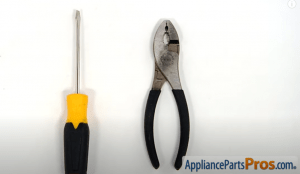
Tools
- Pliers
- Flathead screwdriver
- 2 wooden blocks
How to replace your lower drawer gear
Warning: Unplug your refrigerator
You can prevent the risk of electrocution by unplugging your refrigerator and/or turning off the circuit breakers as you replace your lower drawer gear.
Interested in a video guide to this repair? Check out our how-to video for replacing the lower drawer gear from our experts at AppliancePartsPros.com.
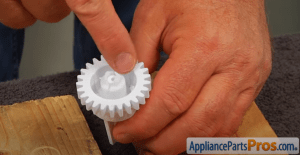
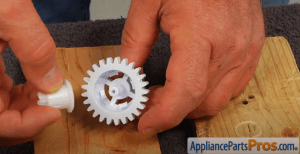
1. Open your replacement lower drawer gear kit
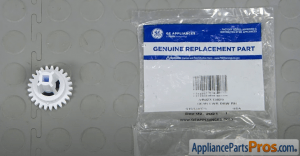
To get started, open your replacement gear kit. This is the part that you’ll be installing today.
To give you an idea, the lower drawer gear is mounted on the right side of the freezer drawer. The main reason you should replace the lower drawer gear is if it’s broken, preventing the drawer from sliding properly.
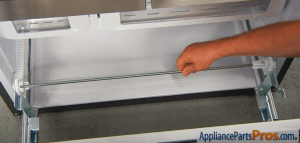
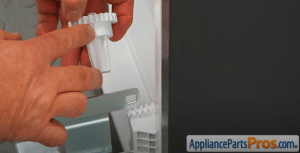
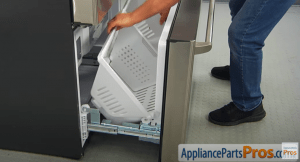
2. Take out the freezer basket drawer
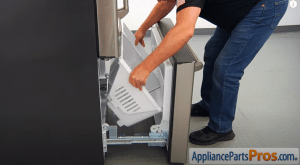
To successfully perform this repair, you’ll need to take apart some of the freezer.
Start by opening the freezer drawer. From here you can remove the basket drawer and slide it out.
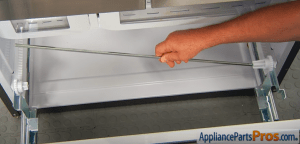
3. Remove the connecting rod
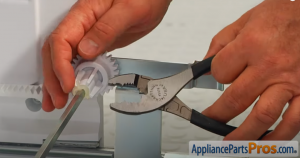
Now you need to take out the connecting rod. It’s held in place by a retainer clip, which is located on the far right side of the rod. Use the pliers to leverage one end of the clip and push it up.
Next, slide the rod to the right and leverage it out of its retainer. At this point, you can remove it completely from the freezer.
4. Take out the lower drawer gear
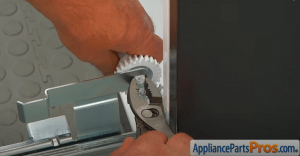
To remove the lower drawer gear from the bracket, use the pliers to squeeze the tab from the back. At the same time, pull on the gear. It should easily come loose.
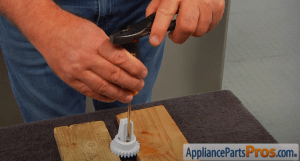
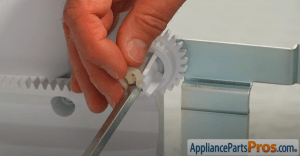
5. Remove the insert from the lower drawer gear
At this point, you need to remove the insert within the lower drawer gear. To do this, set the gear facing down and balance it between two blocks of wood.
Next, set the flathead screwdriver within the inner edge and punch out the insert using the pliers (or a hammer, if you prefer). It should pop right out.
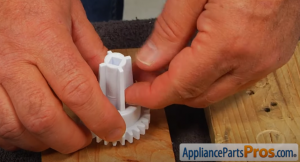
6. Install the insert into your new lower drawer gear
Next, you need to install this insert into your new gear. Keep in mind that the lower drawer gear has four tabs inside. The smooth edge of the insert should interlock with these tabs.
To do this, first drop insert into the new gear, with the wide base facing down. Next, turn over the gear and set it against something hard, such as a block of wood.
Simply press the lower drawer gear down and the insert will lock in. You should hear it click into place.
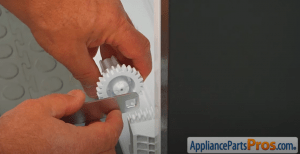
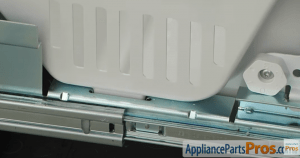
7. Put the new lower drawer gear back in
Next, install the new lower drawer gear. First check that the gear is facing the correct direction. There’s a mark (pictured above) under the edge, which should point down as you install it.
Now, line up the center tab with the metal cutout. Once the gear is properly aligned, you can simply snap it into place.
8. Reinstall the connecting rod
To reinstall the connecting rod, slide the rod all the way to the right. From here, you can set the other end into place.
You should also secure the rod with the retainer clip. Ensure the middle point fits into the cutout on the rod and press it down.
9. Set the freezer drawer back in
At this point, you can set the freezer drawer back in. Slide it in and make sure it’s properly set over the rails. The bottom edge should fit into the corresponding cutout on the rail.
Now you can close the freezer drawer – good work! Don’t forget to plug your refrigerator back in and make sure it’s cooling properly.
Maintain your refrigerator with AppliancePartsPros.com
Congratulations, you’ve now successfully replaced your lower drawer gear! You should also perform general maintenance on your refrigerator all year round. Some tasks you should do regularly include checking the door seals, cleaning the condenser coils and wiping down the inside of the fridge.
Need to make another refrigerator repair? No problem! You can buy any parts you need on AppliancePartsPros.com and check out even more repair guides on our website, YouTube, Facebook and Twitter channels.
Safety tips for working on your refrigerator
Repairing an appliance on your own can be highly rewarding and save you money. Yet, it’s essential that you follow best practices for safety when working on your refrigerator. Here are our top tips for safe DIY refrigerator repairs:
- Always make sure to unplug your refrigerator. Before working on your appliance, unplug it. You should also turn off the circuit breakers. This ensures that you’re safe from the risk of electrocution.
- Wear gloves to avoid injuries. It’s difficult to anticipate sharp edges as you repair your appliance. Always wear gloves as you repair your refrigerator to avoid getting cut on metal or sharp edges.
- Use the right tools for the repair. If you don’t have the right tool, buy it or borrow it from a friend. Using the wrong tools can cause injury and even damage your refrigerator. Make sure you have the right tools before you get started.
- Watch for fall hazards. Your refrigerator should be properly strapped to the wall (with some clearance for air circulation) and there shouldn’t be any items placed on top of it. Before you begin a repair, reduce the risk of fall hazards by checking your appliance from top to bottom.
- Keep your refrigerator clean. You should always wipe up spills and take out shelves for cleaning on a regular basis. In addition, you should scrub down gaskets, knobs, drawers and any other hard-to-reach parts. This will protect you and your family from bacteria and any potential foodborne diseases.
Lower drawer gear FAQs
How do I know if my lower drawer gear needs to be replaced?
You’ll know that it’s time to replace the lower drawer gear when your freezer door is no longer sliding properly. If the door is stuck or difficult to maneuver, it may be a sign that your lower drawer gear is broken or worn down. In this case, you should buy a replacement gear and follow our guide above to replace it.
How can I be sure to buy the correct lower drawer gear?
AppliancePartsPros.com makes it easy to buy replacement parts – whether a lower drawer gear or something else. Look in your operator’s manual to find your part number or model number. From here, you can type in the number on our website and find either the part or your appliance model. If you prefer, you can also check your appliance’s model diagram and click around to find the exact part number you require.
Why is it important to buy a genuine gear replacement?
As you replace the lower drawer gear for a GE brand refrigerator, it’s important to buy a genuine GE replacement part. There are several benefits of getting a genuine part. First, it’s specifically made for your model and offers a guarantee, so you can be sure to achieve a high-quality and successful repair.
Remember that if your refrigerator is a different brand, head to AppliancePartsPros.com to search for the genuine gear part that you need for your specific model. Simply type in your model number to get genuine part options.
 https://www.appliancepartspros.com/b/wp-content/uploads/2025/09/groovetopia_macro_shot_of_frost_crystals_forming_irregular_patt_37deb777-ed26-4ba3-927c-946d5393a753.png
816
1456
appthr
https://www.appliancepartspros.com/b/wp-content/uploads/2020/11/app-logo-std.png
appthr2025-09-24 13:04:442025-09-25 06:50:45Refrigerator Sealed Systems: Where DIY Stops and Gauges Begin
https://www.appliancepartspros.com/b/wp-content/uploads/2025/09/groovetopia_macro_shot_of_frost_crystals_forming_irregular_patt_37deb777-ed26-4ba3-927c-946d5393a753.png
816
1456
appthr
https://www.appliancepartspros.com/b/wp-content/uploads/2020/11/app-logo-std.png
appthr2025-09-24 13:04:442025-09-25 06:50:45Refrigerator Sealed Systems: Where DIY Stops and Gauges Begin https://www.appliancepartspros.com/b/wp-content/uploads/2025/06/20250618_1202_Refrigerator-Door-Gasket-Issue_simple_compose_01jy1wbpw8fxvvpx4nn5ejvsk3.png
1024
1536
Steven E
https://www.appliancepartspros.com/b/wp-content/uploads/2020/11/app-logo-std.png
Steven E2025-06-20 06:21:482025-08-20 12:16:14How to Replace Door Gasket W10355582 on a Whirlpool Fridge
https://www.appliancepartspros.com/b/wp-content/uploads/2025/06/20250618_1202_Refrigerator-Door-Gasket-Issue_simple_compose_01jy1wbpw8fxvvpx4nn5ejvsk3.png
1024
1536
Steven E
https://www.appliancepartspros.com/b/wp-content/uploads/2020/11/app-logo-std.png
Steven E2025-06-20 06:21:482025-08-20 12:16:14How to Replace Door Gasket W10355582 on a Whirlpool Fridge https://www.appliancepartspros.com/b/wp-content/uploads/2025/06/20250617_1527_Refrigerators-Ice-Maker_simple_compose_01jxznp0v6ebzsggaqpx90xtq8.png
1024
1536
Steven E
https://www.appliancepartspros.com/b/wp-content/uploads/2020/11/app-logo-std.png
Steven E2025-06-20 06:06:492025-06-20 06:06:58Whirlpool Fridge Not Making Ice? How To Troubleshoot the Sensor
https://www.appliancepartspros.com/b/wp-content/uploads/2025/06/20250617_1527_Refrigerators-Ice-Maker_simple_compose_01jxznp0v6ebzsggaqpx90xtq8.png
1024
1536
Steven E
https://www.appliancepartspros.com/b/wp-content/uploads/2020/11/app-logo-std.png
Steven E2025-06-20 06:06:492025-06-20 06:06:58Whirlpool Fridge Not Making Ice? How To Troubleshoot the SensorHi! I’m Matt H., and I’m thrilled to be your guide through the world of appliance repair with over 25 years of invaluable experience in the industry.
From the early days of my career, I have been deeply passionate about appliances and their inner workings. Over the years, I’ve seen it all – from vintage models to the latest cutting-edge technology – and I’ve dedicated myself to mastering the art of repair. With a toolbox in one hand and a wealth of knowledge in the other, I’ve tackled every challenge that has come my way, learning and growing with each repair.
Join me as we dive into the intricacies of appliance repair. From step-by-step repair guides to explanations of common problems and their solutions, I’ll be here to simplify the repair process and empower you with the knowledge you need to keep your appliances running smoothly.
Feel free to explore our blog, ask questions, and leave comments – this platform is a space for learning, sharing, and growing together. Let’s work together to ensure that your appliances continue to serve you for years to come.
Thank you for joining me on this journey, and I look forward to being your go-to resource for all things related to appliance repair!