How to Replace a Washing Machine Vane (With Video!)
APP Expert / Wednesday June 8, 2022
Has your washer vane seen better days, leaving your laundry in a spin? Don’t worry, you can tackle this issue from the comfort of your home, saving on costly repair bills. Dive into our straightforward guide, complete with a handy how-to video just below, and get your washing machine back in tip-top shape in no time!
Need a replacement vane for your washer? Search below using your specific washing machine model number to identify the exact part needed:
Don’t fret if your washer vane becomes damaged or breaks off! You can easily replace this part on your own and save money on repair costs. To replace your washer vane, you’ll need to first disassemble your washer and then follow our instructions to install a new vane. Fortunately, our experts at AppliancePartsPros.com have created a step-by-step guide so that there’s no guesswork to this repair. Let’s get started!

How to buy the correct washer vane part
As you repair your washing machine, you may need to buy a replacement part. To get the right one for your model, you can simply go to Appliance Parts Pros.com and:

- Type in your model number into the search bar
- Find your part on the easy-to-read diagram.
- Match it to the numbered parts listed below.
- Click on the item for photos and a repair video.
- Click “Add to Cart,” purchase the item and receive it within 1-2 business days!
Alternatively, you can also go straight to our washer parts section and browse items as needed. Simply use the filters on the left-hand side to narrow down your options.
What you’ll need to replace your washer vane
Time: 15 minutes or less (plus 30 minutes to disassemble and 30 minutes to reassemble your washer)
Parts
- A new washer vane. For this guide, we’ll be using the Frigidaire Vane 134952702, but you can shop for a variety of different washer vanes on Appliance Parts Pros.com.
Tools
- Flathead screwdriver
- Wooden block for support
- Work gloves
How to replace your washer vane
Warning: Unplug your laundry machine and turn off the hot and cold water supply
Safety first when repairing your laundry machine! Before you get started, be sure there’s no risk of electrocution or water leaks by unplugging your laundry machine and turning off the water supply.
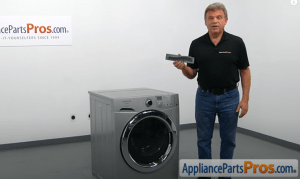
Want to follow a video guide to replacing your washer vane? Check out our washer vane replacement video from our experts at AppliancePartsPros.com on YouTube, or above.
1. Open your replacement washer vane part
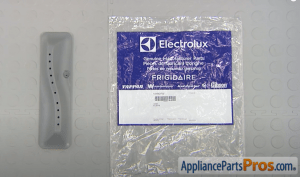
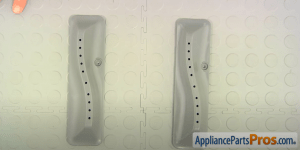
First, open your replacement washer vane part. The washer vane is key to the correct functioning of the laundry cycle. Typically, there are three washer vanes installed within the inner tub, which are used to turn and flatten clothing during the cycle. If the washer vane is damaged or breaks off, you’ll need to first buy a new one on Appliance Parts Pros.com.
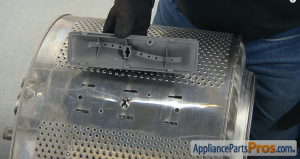
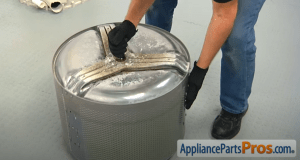
2. Fully disassemble your washer
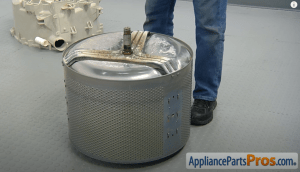
Next, you’ll need to fully disassemble your washer to get to the inner basket, where the washer vanes are located. To disassemble your washer, check out our step-by-step guide. Keep in mind that this process takes about 30 minutes or so to complete. Once your washer is fully disassembled and the inner basket is free of the tub (as pictured above), you can start the washer vane repair.
3. Set the inner basket on its side
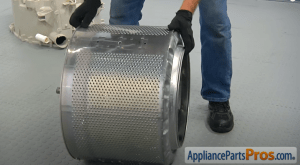
To get started, place the inner basket on its side. To prevent it from rolling around, set a wooden block underneath it. This set-up will allow you to replace the washer vane without any trouble.

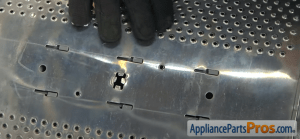
4. Lift up the four locking tabs
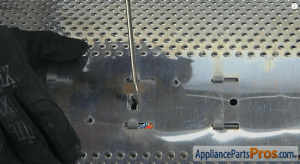
Next, use a flathead screwdriver to lift up the four locking tabs on the side of the basket where the washer vane is located within. Slowly pop the tabs up one by one, until all four are raised and it’s now possible to slide out the washer vane inside the basket.

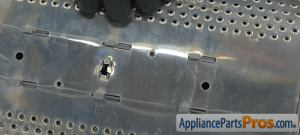
5. Slide the washer vane out of the inner basket
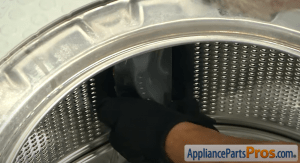
Now you can reach inside the inner basket and slide the vane forward and up. If it’s not easily sliding out, the locking tabs may not be properly raised. Check the tabs and then slide out the vane and remove it from the basket.
6. Install the new vane
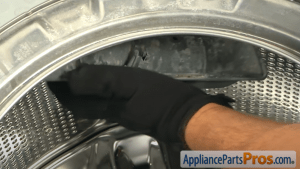
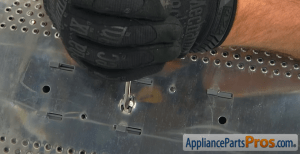
Next, you can install the new vane. Take a careful look at the arrangement of the basket’s six locking tabs before you try to replace it. The six tabs on the vane should match the six cutouts on the basket.
Go ahead and reach into the inner basket with the washer vane and align the tabs with the basket cutouts. The center opening should match between the vane and the basket, too. Once it’s properly aligned, slide it into place so that all six tabs can move down and lock, as pictured above.
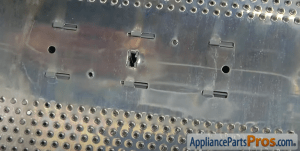
7. Bend the tabs back into the inner basket
Now that the washer vane is in place, bend all four locking tabs back into place. You will need to leverage the flathead screwdriver to manage this. Once all four tabs have locked the vane in place, you’re all set.
8. Remove the wooden block and lift the basket face up
Good work, you’ve now installed the new vane! To get your washer in the right position to reassemble it, be sure to remove the wooden black and set the basket with the shaft facing upward. You’re now ready to restore your washer to its original state!
9. Fully reassemble your washer
Now that you’ve replaced the washer vane, you can follow our guide to reassembling your washer. This process takes approximately 30 minutes. Simply follow our step-by-step instructions to restore your washer to its original state.
Keep your washer in order with Appliance Parts Pros.com
Congrats, you’ve now successfully replaced your washer vane! Keep in mind that you should maintain your washing machine regularly in order to keep it in good working order. A few key tasks you should complete include checking the fill hoses, running a “Clean Washer” cycle and wiping the machine down for any mildew. And remember: if you need any other washer parts, you can get whatever you require on Appliance Parts Pros.com!
Washer vane FAQs
If my washer vane breaks off, do I need to replace my laundry machine?
Absolutely not! If your washer vane becomes damaged or breaks off, you can simply buy a replacement part and make the repair yourself. With our step-by-step instructions above, you’ll be able to install a new washer vane and have your laundry machine spinning in no time.
Are washer vanes different for top load and front load washing machines?
Every laundry machine model comes with a different washer vane part, so be sure you’re buying the right one for your unit. No matter what model you have, you can search for your machine number or part number on Appliance Parts Pros.com. Simply type it in, find the diagrams you need and check out the list of relevant parts for purchase.
Where to find us
If you need any replacement parts for your appliances, you can enter your model number at AppliancePartsPros.com to locate and order them quickly. Most orders arrive in just two business days, and we have tons of great information in our repair help section and YouTube videos to help you troubleshoot.
Stay connected with the latest DIY tips, tutorial videos, and repair guides by following us on Facebook, Instagram, and Twitter. We love hearing about your repair stories and successes. If you need more help or want personalized guidance, feel free to contact or call us at 877-477-7278. We’re ready to help you take on your next project with confidence!
Since 1999, AppliancePartsPros.com has helped millions of people repair their broken appliances by providing high-quality original parts at well below retail prices, free support and troubleshooting, and award-winning customer service from an expert, friendly, US-based customer support team!
 https://www.appliancepartspros.com/b/wp-content/uploads/2025/06/20250529_1201_Eco-Friendly-Laundry-Room_simple_compose_01jwecas94fcv96xaf0123a60t.png
1024
1536
Steven E
https://www.appliancepartspros.com/b/wp-content/uploads/2020/11/app-logo-std.png
Steven E2025-06-05 13:16:582025-06-05 13:17:14How To Test and Replace the Control Board on a Whirlpool Washer
https://www.appliancepartspros.com/b/wp-content/uploads/2025/06/20250529_1201_Eco-Friendly-Laundry-Room_simple_compose_01jwecas94fcv96xaf0123a60t.png
1024
1536
Steven E
https://www.appliancepartspros.com/b/wp-content/uploads/2020/11/app-logo-std.png
Steven E2025-06-05 13:16:582025-06-05 13:17:14How To Test and Replace the Control Board on a Whirlpool Washer https://www.appliancepartspros.com/b/wp-content/uploads/2025/06/20250521_1550_Freshly-Folded-Laundry_simple_compose_01jvt6806mfp3tht742t674s5s.png
1024
1536
Steven E
https://www.appliancepartspros.com/b/wp-content/uploads/2020/11/app-logo-std.png
Steven E2025-06-04 13:21:182025-06-04 13:21:35How To Test And Replace The Lid Lock On A Whirlpool Washer
https://www.appliancepartspros.com/b/wp-content/uploads/2025/06/20250521_1550_Freshly-Folded-Laundry_simple_compose_01jvt6806mfp3tht742t674s5s.png
1024
1536
Steven E
https://www.appliancepartspros.com/b/wp-content/uploads/2020/11/app-logo-std.png
Steven E2025-06-04 13:21:182025-06-04 13:21:35How To Test And Replace The Lid Lock On A Whirlpool Washer https://www.appliancepartspros.com/b/wp-content/uploads/2025/06/20250604_1033_Amish-Laundry-Room_simple_compose_01jwxnnsfgey18ta01yw4qyvgq.png
1024
1536
Steven E
https://www.appliancepartspros.com/b/wp-content/uploads/2020/11/app-logo-std.png
Steven E2025-06-04 07:36:202025-08-18 11:54:54How To Replace LG/Kenmore Washer Shipping Bolt FAA31690705
https://www.appliancepartspros.com/b/wp-content/uploads/2025/06/20250604_1033_Amish-Laundry-Room_simple_compose_01jwxnnsfgey18ta01yw4qyvgq.png
1024
1536
Steven E
https://www.appliancepartspros.com/b/wp-content/uploads/2020/11/app-logo-std.png
Steven E2025-06-04 07:36:202025-08-18 11:54:54How To Replace LG/Kenmore Washer Shipping Bolt FAA31690705Hi! I’m Matt H., and I’m thrilled to be your guide through the world of appliance repair with over 25 years of invaluable experience in the industry.
From the early days of my career, I have been deeply passionate about appliances and their inner workings. Over the years, I’ve seen it all – from vintage models to the latest cutting-edge technology – and I’ve dedicated myself to mastering the art of repair. With a toolbox in one hand and a wealth of knowledge in the other, I’ve tackled every challenge that has come my way, learning and growing with each repair.
Join me as we dive into the intricacies of appliance repair. From step-by-step repair guides to explanations of common problems and their solutions, I’ll be here to simplify the repair process and empower you with the knowledge you need to keep your appliances running smoothly.
Feel free to explore our blog, ask questions, and leave comments – this platform is a space for learning, sharing, and growing together. Let’s work together to ensure that your appliances continue to serve you for years to come.
Thank you for joining me on this journey, and I look forward to being your go-to resource for all things related to appliance repair!