How to Replace an Oven Bake Element
APP Expert / Monday May 24, 2021
Tired of seeing your oven sit cold and useless during dinnertime? A broken oven bake element doesn’t mean it’s time for a costly new appliance. Dive into our step-by-step guide—and accompanying how-to video—to learn how you can easily replace the bake element yourself and get back to cooking up your favorite meals in no time!
An electrical oven isn’t much of an oven if it can’t heat up, but a broken oven bake element doesn’t necessarily mean you need to replace the entire appliance! Don’t let worries about expensive repairs or full replacements ruin your dinner. Though tackling something as big as a broken range may seem like a big job, this is actually a perfect do-it-yourself project. You’ll save a ton of money by replacing a damaged oven bake element, yourself, and avoid the stress of having to wait on repairs or hunt for a new appliance. If you’re ready to take the leap on this, read on. AppliancePartsPros.com has put together a detailed walkthrough for replacing a damaged or broken oven bake element in an electrical oven.
What Is An Oven Bake Element, And How Do I Find The One I Need?
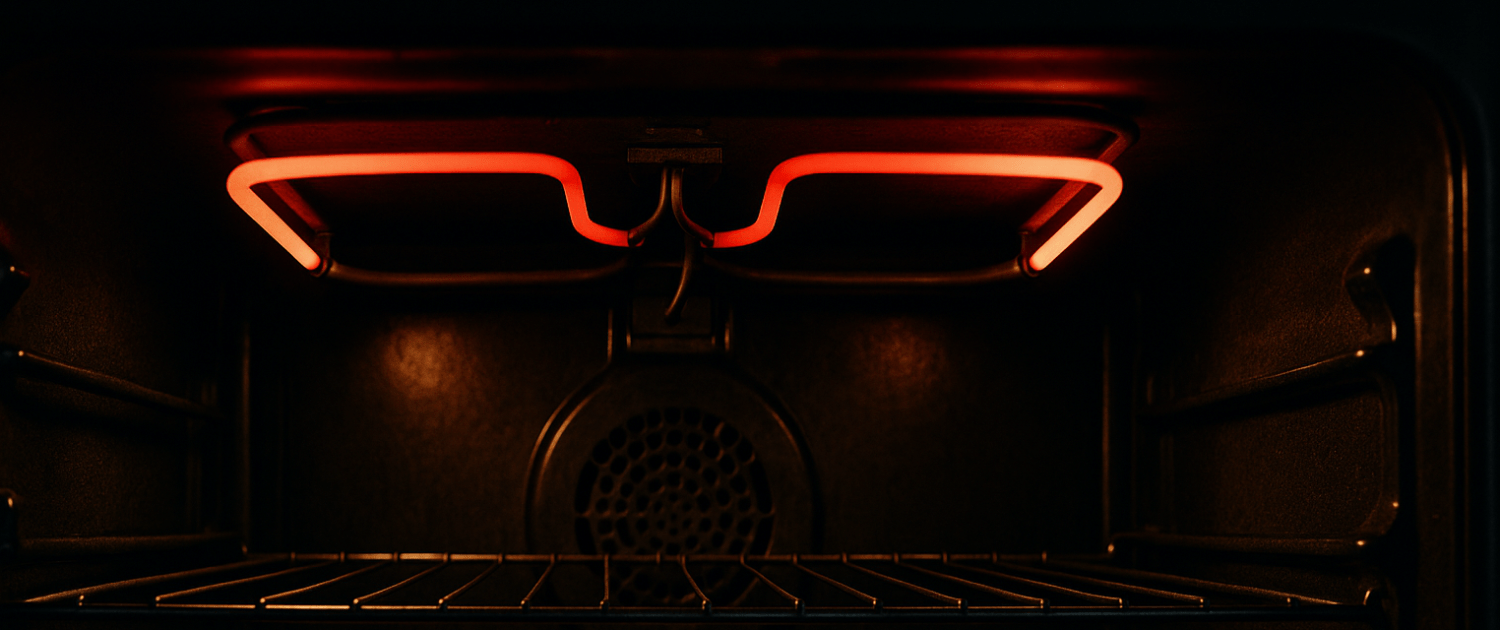
Electrical ovens typically have two heating elements. There’s one at the top, which is used to heat the oven for broiling, and one at the bottom. That’s the oven bake element–the one we’re worried about. This part connects to electrical wires at the back of the oven and is held in place by mounting brackets. You’ll often see it glowing red or orange when it’s in use.
This part, like any electrical component, can go bad over time. Whether it’s been shorted out by an electrical surge or simply worn from years of use, it’s not unusual for the oven’s bake element to kick the bucket. Once you know it’s the bake element that’s broken — you can verify this by turning the oven on and watching to see if it starts to glow red or orange as it heats up the oven — it’s time to figure out exactly what part you’ll need to replace it.

To figure this out, find the model number of your appliance. This’ll be on a metal plate or sticker located somewhere on the appliance. Check on or around the oven door first, as it’s probably somewhere around there. Other places for this plate to be hiding include in the vent ducts, under burners, or beneath the cooktop, itself. With the model number, you can easily search for your replacement oven element on AppliancePartsPros.com.
The Tools You Will Need to Replace an Oven Baking Element
Replacing a bake element may feel like a big job, but it’s actually fairly simple and requires only a few tools. Here’s what you should have on hand in addition to your replacement part:
- A Phillips head screwdriver.
- A quarter inch nut driver.
- A pair of needle-nose pliers.
- Optionally, a voltage tester.
How To Replace An Oven Bake Element
- Disconnect the oven’s electrical supply. To start, make sure that the oven’s controls are all in their off positions and then disconnect the oven from its power source. Accessing the plug can be a bit challenging, and its location on the appliance will vary from model to model. You will likely need to move the appliance away from the wall to unplug it. If this isn’t feasible, whether it’s because the oven is hard-wired into the wall or it’s simply too much to move on your own, you will need to cut power to the appliance by flipping the corresponding circuit breaker in your home’s breaker box
Regardless of whether you opt to pull the plug or flip the breaker, you must make sure that the appliance is not receiving power before moving on to the next steps. You’re going to be working with the oven’s wiring, and could risk damage to the oven or serious injury to yourself if you work on it while it’s still powered! Do not ever perform maintenance on a powered appliance as it puts you at great risk for electrocution.
If the range or oven was recently in use, be sure to allow ample time for it to cool before proceeding. - Remove the oven door. Open the oven door and check its base. There should be a set of mounting screws there, one on each side. Using your Phillips head screwdriver, remove these screws. Then, taking the door in both hands, lift it up to pull it off of its hinges and set it aside. Be careful when handling and moving this part. That glass window is definitely glass and if you drop it, it could shatter!
- Remove the oven racks. The more room you have, the better, so remove the oven’s racks and set them aside to better reach the bake element. You may need to lift up slightly as you pull to completely remove them.
- Remove the broken bake element. You’ll find the bake element on the bottom of the oven mounted against the back wall. Using the quarter inch nut driver, remove the two screws holding its mounting brackets in place.
Don’t just pull the bake element away, yet! There are wires attached to it, and if you’re too forceful, they could either be damaged or fall off and slip through the back wall of the oven. While this wouldn’t be the end of the world, it’d still add a lot of time and work to this job, as you would then have to access the rear panel of the range and thread the wires back through the corresponding holes. Pull the heating element an inch or two back. Just enough that you have easy access to the wires. At this point, as an added safety measure, you can use a voltage tester to verify that the oven is completely unpowered. We do recommend doing this before moving on to make sure that you’ve shut off the power to the correct breaker. Once you’re sure the wires are not powered, use the needle-nose pliers to remove their terminals from the bake element’s contacts. Be careful here, as well. Make sure the wires don’t slip through the openings at the back of the oven.With the damaged bake element completely disconnected from the oven and its wires, this component can be safely removed from the appliance.
- Prep the wires by using the pliers to slightly tighten each of the terminals. This will ensure the wires sit snugly on the new bake element’s contacts.
- Install the new bake element. Slide the wire terminals onto each of the bake element’s contacts. It’s easiest to do this with those needle-nose pliers. Once that’s done, you can slot the element back into place on the rear wall of the oven and secure it with the quarter inch screws you’d removed earlier.
- Reassemble the oven. Alright! The tough stuff is done! Time to put it all back together. First, slide the oven racks back into place. Next, you’ll be reattaching the oven door. To do this, open the oven hinges. You’ll have an easier time if you jam them open, which you can do with the handles of your screwdrivers. Try to make sure they’re open about the same amount; it’ll make your life easier. Now, slide the door back onto its hinges. Before screwing it back in, carefully test the door once or twice by opening and closing it to make sure it’s sitting correctly on the hinges. Finally, you can secure the oven door again with its mounting screws.
- Test the oven to ensure everything is working properly. At this point, you can plug the oven back in or flip the breaker back on. To test, set the oven to bake and watch to make sure that the oven bake element starts to glow and that heat is being produced. If it is, you’re all done! If you are still having trouble with the oven bake element after testing, please reach out to us at AppliancePartsPros.com through LiveChat or give us a call. We are happy to help!
Wrapping Up
That’s it! Hopefully our walkthrough has made the idea of replacing this vital oven component a little less intimidating. If you follow the steps outlined above and check out the corresponding tutorial video, you should have a new oven bake element in place in no time and be back on track to finishing up that casserole. Once dinner’s done, why don’t you swing back by AppliancePartsPros.com? We’ve got tons of tips, tutorials, and replacement parts for home appliance repairs!
Hi! I’m Matt H., and I’m thrilled to be your guide through the world of appliance repair with over 25 years of invaluable experience in the industry.
From the early days of my career, I have been deeply passionate about appliances and their inner workings. Over the years, I’ve seen it all – from vintage models to the latest cutting-edge technology – and I’ve dedicated myself to mastering the art of repair. With a toolbox in one hand and a wealth of knowledge in the other, I’ve tackled every challenge that has come my way, learning and growing with each repair.
Join me as we dive into the intricacies of appliance repair. From step-by-step repair guides to explanations of common problems and their solutions, I’ll be here to simplify the repair process and empower you with the knowledge you need to keep your appliances running smoothly.
Feel free to explore our blog, ask questions, and leave comments – this platform is a space for learning, sharing, and growing together. Let’s work together to ensure that your appliances continue to serve you for years to come.
Thank you for joining me on this journey, and I look forward to being your go-to resource for all things related to appliance repair!