How To Replace Samsung Washer Door Boot Seal DC97-16140G
Steven E / Thursday May 22, 2025
Are mysterious water puddles appearing beneath your Samsung front-load washer, or is a musty odor lingering around longer than it should? These could be telltale signs that your door boot seal is in need of replacement. Don’t worry—our easy-to-follow guide, complete with a step-by-step how-to video, will have your machine leak-free again in just an hour!
Looking for the right part? Enter your appliance model number below to find the exact match and get your appliance running like new again!
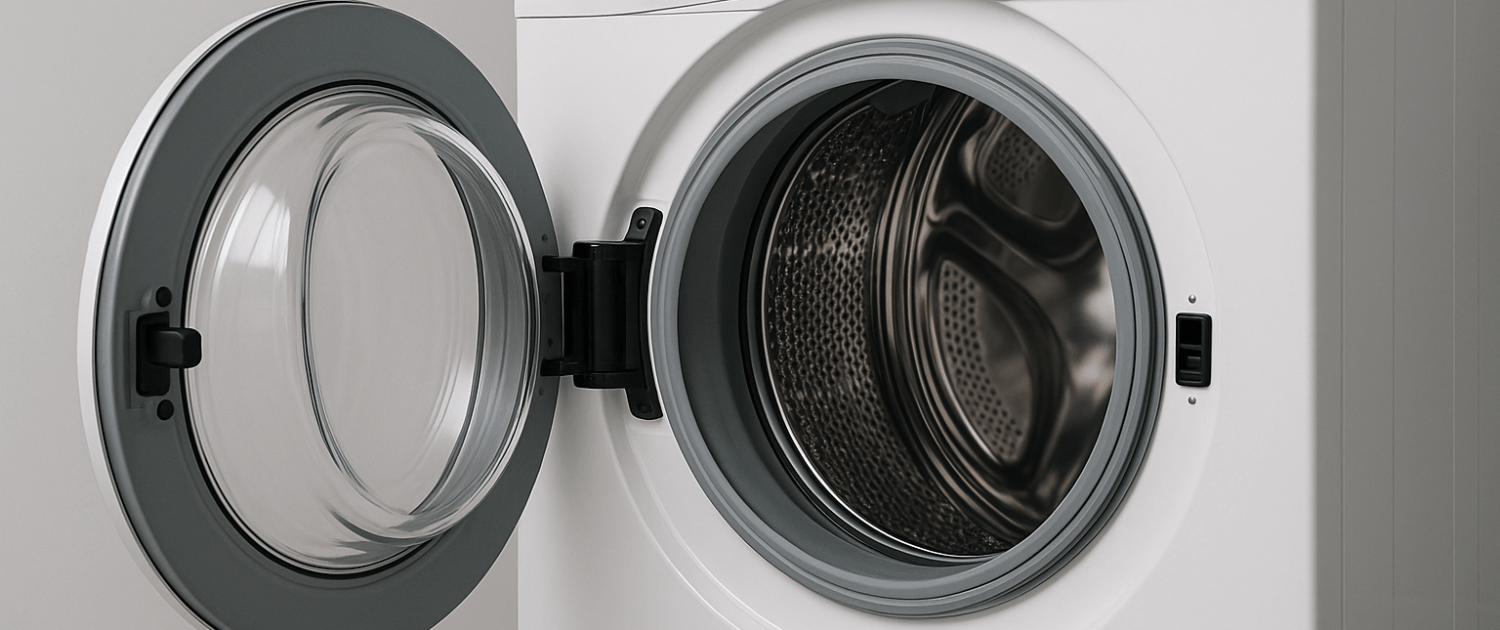
Noticing water puddles at the bottom of your Samsung front-load washer? Or maybe a musty smell that just won’t quit? Sounds like it’s time to replace the door boot seal—also called the door gasket—specifically part DC97-16140G. This large rubber seal keeps water inside the drum and prevents leaks during wash cycles. Over time, it can tear, warp, or mold. The good news? You can replace it yourself in about an hour. I’ll walk you through the full process.

The information in this article may not apply to your specific appliance model. We recommend consulting your manufacturer’s documentation or contact us with any questions.
Watch: How to replace a door boot seal
An Overview of the Door Boot Seal
The door boot seal, sometimes called the bellow or gasket, is a flexible rubber seal that connects the outer tub to the front panel of the washing machine. Its purpose is to form a water-tight barrier between the wash tub and the door opening.
This flexible seal allows the tub to move during the wash cycles while still containing the water inside. It also compensates for small gaps or misalignments between the tub and cabinet.
Over time, this seal can become dried out, cracked, torn, or otherwise damaged from regular use. Detergents and bleach can degrade the rubber. Small tears or holes allow water to leak out during washing machine operation.
Replacing a worn door boot seal is crucial for stopping leaks and preventing further damage to your washer and home. Catching a failing seal early can save you from much larger repairs down the road.
What to Look for When Diagnosing a Bad Seal
There are some clear signs that indicate when the door boot seal needs to be replaced:
- Water on the floor – The most obvious indication is finding pools of water on the floor in front of the washer after running a cycle. This points to leaks from a damaged seal.
- Visible cracks or tears – Carefully inspect the seal for any visible cracks, cuts, or perforations. Even small splits in the seal can cause leaks.
- Stiffness or brittleness – An old seal may become hard, stiff, or brittle rather than staying flexible and rubbery. This can lead to cracks and leaks.
- Mold or mildew – Excess moisture from leaks can promote mold growth on the seal itself. This is a sign it needs to be replaced.
- Clothes are still soaked – If your clothes remain dripping wet after a spin cycle, it could indicate that water is escaping past the seal rather than draining through the pump.
Catching a leaking door boot seal early provides the chance to replace it before major leaks can damage your flooring, walls, or other components.
Gather the Necessary Tools and Supplies
Replacing the Samsung door boot seal does not require many tools. Here is what you’ll need:
- Phillips head screwdriver
- Flathead screwdriver
- Pliers
- Gloves
- Rags
- Bucket
- Soap or lubricant
- Clips and screws
Taking a few minutes to gather supplies saves time and frustration versus searching for tools mid-repair.
How to Replace the Door Boot Seal
- Always start by unplugging the washer for safety.
- Unscrew the top panel and slide it back to remove.
- Open the washer door and remove the outer spring clamp using a flathead screwdriver.
- Carefully pull the old seal away from the door lip and push it into the tub.
- Remove the detergent drawer and control panel screws.
- Remove screws along the door frame and detach the front panel to fully access the seal.
- Locate and remove the inner clamp holding the seal to the drum.
- Fully detach the old gasket from the drum and discard it.
- Line up the notch on the new seal with the indicator tab on the drum.
- Press the seal lip all the way around the drum opening.
- Reinstall the inner clamp using pliers or a spring tool.
- Reinstall the front panel and detergent drawer.
- Pull the outer lip of the seal over the door frame and secure it with the outer spring clamp.
- Plug the washer back in.
- Run a rinse or spin cycle with no laundry to check for leaks.
Additional information
Thanks for reading! If you have any other appliance repair needs or projects, you can find other resources and our DIY blog at AppliancePartsPros.com. There, you can enter your model number to order the exact parts you need. Most orders arrive in 2-3 business days.
You can also reach our award-winning customer service team at 1-877-477-7278, chat with a pro on our website and watch thousands of free video tutorials on our YouTube channel.
 https://www.appliancepartspros.com/b/wp-content/uploads/2024/02/Copy-of-Copy-of-Copy-of-Copy-of-Copy-of-Copy-of-Copy-of-IMAGE-TEMPLATE-FOR-BLOG-31.jpg
1080
1920
Steven E
https://www.appliancepartspros.com/b/wp-content/uploads/2020/11/app-logo-std.png
Steven E2024-02-27 11:27:072024-02-27 11:27:27How to replace the drain pump in a GE washer
https://www.appliancepartspros.com/b/wp-content/uploads/2024/02/Copy-of-Copy-of-Copy-of-Copy-of-Copy-of-Copy-of-Copy-of-IMAGE-TEMPLATE-FOR-BLOG-31.jpg
1080
1920
Steven E
https://www.appliancepartspros.com/b/wp-content/uploads/2020/11/app-logo-std.png
Steven E2024-02-27 11:27:072024-02-27 11:27:27How to replace the drain pump in a GE washer https://www.appliancepartspros.com/b/wp-content/uploads/2024/02/Copy-of-Copy-of-Copy-of-Copy-of-Copy-of-Copy-of-Copy-of-IMAGE-TEMPLATE-FOR-BLOG-12.jpg
1080
1920
Steven E
https://www.appliancepartspros.com/b/wp-content/uploads/2020/11/app-logo-std.png
Steven E2024-02-20 07:41:102024-02-20 07:41:19How to replace the top agitator in a Kenmore washer
https://www.appliancepartspros.com/b/wp-content/uploads/2024/02/Copy-of-Copy-of-Copy-of-Copy-of-Copy-of-Copy-of-Copy-of-IMAGE-TEMPLATE-FOR-BLOG-12.jpg
1080
1920
Steven E
https://www.appliancepartspros.com/b/wp-content/uploads/2020/11/app-logo-std.png
Steven E2024-02-20 07:41:102024-02-20 07:41:19How to replace the top agitator in a Kenmore washer https://www.appliancepartspros.com/b/wp-content/uploads/2024/02/Copy-of-Copy-of-Copy-of-Copy-of-Copy-of-Copy-of-Copy-of-IMAGE-TEMPLATE-FOR-BLOG-10.jpg
1080
1920
Steven E
https://www.appliancepartspros.com/b/wp-content/uploads/2020/11/app-logo-std.png
Steven E2024-02-16 10:11:252024-02-16 10:11:34E22 GE washer error: A troubleshooting guide
https://www.appliancepartspros.com/b/wp-content/uploads/2024/02/Copy-of-Copy-of-Copy-of-Copy-of-Copy-of-Copy-of-Copy-of-IMAGE-TEMPLATE-FOR-BLOG-10.jpg
1080
1920
Steven E
https://www.appliancepartspros.com/b/wp-content/uploads/2020/11/app-logo-std.png
Steven E2024-02-16 10:11:252024-02-16 10:11:34E22 GE washer error: A troubleshooting guideWith nearly a decade of experience in providing top-notch customer service regarding appliance parts and repair, Steven enjoys sharing practical advice, troubleshooting tips, and interesting information to help readers stay informed.