How To Replace the Samsung Washer Control Knob DC97-18058C
Steven E / Tuesday May 27, 2025
Is your Samsung washer’s control knob giving you trouble—spinning in place or refusing to change settings? You’re not alone, and fortunately, there’s an easy fix! Discover how to swiftly replace the faulty knob with part in just a few simple steps. Watch our step-by-step video guide below to restore your washer’s functionality today!
Looking for the right part? Enter your appliance model number below to find the exact match and get your appliance running like new again!
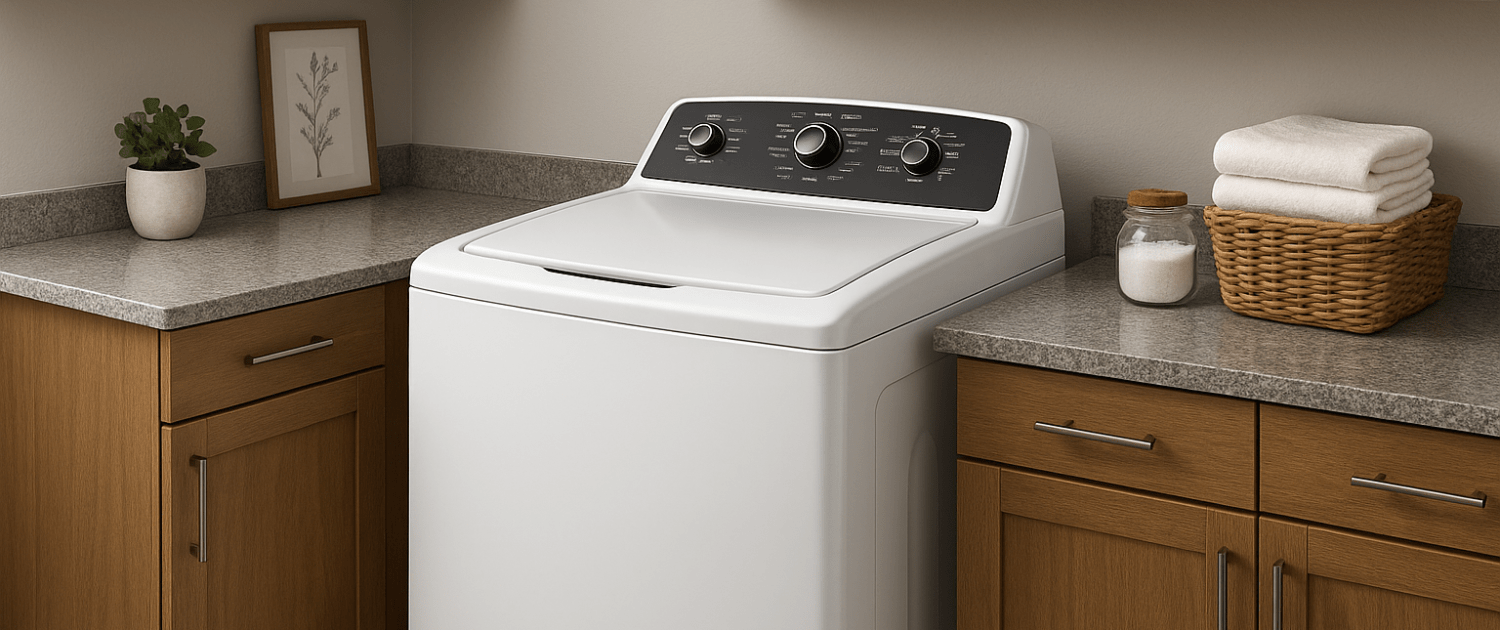
If your Samsung washer control knob is cracked, spinning freely, or just won’t engage the settings anymore, it’s time for a quick and easy fix. The part you need is DC97-18058C, a simple snap-on replacement that restores your washer’s functionality in minutes. Whether it’s worn out from regular use or damaged by an accidental bump, this guide will show you exactly how to remove the old knob and install the new one, no special tools needed.

Watch: How to install a washer control knob
The information in this article may not apply to your specific appliance model. We recommend consulting your manufacturer’s documentation or contact us with any questions.
What the Control Knob Does
The control knob, also called a cycle selector knob, allows you to choose the correct washing cycle for each load. By turning the knob to the appropriate cycle, you ensure your clothes get washed with the right wash motion, spinning speed, water temperature, and other settings.
Over time, the plastic teeth inside the knob can wear down. Or residue, dirt, and grime can prevent the knob from latching properly.
Symptoms of a failing control knob include:
- Knob feels loose and spins freely without changing cycles
- Unable to select certain wash cycles
- Knob randomly jumps to different cycles during a load
- Noise when turning the knob
If you notice any of these issues, replacing the knob should restore normal operation.
Tools Needed
Replacing the knob requires disassembling some of the washer cabinet. Here are the tools you’ll need:
- Phillips head screwdriver
- Flat head screwdriver
- Gloves to protect hands from sharp edges
As for parts, you’ll need the replacement Samsung control knob itself. The part number is DC97-18058C. Locate your model number so you can look up the correct parts for your unit.
On some washers, you may also need a new mounting nut (#DC61-01691A) if the old one won’t tighten properly with the new knob.
Safety precautions
Safety should always be a priority when working on any appliance. Here are a few practical tips to help you stay safe:
- Turn off the power to the appliance by unplugging it or switching off the circuit breaker before starting any maintenance or repairs. This protects you from the risk of electric shock.
- Wear insulated gloves to shield your hands from sharp edges, pinching hazards, or debris.
- Work at a steady pace and take your time to avoid accidents or injuries.
- Make sure your workspace is well-lit so you can clearly see and access the parts you’re working on.
- Keep the area clear of clutter, and ensure children and pets stay out of the workspace.
- Never handle internal parts with wet hands. Check that both your hands and the work area are completely dry.
- Refer to your appliance’s user manual for any specific instructions or safety guidelines related to the part or repair.
- Handle parts gently to avoid damage to the appliance or potential injuries from applying too much force.
- Use safety glasses when dealing with chemicals, dust, or large debris to protect your eyes from harm.
- If the appliance was recently used, give it enough time to cool down before working on any heated components.
- Take photos or notes of wiring connections and terminals before disconnecting anything to make reassembly easier.
- Avoid touching exposed wires or terminals. If you must handle wires, use non-conductive tools or wear insulated gloves to minimize the risk of electrical shock.
Replacement steps
- Locate the two screws along the back edge of the top panel. Use a Phillips screwdriver to remove them.
- With the screws out, tilt up the back of the top panel a few inches, then slide it back to release the front mounting tabs.
- Lift off the top panel completely and set it aside. Take care not to bend or dent the panel.
- Pull out the dispenser drawer by sliding it forward fully, then lifting it up and out. Set it aside.
- Look underneath the dispenser housing area for 3 screws. Remove them with a Phillips screwdriver.
- The dispenser housing can now be slid back and lifted out. As you slide it back, two supply hoses will disconnect from the back.
- Set aside the dispenser housing and keep track of the mounting screws for reassembly later.
- Pull the lower edge of the control panel forward to release the mounting tabs from the frame slots.
- As you tilt the panel forward, you’ll see two electrical connectors on the back. Carefully unplug them by releasing the locking tabs.
- Set the control panel on a flat, padded surface to avoid scratching it.
- On the back of the control panel, locate the mounting nut that holds the knob/shaft assembly in place. Use pliers or a wrench to loosen the nut.
- Now you should be able to push the knob shaft forward from the front and separate the knob.
- If needed, grab the knob with pliers or wrap it in a towel for grip. Twist and pull firmly until it releases from the shaft.
- Inspect the old knob and shaft for any worn or damaged parts. Clean any dirt or residue buildup off the shaft so the new knob seats properly.
- Align the flat side or D-shaped opening of the knob with the flat portion of the control shaft.
- Push the knob firmly onto the shaft until it snaps fully into place. Give it a test spin to make sure it rotates smoothly.
- On the back, tighten down the mounting nut to secure the knob/shaft assembly into the control panel.
- Carefully plug the two electrical connectors back into the control panel. Make sure they click into place.
- Position the control panel back into place over the front frame. Push it back so the tabs along the bottom edge lock into the frame slots.
- Reinstall the dispenser housing, supply hoses, drawer, and mounting screws. Make sure the hoses are fully seated.
- Set the top panel back over the washer cabinet. Slide it forward so the front tabs insert into their slots.
- Replace the two screws along the back of the top panel. Don’t over tighten.
With that, you’ve officially completed the control knob replacement job. Nice work!
More Information
Thanks for reading! If you have any other appliance repair needs or projects, you can find other resources and our DIY blog at AppliancePartsPros.com. There, you can enter your model number to order the exact parts you need. Most orders arrive in 2-3 business days.
You can also reach our award-winning customer service team at 1-877-477-7278, chat with a pro on our website and watch thousands of free video tutorials on our YouTube channel.
 https://www.appliancepartspros.com/b/wp-content/uploads/2025/04/APP-blog-square-63.jpg
1080
1080
Steven E
https://www.appliancepartspros.com/b/wp-content/uploads/2020/11/app-logo-std.png
Steven E2025-04-10 12:16:042025-04-10 12:16:16How to Test the Spin Basket on an Unbalanced Maytag Washer
https://www.appliancepartspros.com/b/wp-content/uploads/2025/04/APP-blog-square-63.jpg
1080
1080
Steven E
https://www.appliancepartspros.com/b/wp-content/uploads/2020/11/app-logo-std.png
Steven E2025-04-10 12:16:042025-04-10 12:16:16How to Test the Spin Basket on an Unbalanced Maytag Washer https://www.appliancepartspros.com/b/wp-content/uploads/2025/04/APP-blog-square-62.jpg
1080
1080
Steven E
https://www.appliancepartspros.com/b/wp-content/uploads/2020/11/app-logo-std.png
Steven E2025-04-10 11:58:362025-04-10 11:58:46How to test the gearcase on a Maytag washer that is unbalanced
https://www.appliancepartspros.com/b/wp-content/uploads/2025/04/APP-blog-square-62.jpg
1080
1080
Steven E
https://www.appliancepartspros.com/b/wp-content/uploads/2020/11/app-logo-std.png
Steven E2025-04-10 11:58:362025-04-10 11:58:46How to test the gearcase on a Maytag washer that is unbalanced https://www.appliancepartspros.com/b/wp-content/uploads/2025/04/APP-blog-square-61.jpg
1080
1080
Steven E
https://www.appliancepartspros.com/b/wp-content/uploads/2020/11/app-logo-std.png
Steven E2025-04-10 11:26:052025-04-10 11:26:14How to test the belt on an unbalanced Maytag washer
https://www.appliancepartspros.com/b/wp-content/uploads/2025/04/APP-blog-square-61.jpg
1080
1080
Steven E
https://www.appliancepartspros.com/b/wp-content/uploads/2020/11/app-logo-std.png
Steven E2025-04-10 11:26:052025-04-10 11:26:14How to test the belt on an unbalanced Maytag washerWith nearly a decade of experience in providing top-notch customer service regarding appliance parts and repair, Steven enjoys sharing practical advice, troubleshooting tips, and interesting information to help readers stay informed.