How to Troubleshoot the F22 Error Code on KitchenAid Cooktops
Steven E / Friday May 9, 2025
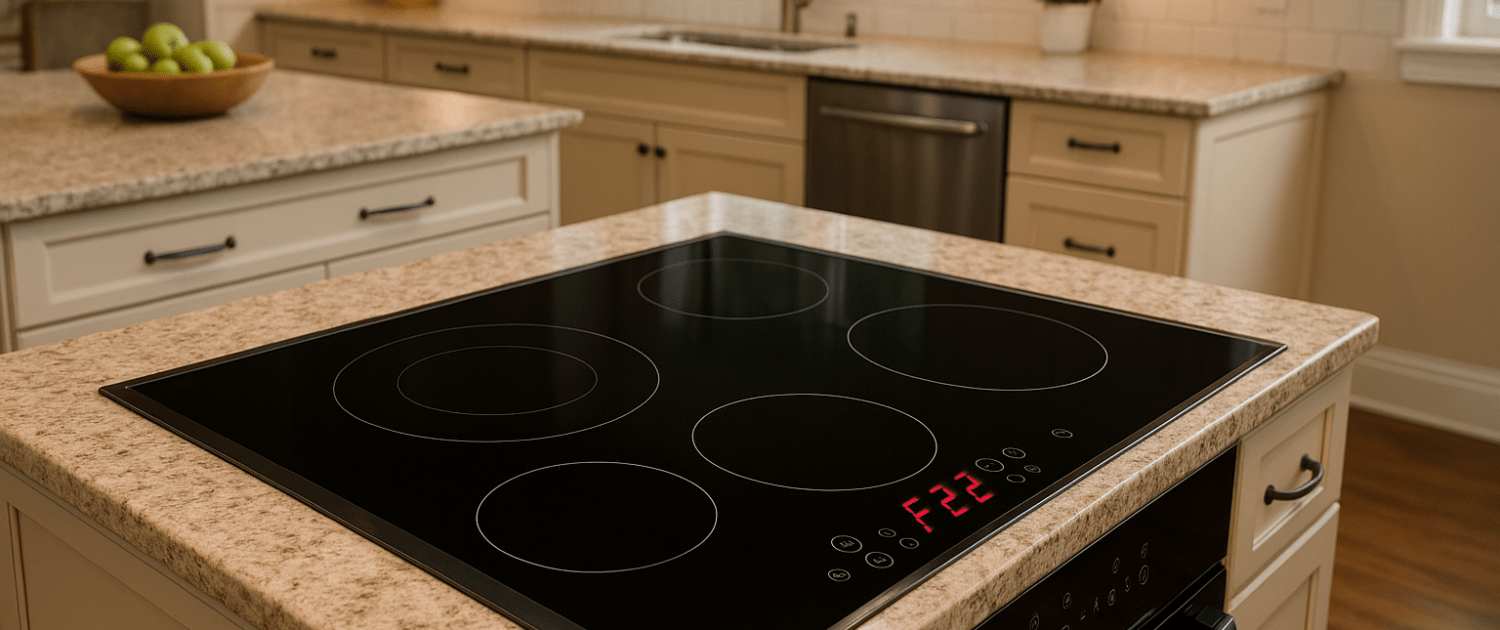
If your KitchenAid cooktop is flashing the F22 error code, it could mean low voltage, a wiring issue, or a communication glitch between internal components. But don’t worry! We’ll break down what’s causing the F22 code, how to check for common culprits, and what you can do to fix it, no stress, no guesswork.
If you find out that you need any replacement parts for your appliance while you’re troubleshooting, you can enter your model number at AppliancePartsPros.com to order them. Most orders arrive in just two business days, and we have thousands of free guides to show you how to install your new parts.
The information in this article may not apply to your specific appliance model. We recommend consulting your manufacturer’s documentation or contact us with any questions.
What causes the F22 fault code?
The F22 error code points to an issue with the touch key sensitivity on the cooktop’s glass surface. Here’s what happens inside the touch control module:

- The glass surface has touch sensor pads connected to the control circuitry.
- Touching a pad changes electrical capacitance, sending a signal to the module.
- The module monitors for valid signal patterns when pads are touched.
- If irregular signals occur, the module generates an F22 sensitivity error.
Possible causes for the error include:
- Loose wiring connections causing touch signal disruption.
- Contaminants on the glass surface interfere with touch pads.
- Faulty touchpad circuits inside the control module.
- Failure of the module’s microprocessor or logic circuits.
Without repair, the F22 can disable the cooktop touch controls partially or fully. Troubleshooting is required to restore normal operation and temperature settings.
Safety precautions
When working on any appliance, remember to keep safety first. Here are some tips to keep in mind:
- Always power off and unplug your appliance or switch off the circuit breaker before attempting any maintenance or replacement work. This keeps you safe by preventing any risk of injury from electric shock.
- Wear insulated work gloves to protect your hands from sharp metal parts, pinching hazards and debris.
- Take your time and don’t rush while working to prevent accidents and personal injuries.
- Work in a well-lit area so you can clearly see and access the interior parts.
- Clear your workspace of clutter and other obstacles. Keep children and pets away from the work area.
- Never work on internal parts with bare wet hands. Make sure the work area is completely dry.
- Check your user manual to see if there are specific installation or safety instructions for your part or appliance.
- Be gentle when handling or removing parts. Excessive force might damage the appliance or cause injury.
- Wear safety glasses when working with chemicals, dust or cleaning large debris to prevent injury.
- If the appliance has recently been used, give it plenty of time for any heating parts to cool down before working on it.
- Take pictures or make a note of wiring terminals or other connections before disconnecting to prevent any problems with reassembly.
- When working with wires, avoid touching any exposed wires or terminals. If you need to touch a wire, use a non-conductive tool or wear insulating gloves to prevent electrical shock.
Troubleshooting steps
Step 1: Reset the appliance
As an initial step, resetting the cooktop may clear up intermittent F22 faults:
- Disconnect power to the cooktop for 1 full minute to discharge circuits.
- After 1 minute, reconnect power and test touch key operation.
- The reset may have cleared any temporary F22 issues. If not, continue troubleshooting.
Step 2: Access the touch control module
The first troubleshooting step is safely accessing the touch control module:
- Disconnect electrical power to the cooktop at the breaker or by unplugging.
- If built-in, remove the cooktop and locate any touch module mounting fasteners.
- Detach the wiring harness and ribbon cable from the touch module.
- Remove any remaining fasteners and carefully extract the module for inspection.
- Visually check for external damage and debris on the glass touch surface.
Step 3: Inspect wiring and connections
- Visually inspect wires and terminals between the touch module and electronic control board. Look closely for damage.
- Wiggle or twist each wire while observing the connection point. Intermittent faults may reveal loose terminals.
- Check for bent or broken pins on ribbon cable connectors.
- Replace any visibly damaged wires.
- Carefully retest cooktop operation after any wiring repairs.
Step 4: Replace the touch control module
- Obtain an exact replacement touch control module made specifically for the cooktop model.Click here and enter your model number to ensure you get the correct part.
- Disconnect the ribbon cable and wiring harness from the old module. Remove any mounting screws.
- Carefully detach the faulty module without damaging nearby components. Discard the old module.
- Install the replacement module in the same position as the original.
- Insert the module’s ribbon cable firmly into its receptacle on the new module until fully seated.
- Reconnect any other detached wires to their proper terminals on the module per the wiring diagram.
- Secure the new module using original mounting screws or supplied hardware. Do not overtighten.
Step 5: Replace electronic control board
Replace the electronic control if the F22 fault persists after all other possible causes are ruled out:
- Obtain an exact replacement electronic control board designed for that specific cooktop model. Click here and insert your model number to ensure you get the correct board the first time.
- When replacing the board, be extremely careful reconnecting wires to the proper terminals.
- Double check wire routing against the appliance wiring diagram after replacement.
- Securely fasten all wire connections and ensure proper installation and clearance from hot or moving components.
- Restore electrical power and retest cooktop operation. The electronic control and touch module replacements should correct the issue.
Additional information
Thank you for reading! We hope you found this information useful to get your cooktop working again.
If you have any other appliance repair needs or projects, don’t hesitate to explore our thousands of free videos and troubleshooting guides available. If you need replacement parts or some extra help, grab your model number and head over to AppliancePartsPros.com, where you can chat with a pro, order parts, read our DIY blog, and more.
Be sure to subscribe to us on YouTube and follow us on Facebook, Twitter, and Instagram!
 https://www.appliancepartspros.com/b/wp-content/uploads/2020/11/pexels-rodnae-productions-5591463.jpg
853
1280
Steven E
https://www.appliancepartspros.com/b/wp-content/uploads/2020/11/app-logo-std.png
Steven E2023-07-25 12:56:212026-01-15 11:50:21How to troubleshoot & fix an F3E3 error on a Maytag dryer
https://www.appliancepartspros.com/b/wp-content/uploads/2020/11/pexels-rodnae-productions-5591463.jpg
853
1280
Steven E
https://www.appliancepartspros.com/b/wp-content/uploads/2020/11/app-logo-std.png
Steven E2023-07-25 12:56:212026-01-15 11:50:21How to troubleshoot & fix an F3E3 error on a Maytag dryer  picture by Freepik
https://www.appliancepartspros.com/b/wp-content/uploads/2022/09/stressed-woman-doing-laundry-medium-shot-by-freepik-scaled.jpg
1958
2560
Steven E
https://www.appliancepartspros.com/b/wp-content/uploads/2020/11/app-logo-std.png
Steven E2023-07-25 12:52:362026-01-15 11:58:39F/dL Whirlpool Washer Error Code: A Troubleshooting Guide
picture by Freepik
https://www.appliancepartspros.com/b/wp-content/uploads/2022/09/stressed-woman-doing-laundry-medium-shot-by-freepik-scaled.jpg
1958
2560
Steven E
https://www.appliancepartspros.com/b/wp-content/uploads/2020/11/app-logo-std.png
Steven E2023-07-25 12:52:362026-01-15 11:58:39F/dL Whirlpool Washer Error Code: A Troubleshooting Guide https://www.appliancepartspros.com/b/wp-content/uploads/2023/06/how-to-install-a-new-dryer.png
616
955
Steven E
https://www.appliancepartspros.com/b/wp-content/uploads/2020/11/app-logo-std.png
Steven E2023-07-24 11:39:052026-01-15 12:08:50E1 and E2 Maytag Dryer Error Code: A Troubleshooting Guide
https://www.appliancepartspros.com/b/wp-content/uploads/2023/06/how-to-install-a-new-dryer.png
616
955
Steven E
https://www.appliancepartspros.com/b/wp-content/uploads/2020/11/app-logo-std.png
Steven E2023-07-24 11:39:052026-01-15 12:08:50E1 and E2 Maytag Dryer Error Code: A Troubleshooting GuideWith nearly a decade of experience in providing top-notch customer service regarding appliance parts and repair, Steven enjoys sharing practical advice, troubleshooting tips, and interesting information to help readers stay informed.