What the E309 Error Code Means on Bosch Ovens
Steven E / Friday May 9, 2025
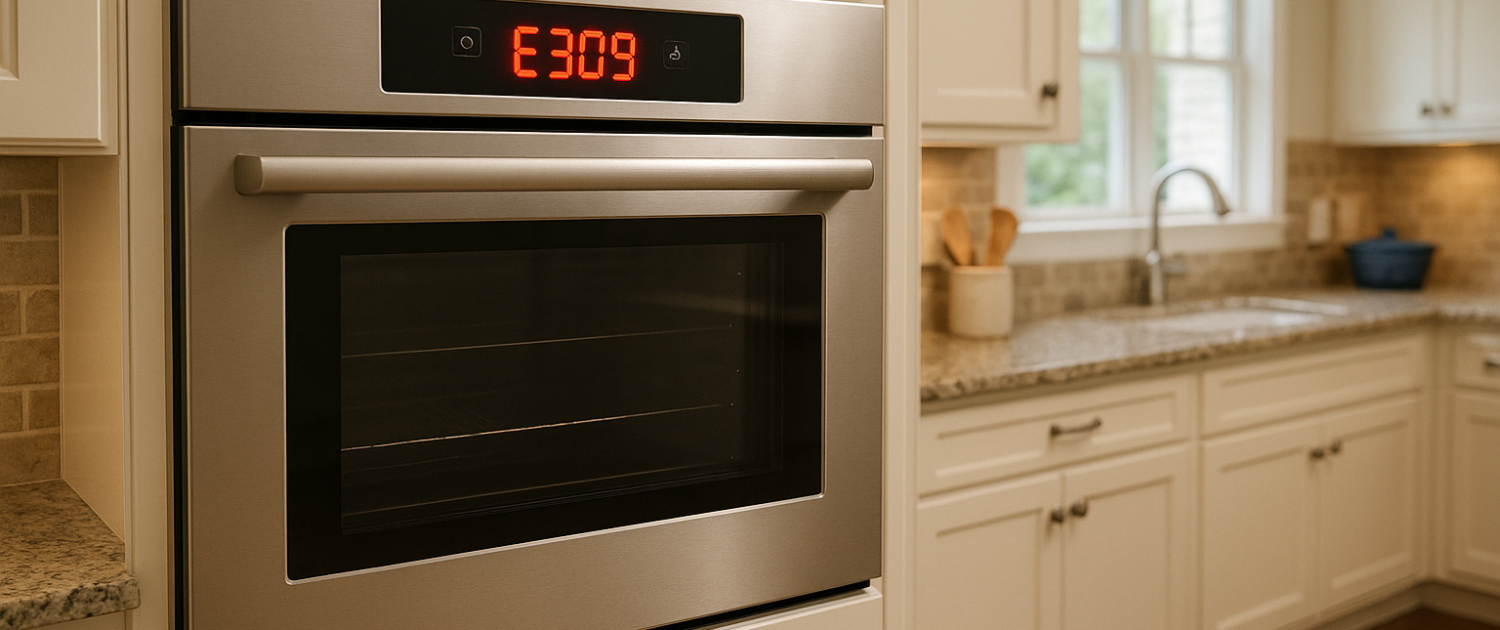
Is your Bosch oven flashing the E309 error code and refusing to work? This error usually signals a communication breakdown between the display (user interface) and the main control board. But no worries—this guide will show you how to troubleshoot the issue, reset the oven, and know when it’s time to call in a replacement part.
If you find out that you need any replacement parts for your appliance while you’re troubleshooting, you can enter your model number at AppliancePartsPros.com to order them. Most orders arrive in just two business days, and we have thousands of free guides to show you how to install your new parts.
The information in this article may not apply to your specific appliance model. We recommend consulting your manufacturer’s documentation or contact us with any questions.
What does the error code mean?
On Bosch gas slide-in ranges, the E309 error code indicates that the control module has failed an internal ROM (Read Only Memory) check on startup.

The control module contains the logic board and programming that operates the various oven functions. At power-up, it runs a self-check on its internal ROM chip.
The E309 error signifies this ROM check has failed and the control module needs to be reset or replaced. It’s not a common error but can occur over time from electrical spikes or power fluctuations corrupting the module’s memory.
When an E309 is present, the oven will be unresponsive and won’t heat up. A control module reset or replacement is required to resume normal operation.
Safety precautions
When working on any appliance, remember to keep safety first. Here are some tips to keep in mind:
- Always power off and unplug your appliance or switch off the circuit breaker before attempting any maintenance or replacement work. This keeps you safe by preventing any risk of injury from electric shock.
- Wear insulated work gloves to protect your hands from sharp metal parts, pinching hazards and debris.
- Take your time and don’t rush while working to prevent accidents and personal injuries.
- Work in a well-lit area so you can clearly see and access the interior parts.
- Clear your workspace of clutter and other obstacles. Keep children and pets away from the work area.
- Never work on internal parts with bare wet hands. Make sure the work area is completely dry.
- Check your user manual to see if there are specific installation or safety instructions for your part or appliance.
- Be gentle when handling or removing parts. Excessive force might damage the appliance or cause injury.
- Wear safety glasses when working with chemicals, dust or cleaning large debris to prevent injury.
- If the appliance has recently been used, give it plenty of time for any heating parts to cool down before working on it.
- Take pictures or make a note of wiring terminals or other connections before disconnecting to prevent any problems with reassembly.
- When working with wires, avoid touching any exposed wires or terminals. If you need to touch a wire, use a non-conductive tool or wear insulating gloves to prevent electrical shock.
Troubleshooting steps
Step 1: Reset the power supply
Start by resetting the power to the control module:
- Disconnect power to the range at the breaker or wall outlet.
- Wait 1-minute minimum to de-energize the control module. This clears any temporary errors.
- Restore power and turn on the oven. Check if the E309 code still appears on the display during initialization.
- Repeat the process if the error persists. Forcing a hard reset of the module’s memory may resolve the issue.
Power cycling the control module essentially reboots the computer chip and clears any corrupt memory segments. This allows the ROM check to pass on to the next startup.
If the E309 returns right away, it’s likely a permanent issue requiring the replacement of the control module itself.
Step 2: Check option code settings
Before replacement, double-check the control module’s option code:
- Initiate service mode by pressing a combination of buttons – refer to the range’s service manual.
- Navigate to the option code menu and verify it shows the correct 4-digit number for that specific model. For an 800 series range, it should be 2078.
- If incorrect, enter the proper code then exit service mode. The error may clear after correcting the option code.
The option code ensures the control module has the right programming for the specific appliance it’s installed in. If incorrect, communication issues can occur.
Step 3: Inspect wiring
With the range unplugged, next inspect the power and wiring:
- Use a multimeter to check for 120V power at the outlet or junction box.
- Check the power cord wires at the terminal block on the back of the range. Verify proper connections.
- Follow input power wires through any protection devices like fuses or breakers. Make sure nothing is tripped or faulty.
- Check wiring harnesses between components for damage, oxidation, or loose plugs.
Problems with outlet power, internal wiring faults, or poor connections can all cause control module issues. Inspect closely for anything preventing full 120V power.
Step 4: Monitor startup voltage
If incoming power checks out okay, monitor voltage during a startup:
- Access the rear of the control module and locate the power supply pins. Refer to the wiring diagram.
- With a multimeter probe on the proper pins, initiate a startup.
- Check that 120V is present at the module’s input pins when turning on the oven.
- If voltage is absent on startup, trace wiring back from the module to find the interruption source.
Monitoring input voltage during initialization provides clues if it’s an internal control board failure or an external wiring/power problem.
Step 5: Replace the control module
If power and wiring check out fine after the above steps, replace the control module:
- Turn off the power and gas supply, then disconnect all harness plugs. Remove mounting screws.
- Install the replacement control module using the original fasteners to secure it.
- Reconnect the wiring harnesses to the proper terminals – refer to the wiring diagram.
- Restore power and gas. Clear any leftover error codes. Allow several minutes for first-time initialization.
- Run the oven through testing for each function. If the E309 code is gone, the controller replacement fixes the issue.
Replace the entire control module assembly if available. Swapping just the logic board should be a last resort.
Additional information
Thank you for reading! We hope you found this information useful to get your oven working again.
If you have any other appliance repair needs or projects, don’t hesitate to explore our thousands of free videos and troubleshooting guides available. If you need replacement parts or some extra help, grab your model number and head over to AppliancePartsPros.com, where you can chat with a pro, order parts, read our DIY blog, and more.
Be sure to subscribe to us on YouTube and follow us on Facebook, Twitter, and Instagram!
 https://www.appliancepartspros.com/b/wp-content/uploads/2024/10/5.jpg
1080
1080
Steven E
https://www.appliancepartspros.com/b/wp-content/uploads/2020/11/app-logo-std.png
Steven E2025-03-13 05:25:562025-08-06 13:25:32Troubleshooting error code dE on a Samsung top load washer
https://www.appliancepartspros.com/b/wp-content/uploads/2024/10/5.jpg
1080
1080
Steven E
https://www.appliancepartspros.com/b/wp-content/uploads/2020/11/app-logo-std.png
Steven E2025-03-13 05:25:562025-08-06 13:25:32Troubleshooting error code dE on a Samsung top load washer https://www.appliancepartspros.com/b/wp-content/uploads/2024/10/4.jpg
1080
1080
Steven E
https://www.appliancepartspros.com/b/wp-content/uploads/2020/11/app-logo-std.png
Steven E2025-03-13 05:18:022025-03-13 05:18:11Troubleshooting error code 5E on a Samsung top load washer
https://www.appliancepartspros.com/b/wp-content/uploads/2024/10/4.jpg
1080
1080
Steven E
https://www.appliancepartspros.com/b/wp-content/uploads/2020/11/app-logo-std.png
Steven E2025-03-13 05:18:022025-03-13 05:18:11Troubleshooting error code 5E on a Samsung top load washer https://www.appliancepartspros.com/b/wp-content/uploads/2024/10/2.jpg
1080
1080
Steven E
https://www.appliancepartspros.com/b/wp-content/uploads/2020/11/app-logo-std.png
Steven E2025-03-12 13:17:362025-08-06 13:20:26Troubleshooting error code 3E on a Samsung top load washer
https://www.appliancepartspros.com/b/wp-content/uploads/2024/10/2.jpg
1080
1080
Steven E
https://www.appliancepartspros.com/b/wp-content/uploads/2020/11/app-logo-std.png
Steven E2025-03-12 13:17:362025-08-06 13:20:26Troubleshooting error code 3E on a Samsung top load washerWith nearly a decade of experience in providing top-notch customer service regarding appliance parts and repair, Steven enjoys sharing practical advice, troubleshooting tips, and interesting information to help readers stay informed.