Why Your Reverse Osmosis System Is Leaking (and How to Fix It)
Steven E / Tuesday May 6, 2025
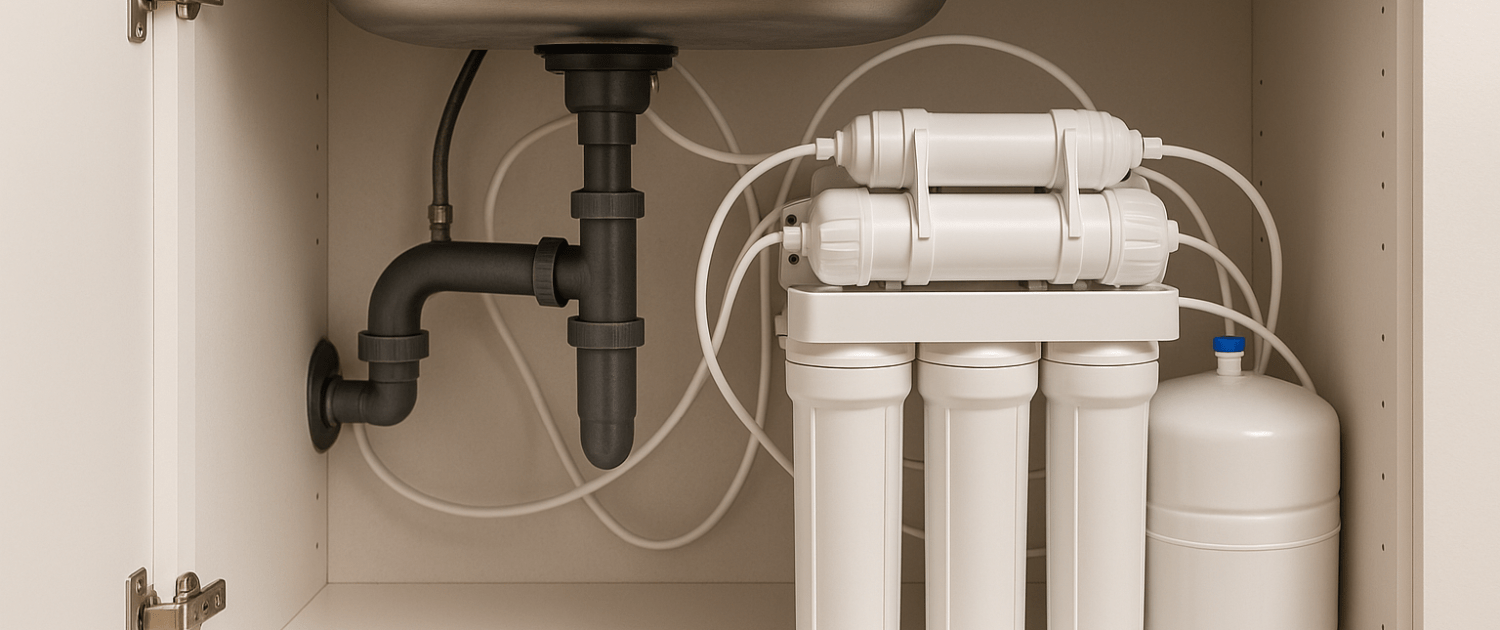
Reverse osmosis (RO) systems are amazing for giving you clean, great-tasting water right from your kitchen faucet. But when you walk into the kitchen and find a puddle under your sink or hear that dreaded dripping noise, your peaceful hydration dreams can quickly turn into a plumbing headache.
The good news? Leaky RO systems are a common issue, and an easy fix. With a little DIY know-how, some patience, and a few basic tools, you can track down the problem and get your system back to leak-free perfection.
If you find out that you need any replacement parts for your appliance while you’re troubleshooting, you can enter your model number at AppliancePartsPros.com to order them. Most orders arrive in just two business days, and we have thousands of free guides to show you how to install your new parts.
The information in this article may not apply to your specific appliance model. We recommend consulting your manufacturer’s documentation or contact us with any questions.

Common causes of leaks
Understanding the root issues will help you troubleshoot and address the problem effectively. Here are the steps to help you determine where the leak is originating:
Loose or damaged fittings
- Inspect all the connections in your RO system, including tubing connections, faucet connections, and filter housing. Loose fittings may appear visibly disconnected or show signs of water seepage around the connection points.
- Use appropriate tools, such as a wrench or pliers, to gently tighten loose fittings. Be careful not to overtighten, as this could cause damage.
Cracked or damaged tubing
- Examine the tubing in your RO system for visible cracks, splits, or signs of wear and tear. Damaged tubing can allow water to escape.
- If you find any damaged tubing, replace it with new, compatible tubing. Ensure that the replacement tubing is cut to the correct length and securely connected.
Faulty O-rings and seals
- Many RO systems use O-rings and seals to create watertight connections. Check these components in filter housings, fittings, and connections.
- If you discover damaged or worn O-rings or seals, replace them with suitable replacements to maintain a proper seal.
High water pressure
- Excessive water pressure can strain the connections and fittings in your RO system, leading to leaks.
- If you suspect high water pressure is the cause, consider installing a pressure regulator on your water supply line or adjusting the existing one to maintain optimal pressure levels for your RO system.
Identifying the leak
The next step in troubleshooting your reverse osmosis (RO) system’s leak is to pinpoint the source of the problem.
- Examine the area around your RO system, particularly beneath and around any exposed components, such as the filtration unit, faucet, or tubing connections. Look for signs of water pooling or dripping.
- Inspect the walls, floor, and surrounding fixtures for damp spots or discoloration, as these may indicate a hidden leak.
- Sometimes, a leak might produce distinctive sounds. Listen carefully around the RO system and connected plumbing for hissing, dripping, or running water noises.
- In some cases, a leak may introduce impurities or contaminants into the RO system, resulting in a noticeable change in the taste or smell of the filtered water. Pay attention to any unusual odors or flavors in your drinking water.
- Check the color of the filtered water. If it appears discolored or cloudy, it could indicate that the leak is introducing foreign substances into the system.
Once you’ve determined where the leak is originating, you can proceed to address the specific issue causing the leak.
Check the Fittings and Push-In Connectors
RO systems use quick-connect (push-to-fit) fittings, which are super convenient but can loosen over time or if bumped.
What to do:
- Push the tubing in firmly to make sure it’s seated all the way.
- Then pull gently, if it comes out easily, the connection wasn’t secure.
- If the leak continues, turn off the water, remove the tubing, and check for scratches or cracks on the tubing, dirt or debris inside the fitting, and a worn-out O-ring or collet.
How to fix:
- Cut a fresh, clean end on the tubing using a sharp utility knife.
- Reinsert it fully into the fitting.
- If the fitting itself is cracked or worn, replace it, it’s a cheap and easy fix.
Inspect the Filter Housings
If the leak is coming from around one of the filter canisters, you’re likely dealing with a loose housing or a bad O-ring.
How to check:
- Wipe the housing dry and look for leaks around the top or bottom of the canister.
- Use the RO wrench (that came with your system) to gently tighten the housing clockwise.
Caution: Don’t overtighten, it can damage the threads or crack the plastic.
If the leak persists:
- Turn off the water and unscrew the housing.
- Remove the filter and check the O-ring.
- Is it dry, cracked, or misaligned? Lubricate it with food-grade silicone grease and reseat it properly.
- Replace the O-ring if it’s worn out.
Screw the housing back on, turn the water back on, and check again for leaks.
Look at the RO Faucet
Leaks from the RO faucet are usually pretty easy to spot, they’ll often drip down onto your sink or counter.
- Loose fittings underneath the sink
- Cracked base or faucet body
- Leaky air gap
If your system uses an air gap faucet (a small hole or bump in the faucet stem), water leaking from the hole means there’s a clog in the drain line.
What to do:
- Remove the drain tubing and clean it out with a pipe cleaner or brush.
- Clear any debris that might be backing up water into the air gap.
For leaks at the base of the faucet, tighten the mounting hardware or replace washers and fittings as needed.
Check the Storage Tank
The pressurized storage tank can sometimes develop leaks at the top valve or around the base.
What to look for:
- Water pooling around the bottom of the tank
- Drips coming from the valve or tee fitting at the top
Fixes:
- Tighten the top valve or fitting using a wrench (but not too hard).
- If the tank itself is leaking (from a seam or weld), it will need to be replaced.
Tanks can last 5–10 years, but eventually they wear out. If your tank is older and leaking, a replacement is usually the best solution.
Investigate the Drain Saddle
The drain saddle valve is the little clamp that attaches your RO system’s drain line to your sink’s drainpipe.
If it’s leaking:
- It may not be aligned properly with the drilled hole.
- The clamp could be loose or corroded.
- There might be gunk clogging the drain line, causing water to back up.
What to do:
- Remove the saddle clamp and clean both the drainpipe and clamp area.
- Realign it properly over the hole.
- Tighten the screws evenly on both sides.
- Make sure the drain tubing is fully inserted and secured.
If the clamp or tubing is damaged, replace it, it’s a cheap part and easy to install.
Examine the RO Membrane Housing
The membrane housing is a horizontal cylinder, usually mounted near the top of your system.
Leaks from this housing can come from:
- Loose end caps
- Worn O-rings
- Cracks in the housing itself
Fixes:
- Unscrew the end cap using your hand or a wrench (lefty-loosey!).
- Inspect and lubricate or replace the O-rings.
- Look for cracks in the plastic.
- Replace the housing if needed, it’s inexpensive and available online.
Replace Old or Brittle Tubing
If your system is a few years old, some of the plastic tubing may be getting stiff, cracked, or brittle. Tiny pinholes or hairline cracks can cause small, slow leaks that are hard to spot.
How to fix:
- Cut off the damaged section.
- Reconnect with a push fitting or install a new length of tubing.
- Use 1/4-inch or 3/8-inch food-grade tubing, depending on your system size.
Always cut the tubing square and clean to avoid leaks at the fittings.
Additional information
Thank you for reading! We hope this guide helped you get your reverse osmosis system working again.
If you have any other appliance repair needs or projects, don’t hesitate to explore our other troubleshooting guides and videos.
If you need replacement parts or some extra help with ordering them, grab your model number and head over to AppliancePartsPros.com, where you can chat with a pro, read our DIY blog and more.
Don’t forget to subscribe to us on YouTube and follow us on Facebook, Twitter and Instagram!
 https://www.appliancepartspros.com/b/wp-content/uploads/2025/01/APP-blog-square-19.jpg
1080
1080
Steven E
https://www.appliancepartspros.com/b/wp-content/uploads/2020/11/app-logo-std.png
Steven E2025-01-22 12:18:292025-01-22 12:18:38How to replace an igniter on a gas furnace
https://www.appliancepartspros.com/b/wp-content/uploads/2025/01/APP-blog-square-19.jpg
1080
1080
Steven E
https://www.appliancepartspros.com/b/wp-content/uploads/2020/11/app-logo-std.png
Steven E2025-01-22 12:18:292025-01-22 12:18:38How to replace an igniter on a gas furnace https://www.appliancepartspros.com/b/wp-content/uploads/2025/01/APP-blog-square-22.jpg
1080
1080
Steven E
https://www.appliancepartspros.com/b/wp-content/uploads/2020/11/app-logo-std.png
Steven E2025-01-22 12:04:582025-01-22 12:05:06DIY maintenance tips for electric furnaces
https://www.appliancepartspros.com/b/wp-content/uploads/2025/01/APP-blog-square-22.jpg
1080
1080
Steven E
https://www.appliancepartspros.com/b/wp-content/uploads/2020/11/app-logo-std.png
Steven E2025-01-22 12:04:582025-01-22 12:05:06DIY maintenance tips for electric furnaces https://www.appliancepartspros.com/b/wp-content/uploads/2025/01/APP-blog-square-2-6.jpg
1080
1080
Steven E
https://www.appliancepartspros.com/b/wp-content/uploads/2020/11/app-logo-std.png
Steven E2025-01-22 11:15:382025-01-22 11:15:49How to replace the capacitor in an electric furnace
https://www.appliancepartspros.com/b/wp-content/uploads/2025/01/APP-blog-square-2-6.jpg
1080
1080
Steven E
https://www.appliancepartspros.com/b/wp-content/uploads/2020/11/app-logo-std.png
Steven E2025-01-22 11:15:382025-01-22 11:15:49How to replace the capacitor in an electric furnaceWith nearly a decade of experience in providing top-notch customer service regarding appliance parts and repair, Steven enjoys sharing practical advice, troubleshooting tips, and interesting information to help readers stay informed.