5 Reasons a Reverse Osmosis System Drains Continuously
Steven E / Tuesday May 6, 2025
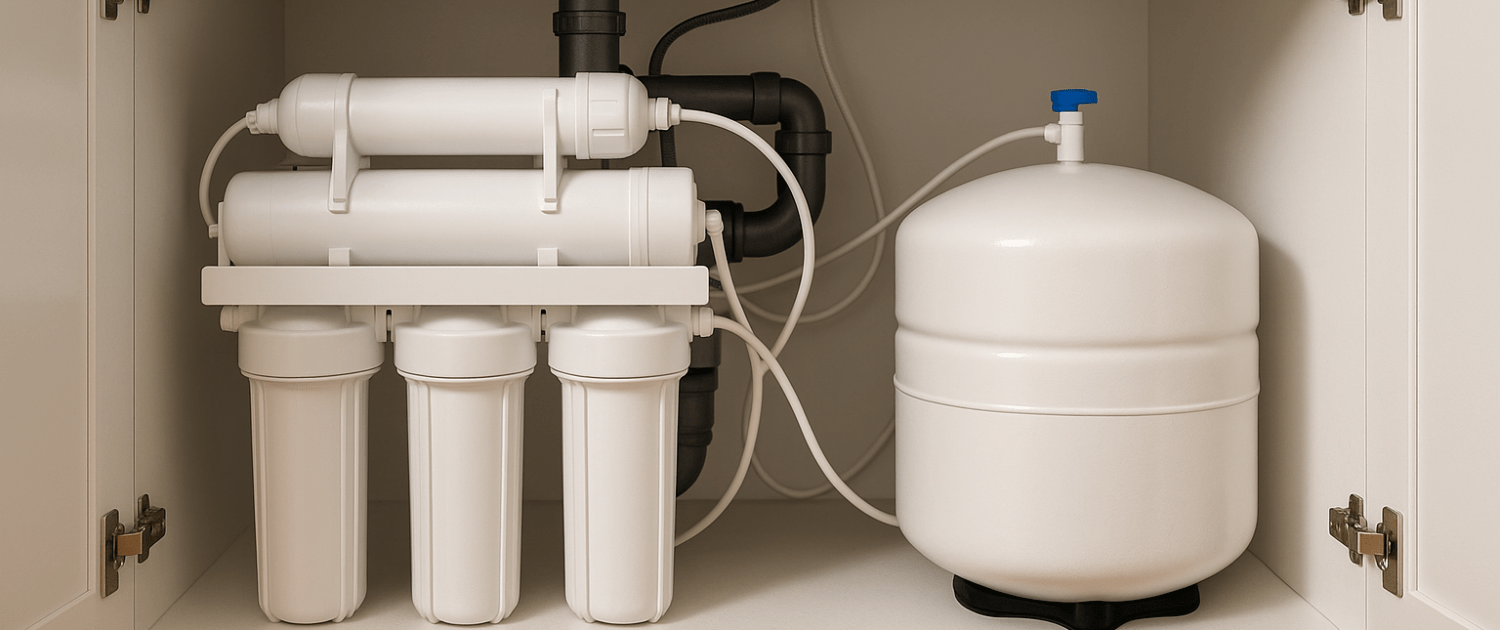
Reverse osmosis (RO) systems are an essential tool for ensuring clean and safe drinking water in many households. These systems use a sophisticated process to remove contaminants and impurities from your tap water, providing you with high-quality drinking water. However, if you’ve noticed that your RO system is continuously draining water, it’s essential to address this issue promptly.
If you find out that you need any replacement parts for your appliance while you’re troubleshooting, you can enter your model number at AppliancePartsPros.com to order them. Most orders arrive in just two business days, and we have thousands of free guides to show you how to install your new parts.
The information in this article may not apply to your specific appliance model. We recommend consulting your manufacturer’s documentation or contact us with any questions.
Understanding RO systems
Before we dive into troubleshooting your reverse osmosis system, it’s important to know the fundamental principles of how RO systems work and what their key components are. This understanding will serve as a foundation for diagnosing and resolving the problem effectively.

Overview of the RO process:
- Pre-filtration: The water first passes through pre-filters, which remove larger particles and sediments, protecting the RO membrane from clogging.
- Pressurization: The pressurized water is then forced through the RO membrane, which has tiny pores that allow water molecules to pass while blocking impurities.
- Product water: The purified water, also known as “product water” or “permeate,” is collected and stored for consumption.
- Concentrated water: The concentrated contaminants and impurities are directed to the drain through a separate pathway.
Parts of an RO system:
- RO membrane: The semi-permeable membrane is the heart of the system. It selectively allows water molecules to pass through while rejecting contaminants.
- Pre-filters: These pre-filters, often made of sediment and carbon, remove larger particles, chlorine, and organic matter.
- Automatic shut-off valve: This valve controls the flow of water to the RO membrane and stops water production when the storage tank is full.
- Storage tank: The storage tank holds the purified water until you need it.
- Drain line: The drain line carries away concentrated impurities and wastewater.
- Flow restrictor: The flow restrictor helps maintain the proper pressure in the RO system, ensuring efficient water purification.
- Check valve: The check valve prevents backward flow, ensuring that purified water doesn’t mix with untreated water.
Troubleshooting steps
Step 1: Automatic shut-off valve not working
If you suspect that the automatic shut-off valve is not functioning correctly and causing continuous drainage, follow these steps to diagnose and address the issue:
- Locate the shut-off valve: The automatic shut-off valve is typically located near the RO membrane housing or the water line. It may be integrated into the RO membrane housing assembly.
- Check valve operation: Observe the valve while the RO system is in operation. It should open when water is being purified and close when the storage tank is full.
- Listen for audible clues: Sometimes, you can hear the valve’s operation. If it’s not shutting off properly, it may produce a continuous hissing sound even when the tank is full.
- Inspect for debris or obstructions: Debris or mineral buildup can prevent the valve from closing completely. Disconnect the valve, clean it, and remove any obstructions.
- Replace the valve: If the valve is damaged or cannot be repaired, it’s essential to replace it with a new automatic shut-off valve. Ensure that the replacement valve is compatible with your RO system model.
Step 2: Low incoming water pressure
Low incoming water pressure can disrupt the operation of your RO system, leading to continuous drainage. To address this issue, follow these steps:
- Check incoming water pressure: Begin by assessing the incoming water pressure to your home’s plumbing. RO systems typically require a minimum water pressure of 40 psi (pounds per square inch) to operate efficiently. You can measure the water pressure using a pressure gauge installed at a suitable point in your water supply line.
- Check for plumbing issues: Inspect your home’s plumbing system for any leaks, obstructions, or damage that may be causing a drop in water pressure. Address any plumbing issues promptly to restore optimal water pressure throughout your home.
- Boost water pressure: If you find that the incoming water pressure is consistently below the required 40 psi, consider installing a booster pump. A booster pump increases the water pressure to meet the RO system’s minimum requirements.
Step 3: Low RO storage tank air pressure
Low air pressure in the RO storage tank can result in continuous drainage and prevent the tank from filling properly. To address this issue, follow these steps:
- Locate the RO storage tank: The storage tank is typically located under the sink or in a convenient and accessible area. It may be connected to the RO system with tubing.
- Turn off the water supply: Before working on the tank, turn off the water supply to the RO system. This step ensures your safety and prevents further water drainage.
- Check air pressure: Using a pressure gauge compatible with low pressures (usually 5-7 psi), check the air pressure in the RO storage tank. This measurement should be taken when the tank is empty.
- Adjust the air pressure: If the air pressure is below the recommended range (5-7 psi), use an air compressor with a low-pressure setting to adjust the tank’s air pressure. Ensure that the valve on the tank is secure to prevent air leakage.
- Monitor tank filling: Turn the water supply back on and monitor the tank’s filling process. It should start filling, and once it reaches capacity, the RO system should shut off automatically.
- Tank pressure maintenance: Regularly check and maintain the air pressure in the tank to ensure it stays within the recommended range. Over time, air pressure may decrease, requiring occasional adjustments.
Step 4: Damaged storage tank
If the bladder inside your RO storage tank is damaged or ruptured, it can lead to continuous drainage and prevent the tank from functioning correctly. To address this issue, follow these steps:
- Locate the RO storage tank: Identify the location of the RO storage tank, which is typically placed under the sink or in a convenient area.
- Turn off the water supply: Before working on the tank, ensure you turn off the water supply to the RO system to prevent water flow.
- Drain the tank: Open the faucet connected to the RO system and let any remaining water drain from the storage tank completely. This step ensures that you can work on the tank safely.
- Disconnect the tank: Disconnect the RO storage tank from the RO system. This may involve shutting off the water inlet valve to the tank and detaching any tubing.
- Inspect the bladder: Carefully inspect the bladder inside the tank. If you notice any visible damage, such as ruptures, cracks, or leaks, the bladder is compromised and needs replacement.
- Replace the RO storage tank: If the bladder is damaged, it’s often best to replace the entire RO storage tank. Ensure that the replacement tank is compatible with your RO system model.
- Reconnect and test: Once you’ve replaced the tank, reconnect it to the RO system and turn the water supply back on. Monitor the tank filling process to ensure it operates correctly.
Step 5: Worn out flow restrictor in drain line
A worn-out or malfunctioning flow restrictor in the drain line can disrupt the operation of your RO system, leading to continuous drainage. To address this issue, follow these steps:
- Locate the flow restrictor: The flow restrictor is typically installed in the drain line of the RO system. It helps maintain the correct pressure and flow rate in the system.
- Turn off the water supply: Before working on the flow restrictor, turn off the water supply to the RO system to prevent water flow.
- Disconnect the drain line: Carefully disconnect the drain line where the flow restrictor is located. Be prepared for some water drainage when you do this.
- Inspect the flow restrictor: Examine the flow restrictor for signs of wear, damage, or blockage. Over time, mineral buildup or wear can affect its performance.
- Replace the flow restrictor: If the flow restrictor appears worn out, damaged, or blocked, it’s essential to replace it with a new one. Ensure that the replacement flow restrictor matches the membrane’s capacity.
- Reconnect and test: Reattach the drain line to the system and turn the water supply back on. Monitor the system to ensure it operates correctly, with the flow restrictor helping maintain the proper pressure and flow rate.
Additional information
Thanks for reading! We hope this guide has helped you successfully navigate the troubleshooting process for your reverse osmosis filter system as you fix the issue with draining continuously.
If you need any replacement parts for your appliances, you can enter your model number at AppliancePartsPros.com to locate and order them quickly. Most orders arrive in just two business days, and we have tons of great information in our repair help section and YouTube videos to help you troubleshoot.
Stay connected with the latest DIY tips, tutorial videos, and repair guides by following us on Facebook, Instagram, and Twitter. We love hearing about your repair stories and successes. If you need more help or want personalized guidance, feel free to reach out. We’re ready to help you take on your next project with confidence!
 https://www.appliancepartspros.com/b/wp-content/uploads/2023/03/224_refrigerator-door-shelf-bar-replacement-the_top.png
640
1536
APP Expert
https://www.appliancepartspros.com/b/wp-content/uploads/2020/11/app-logo-std.png
APP Expert2023-03-06 13:53:402026-01-26 08:27:05Refrigerator Door Shelf Bar Replacement: The Ultimate Guide for DIYers
https://www.appliancepartspros.com/b/wp-content/uploads/2023/03/224_refrigerator-door-shelf-bar-replacement-the_top.png
640
1536
APP Expert
https://www.appliancepartspros.com/b/wp-content/uploads/2020/11/app-logo-std.png
APP Expert2023-03-06 13:53:402026-01-26 08:27:05Refrigerator Door Shelf Bar Replacement: The Ultimate Guide for DIYers https://www.appliancepartspros.com/b/wp-content/uploads/2023/02/222_fridge-filters-a-master-guide-to-all-you-need-to_top.png
640
1536
APP Expert
https://www.appliancepartspros.com/b/wp-content/uploads/2020/11/app-logo-std.png
APP Expert2023-02-28 12:17:392026-01-26 08:57:03Fridge Filters: A Master Guide to All You Need to Know
https://www.appliancepartspros.com/b/wp-content/uploads/2023/02/222_fridge-filters-a-master-guide-to-all-you-need-to_top.png
640
1536
APP Expert
https://www.appliancepartspros.com/b/wp-content/uploads/2020/11/app-logo-std.png
APP Expert2023-02-28 12:17:392026-01-26 08:57:03Fridge Filters: A Master Guide to All You Need to Know https://www.appliancepartspros.com/b/wp-content/uploads/2023/02/ChatGPT-Image-Jan-26-2026-12_32_23-PM.png
1024
1536
APP Expert
https://www.appliancepartspros.com/b/wp-content/uploads/2020/11/app-logo-std.png
APP Expert2023-02-27 13:52:162026-01-26 09:42:00Dryer Drum Belt Replacement: A Step-by-Step Guide to Fixing Your Dryer
https://www.appliancepartspros.com/b/wp-content/uploads/2023/02/ChatGPT-Image-Jan-26-2026-12_32_23-PM.png
1024
1536
APP Expert
https://www.appliancepartspros.com/b/wp-content/uploads/2020/11/app-logo-std.png
APP Expert2023-02-27 13:52:162026-01-26 09:42:00Dryer Drum Belt Replacement: A Step-by-Step Guide to Fixing Your DryerWith nearly a decade of experience in providing top-notch customer service regarding appliance parts and repair, Steven enjoys sharing practical advice, troubleshooting tips, and interesting information to help readers stay informed.