Whirlpool Dishwasher Upper Rail Roller WP8575897 Install Tips
Steven E / Wednesday June 18, 2025
Are you tired of dealing with a stubborn upper dish rack in your Whirlpool dishwasher that won’t glide smoothly or keeps falling off? Don’t let a worn-out rail roller ruin your kitchen routine any longer! Our simple guide and step-by-step video just below will help you replace the faulty roller in no time, restoring your dish rack to perfect, effortless sliding.
Looking for the right part? Enter your appliance model number below to find the exact match and get your appliance running like new again!
If the upper dish rack on your Whirlpool dishwasher isn’t sliding smoothly or keeps falling off the track, a worn out rail roller could be the cause. Part number WP8575897 helps the rack glide in and out properly, and when it’s damaged or broken, loading and unloading dishes can get frustrating fast. The good news is that replacing the roller is a quick and easy repair you can do yourself. In this guide, we’ll show you how to swap out the old roller and get your dish rack rolling like new again. Let’s get started!

Watch here: How to replace upper dish rack rail roller in a dishwasher
The information in this article may not apply to your specific appliance model. We recommend consulting your manufacturer’s documentation or contact us with any questions.
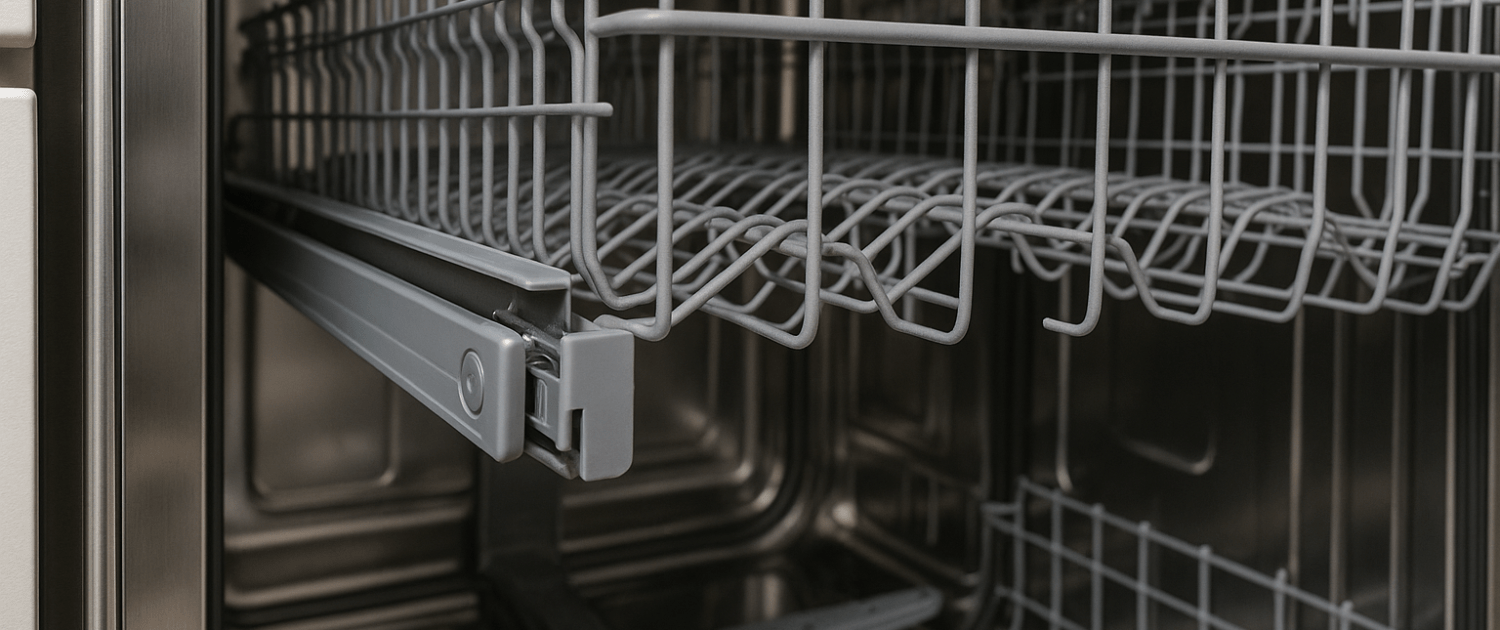
What’s the Upper Rail Roller?
The upper rail roller is the part that helps your top dish rack slide in and out smoothly. If it’s broken or worn out, you might notice the rack getting stuck, sagging, or wobbling around.
Tools and materials needed
Before diving into directly replacing your dishwasher’s upper dish rack rail roller, let’s run through the preparation steps:
- Upper dish rack rail roller WP8575897 – Take your model number to AppliancePartsPros.com to locate the correct part for your unit.
- Flat head screwdriver
- 3/16-inch nut driver
Safety first
When working on any appliance, remember to keep safety first. Here are some tips to keep in mind:
- Always power off and unplug your appliance or switch off the circuit breaker before you attempt any maintenance or replacement work. This keeps you safe by preventing any risk of electric shock.
- If the appliance has recently been used, give it plenty of time to cool down before working on it.
- Take your time while working to prevent accidents and personal injuries. Rushing is the enemy of precision.
- Work in a well-lit area so you can clearly see and access appliance parts.
- Keep your workspace free of clutter and other obstacles. Keep children and pets away from the work area.
- Check the user manual to see if there are specific installation or safety instructions related to your appliance or replacement part.
- Be gentle when handling or removing parts. Excessive force might damage the appliance or cause personal injury.
- Wear insulated work gloves to protect your hands from sharp metal parts and debris.
- Consider wearing safety glasses and/or a dust mask when working with chemicals, dust or a large amount of debris to prevent irritation or injury.
Replacement Steps
Make sure your dishwasher is unplugged or that the circuit breaker is turned off before you begin. You don’t want to risk an electric shock while working.
Step 1: Open the Dishwasher and Remove the Upper Rack
- Open the dishwasher door fully so you can access the upper dish rack.
- Slide the upper rack all the way out until it stops.
- At the end of each rail, you’ll see end caps—those keep the rack from sliding out.
- To remove an end cap, locate the button or tab in the middle of the cap.
- Press in on the button, then gently press the end cap inward toward the center of the dishwasher. It should pop out.
- Repeat this process on the other side.
- Lift the rack out and set it aside.
Step 2: Remove the Old Roller Assembly
- You’ll now see four sets of rollers inside the dishwasher—two in front, two in back.
- If you’re changing a front roller, it’s super easy, just remove the screws holding it in place with your 3/16-inch nut driver.
- Slide the roller off the rail.
- If you’re changing a rear roller, it takes one extra step, use a flathead screwdriver to press in the locking tab on the rear end cap and lift it off.
- Once that’s off, you’ll have room to reach the roller.
- Use your 3/16-inch nut driver to remove the screws and slide the roller off the rail.
Step 3: Install the New Roller
- Grab your new roller and line it up with the rail.
- Slide the rail through the roller’s center and position it exactly where the old one was.
- Use your nut driver to screw it back into place.
- Reinstall the rear end cap by lining it up and snapping it back into place.
Step 4: Reinstall the Upper Dish Rack
- Bring the upper rack back to the dishwasher.
- Line up the rack wheels with the rails on both sides.
- Slide the rack back in gently, making sure the wheels are riding inside the tracks.
- Pull the rack forward just a bit so you can reinstall the end caps.
Step 5: Reinstall the End Caps
- Line up the tabs on the end caps with the cutouts on the rails.
- Press them into place until they click and lock in.
- Repeat for the other side.
Step 6: Wrap It Up
- Slide the upper rack back in completely.
- Close the dishwasher door.
- Plug the unit back in or turn the breaker back on.
- Run a quick cycle to make sure everything is working smoothly and that the rack glides like new.
More information
Thanks for reading! We hope this guide helped you replace the upper dish rack rail roller in your Whirlpool dishwasher.
If you still need some replacement parts, grab your model number and head over to AppliancePartsPros.com. We offer over two million parts and most orders arrive in two business days. If you need some help with finding the right part or placing an order, you can contact our team at 1 (877) 477-7278.
While you’re waiting for your new part to arrive, you can explore our DIY blog and watch thousands of video tutorials on our YouTube channel.
Be sure to follow us on Facebook, Twitter and Instagram to see our latest repair guides!
- Disconnect power before you start — unplug it or switch off the breaker, and confirm it’s dead.
- Follow your local electrical code.
- Anything involving household wiring, outlets, or the breaker panel itself is licensed-electrician territory.
 https://www.appliancepartspros.com/b/wp-content/uploads/2026/05/20250617_1304_Cozy-U-Shaped-Kitchen_simple_compose_01jxzdg9v3fstrryxrppkmhahb.png
1024
1536
Steven E
https://www.appliancepartspros.com/b/wp-content/uploads/2020/11/app-logo-std.png
Steven E2026-05-14 07:52:532026-07-14 13:09:50How the Water Inlet Valve Works in Your Dishwasher (And How to Tell When It’s Failing)
https://www.appliancepartspros.com/b/wp-content/uploads/2026/05/20250617_1304_Cozy-U-Shaped-Kitchen_simple_compose_01jxzdg9v3fstrryxrppkmhahb.png
1024
1536
Steven E
https://www.appliancepartspros.com/b/wp-content/uploads/2020/11/app-logo-std.png
Steven E2026-05-14 07:52:532026-07-14 13:09:50How the Water Inlet Valve Works in Your Dishwasher (And How to Tell When It’s Failing) https://www.appliancepartspros.com/b/wp-content/uploads/2026/04/20250617_1308_Cozy-U-Shaped-Kitchen_simple_compose_01jxzdp5b7fwcva6p69cjrht40.png
1024
1536
Steven E
https://www.appliancepartspros.com/b/wp-content/uploads/2020/11/app-logo-std.png
Steven E2026-04-24 12:25:132026-07-14 13:09:41How to Replace the Water Inlet Valve on Your Dishwasher
https://www.appliancepartspros.com/b/wp-content/uploads/2026/04/20250617_1308_Cozy-U-Shaped-Kitchen_simple_compose_01jxzdp5b7fwcva6p69cjrht40.png
1024
1536
Steven E
https://www.appliancepartspros.com/b/wp-content/uploads/2020/11/app-logo-std.png
Steven E2026-04-24 12:25:132026-07-14 13:09:41How to Replace the Water Inlet Valve on Your Dishwasher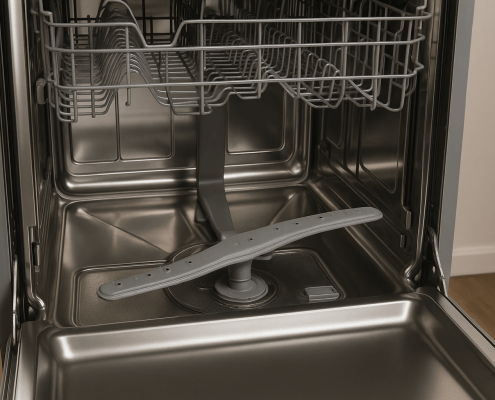 https://www.appliancepartspros.com/b/wp-content/uploads/2025/06/20250618_1135_Open-Dishwasher-Interior_simple_compose_01jy1tspt8frxbw1s0kphty34n.png
1024
1536
Steven E
https://www.appliancepartspros.com/b/wp-content/uploads/2020/11/app-logo-std.png
Steven E2025-06-19 06:08:512026-07-14 12:42:37Whirlpool Dishwasher Lower Spray Arm W10803178 Install Guide
https://www.appliancepartspros.com/b/wp-content/uploads/2025/06/20250618_1135_Open-Dishwasher-Interior_simple_compose_01jy1tspt8frxbw1s0kphty34n.png
1024
1536
Steven E
https://www.appliancepartspros.com/b/wp-content/uploads/2020/11/app-logo-std.png
Steven E2025-06-19 06:08:512026-07-14 12:42:37Whirlpool Dishwasher Lower Spray Arm W10803178 Install GuideWith nearly a decade of experience in providing top-notch customer service regarding appliance parts and repair, Steven enjoys sharing practical advice, troubleshooting tips, and interesting information to help readers stay informed.