How To Deep Clean Your Refrigerator
APP Expert / Monday March 28, 2022
Is your fridge bursting at the seams and causing you to dread the thought of sorting through its contents? If clutter and grime are taking over your refrigerator, it’s time to reclaim your space with our easy, step-by-step fridge cleaning guide. Dive in to see how our quick how-to video can transform your fridge into a spotless and organized champion of freshness!
Need to fix an appliance problem to make your fridge run smoothly? Search below using your specific appliance model number to identify the exact part needed:
Does the thought of sorting through what’s lurking behind your refrigerator door send you running? If you keep opting for take out instead of cracking that freezer door open, it’s probably time to do a deep clean. Thankfully, while it might seem like a tedious task, refrigerators are not all that hard to clean, and it’ll become easier to keep in order once you know what you’re doing.
Today, we’re walking you through a refrigerator deep clean routine and offering some serious grime-busting tips. With our guide, you can get your refrigerator sparkling clean in about an hour. Ready? Grab your cleaning supplies and let’s go!

What You’ll Need
You don’t need that much to get your refrigerator clean, but having the following items on hand before you start can make it go a whole lot faster:
- Coolers with ice and enough room to store any food that may spoil if left out
- Rubber gloves – wear them, you’ll thank us
- Sponges and rags or paper towels
- An old toothbrush
- A few microfiber cloths
- A vacuum cleaner or shop vac with hose attachments
- Optionally, a condenser coil brush
- A towel to lay down to catch any spills
- A few cleaning agents…
What cleaners should I use on my refrigerator?
- Use cleaning agents that are food safe. Unscented dish soap, vinegar, or baking soda (though not vinegar and baking soda combined, as that creates a neutral salt water solution) should be enough to get your refrigerator sparkling clean.
- You can use a multipurpose cleaner on the interior, too, and you may want to use a stainless steel cleaner on the exterior if that’s the finish your fridge has.
- When in doubt, err unscented. Foods absorb odors, and you don’t want your meats, veggies, and leftovers tasting like floral soaps.
- Take care when using bleach. Read the labels on any cleaning agent you use, whether it’s bleach, ammonia, or just a multipurpose cleaner. Some chemical combinations are extremely dangerous, and even the most harmless-seeming soaps can discolor or cloud certain materials and finishes if used incorrectly!
- If you’re handling bleach or ammonia, wear gloves.
- One tablespoon of bleach dissolved in one gallon of water should suit your needs for disinfecting.
- If you’re using a magic eraser style sponge, be sure to test it out on a small patch of whatever material you’re cleaning as it can discolor or potentially damage certain surfaces.
A Step-By-Step Guide To Cleaning Your Refrigerator
1. Consider unplugging your refrigerator
Before you begin, you may want to unplug your refrigerator. This isn’t necessarily a safety concern. Rather, by unplugging your fridge before you start, you won’t waste as much electricity. If you’d rather keep it plugged in, make sure to close the refrigerator each time you’re not in it.
2. Empty your fridge
In order to get your refrigerator really clean, you’re going to have to empty it out completely. Not only will clearing your fridge out beforehand make cleaning everything easier, you’ll also familiarize yourself with what you have on hand.
- Put things that need to be temperature controlled, like milk and medications, in a cooler with ice. Some foods can simply be left on the counter while you work, but don’t let anything sit out for more than two hours, particularly if it’s a warm day.
- As you work, toss, compost, or recycle extremely expired foods and old leftovers. Make note of the things that are still good but expiring soon, too – you’ll want to move those to the front of your fridge when you put everything back together again.
- Whether you use ice cube trays or an icemaker, check the ice to see if it looks like it’s sublimated. If it’s old, the ice will have shrunk up. Old ice tastes a little too funky to be good in drinks or smoothies, but it can still be used to help keep a cooler cold while you work!
3. Prep and clean removable bins and shelves
Time to get to the actual cleaning. Start by removing all bins and shelves. Take care if you have glass shelving, as it can shatter if dropped or knocked too hard.
- Let your glass shelves and plastic bins come to room temperature before cleaning them. A sudden change in temperature, such as being submerged in warm water while ice cold, will cause certain materials to crack. This is less of a concern with plastics, but may still happen.
- Make sure to turn those bins and door shelves upside down over the trash to shake out any crumbs or loose gunk.
- Your bins and shelving can be cleaned with dish soap, a sponge, and warm water. Be sure to rinse them thoroughly before calling the job done.
- Clean your ice bucket, too, if you have an ice maker! In most modern refrigerators, the ice bucket can be removed by releasing a locking tab.
- Let them dry completely before replacing them. While you wait for that, you can move on to the next step…
4. Clean your fridge’s interior
It’s time to clean the walls, floors, ceilings, and doors of your refrigerator, as well as any shelves that couldn’t be removed with the bins and drawers.
- A damp sponge or rag can do the trick for most surfaces. Dish soap or a multipurpose appliance cleaner will do the trick here, but you can also employ vinegar if some of those stains are particularly bad.
- If you have any glass shelves that you couldn’t remove, a glass cleaner can be used to get them extra clean.
- Got stuck on crud? Wet a sponge or rag with water that’s as hot as you can stand without being burned and press it to the grime. Hold it there for a few seconds and then gradually move the sponge back and forth. This should loosen up stubborn old splatters.
- If that’s not cutting it, make a paste using water and baking soda. This abrasive can be used to scrub away at stains and grime, and applying and scrubbing with a cleaning toothbrush can help
- Wipe down everything thoroughly with a clean, wet rag to rinse, and then dry with a microfiber cloth. Make sure you don’t leave any soapy residue behind, as it will get sticky.
5. Clean the freezer
For the most part, cleaning your freezer compartment is the same as cleaning the interior of your fresh food compartment. Just repeat the above steps, and you should be fine.
- A lot of icy build up in your freezer is a sign that something’s wrong. Depending on where the ice is, it could be that a water line from your ice maker is leaking or a component of the defrost assembly is faulty.
- Want some more help with a frosty freezer? Check out our guide to dealing with a lot of frosty build up in the frozen food compartment.
6. Time for some maintenance
With your fridge empty and clean, it’s time for a bit of maintenance. Here’s what we suggest:
- First of all, at this point, if you haven’t done so already, unplug your refrigerator. Some of these tasks will require interacting with parts that could harm you if the appliance is receiving power.
- Next, check the water filter and replace it if necessary. You should change your refrigerator’s water filter every six months or so. Letting it go over isn’t such a big deal, but it can lead to foul tasting and smelling ice and water if left alone. Leave an old water filter in long enough, and it could cause clogs that will damage the refrigerator’s components.
- If your house has hard water or you use your water dispenser frequently, you may want to consider replacing it more often than twice a year.
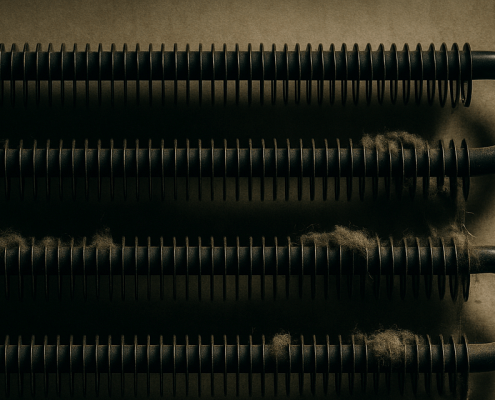
- Carefully clean the condenser coils and the area around them on the back of the refrigerator with a condenser brush and vacuum. You can do this once or twice a year to make your refrigerator run more efficiently and potentially lower your electric bill!
- Check your refrigerator’s water lines, especially if you’re getting a mildewy smell even after you’ve cleaned everything. If there’s any growth, the line should probably be replaced.
- Wipe down the door gaskets for both the freezer and fresh food compartments. You can use dish soap and water on this, but if you notice any mold growth, use vinegar, instead. Rinse and dry the door seals thoroughly with a microfiber cloth or rag once you’re done.
7. Refill your fridge!
It’s time to put everything back. Start with all of your shelves and bins, then you can move onto food. Check everything as you put it back. The more organized your fridge is, the less you and your family are to waste food.
Consider these tips:
- New stuff in the back. If you’ve got two cartons of milk, put the newer carton behind the older one, so the older one gets used first.
- Put things that are expiring soon as close to eye level as possible. If they’re right there when you open the fridge, you’re more likely to use them.
- Add baking soda or activated charcoal to fight bad smells. You can put this in the very back of your fresh food compartment.
- Line your meat and veggie drawers with tea towels or paper towels. These will catch any liquid that seeps out as meat thaws and veggies age. It makes cleaning the bins a bit easier later.
- Learn how to get the most out of your crisper drawer. If you use it correctly, your veggies can stay fresher longer, leading to less waste and mess.
- Keep meats either in the meat drawer or on the lowest shelf. As they defrost, they tend to leak, making messes. Keeping them separate and low in the fridge reduces the risk of cross-contamination with other foods.
- Don’t overfill anything. You’ll risk breaking shelves and bins by overstuffing them. While having a full freezer can be beneficial, an overly full fresh food compartment will be less efficient about airflow.
8. Clean the exterior
You’re just about done! Time to clean the exterior, front panel, handles, and all.
- A damp microfiber cloth should be enough for most surfaces. If you have a stainless steel finish on your fridge, avoid leaving streaks behind when you clean by following the direction of the grain – no circular motions when you clean!
- Don’t forget the handle. This thing can get particularly grimy, so a little elbow grease may be needed. Just don’t put too much weight on it, you could break one of the mounting points.
- If you have a water dispenser, wipe this down, too.
- You can remove the bottom tray to more easily clean those nooks and crannies. This is a good time to use that toothbrush.
- If your dispenser has any build up like calcium deposits, you can wrap it in a warm vinegar-and-water soaked rag to try and break some of it up. That old toothbrush can be used to scrub it away once the vinegar has loosened it up.
A Few Final Cleaning Tips To Consider
Whether you’re a seasoned scourer or new to this cleaning business, we hope you’ve found some advice that’ll help you out as you clean your refrigerator. Before you go, here are a few final bits of cleaning advice:
- Clean your refrigerator seasonally – about every 3 months – and if your family is big on feasts, try to schedule it to fall right before you do your shopping for holiday meals. If your fridge is clean and organized beforehand, it’ll be easier to fit those big frozen birds and giant casserole dishes later.
- Make sure your condiments, jars, and containers are clean before putting them in your fridge. If you’re putting something sticky or stained in the refrigerator, it’s likely going to leave that mess on the fridge itself.
- While you work, check for damage. Examine the door gasket to see if it’s worn out or torn, check shelves and bins for cracks and breaks, and make sure everything’s working as it should. If your fridge is already cleared out for cleaning, it’s the perfect time to repair or replace any broken components, and AppliancePartsPros.com has the tips, tutorials, and parts you need to get the job done! Check out our blog and our YouTube channel for great DIY repair tutorials.
- And if you’re still on a cleaning spree, check out our 10 Tips to Clean Your Appliances.
Where To Find Us
If you need any replacement parts for your appliances, you can enter your model number at AppliancePartsPros.com to locate and order them quickly. Most orders arrive in just two business days, and we have tons of great information in our repair help section and YouTube videos to help you troubleshoot.
Stay connected with the latest DIY tips, tutorial videos, and repair guides by following us on Facebook, Instagram, and Twitter. We love hearing about your repair stories and successes. If you need more help or want personalized guidance, feel free to contact or call us at 877-477-7278. We’re ready to help you take on your next project with confidence!
Since 1999, AppliancePartsPros.com has helped millions of people repair their broken appliances by providing high-quality original parts at well below retail prices, free support and troubleshooting, and award-winning customer service from an expert, friendly, US-based customer support team!
 https://www.appliancepartspros.com/b/wp-content/uploads/2021/03/19_how-to-clean-refrigerator-coils-in-5-easy-steps_top.png
640
1536
Steven E
https://www.appliancepartspros.com/b/wp-content/uploads/2020/11/app-logo-std.png
Steven E2021-03-17 10:27:362026-01-15 12:04:51How To Clean Refrigerator Coils In 5 Easy Steps & Why To Do It
https://www.appliancepartspros.com/b/wp-content/uploads/2021/03/19_how-to-clean-refrigerator-coils-in-5-easy-steps_top.png
640
1536
Steven E
https://www.appliancepartspros.com/b/wp-content/uploads/2020/11/app-logo-std.png
Steven E2021-03-17 10:27:362026-01-15 12:04:51How To Clean Refrigerator Coils In 5 Easy Steps & Why To Do ItHi! I’m Matt H., and I’m thrilled to be your guide through the world of appliance repair with over 25 years of invaluable experience in the industry.
From the early days of my career, I have been deeply passionate about appliances and their inner workings. Over the years, I’ve seen it all – from vintage models to the latest cutting-edge technology – and I’ve dedicated myself to mastering the art of repair. With a toolbox in one hand and a wealth of knowledge in the other, I’ve tackled every challenge that has come my way, learning and growing with each repair.
Join me as we dive into the intricacies of appliance repair. From step-by-step repair guides to explanations of common problems and their solutions, I’ll be here to simplify the repair process and empower you with the knowledge you need to keep your appliances running smoothly.
Feel free to explore our blog, ask questions, and leave comments – this platform is a space for learning, sharing, and growing together. Let’s work together to ensure that your appliances continue to serve you for years to come.
Thank you for joining me on this journey, and I look forward to being your go-to resource for all things related to appliance repair!