How to Fix Frigidaire Front Load Washer Door Lock 131763202
Steven E / Wednesday June 18, 2025
Is your Frigidaire front load washer giving you trouble by not starting, pausing mid-cycle, or showing a door lock error? Don’t worry, the issue might be as simple as a malfunctioning door lock assembly, and we’ve got a step-by-step guide to help you fix it without breaking a sweat. Watch our how-to video below to learn how to replace the door lock assembly and get your washer back in action.
Looking for the right part? Enter your appliance model number below to find the exact match and get your appliance running like new again!
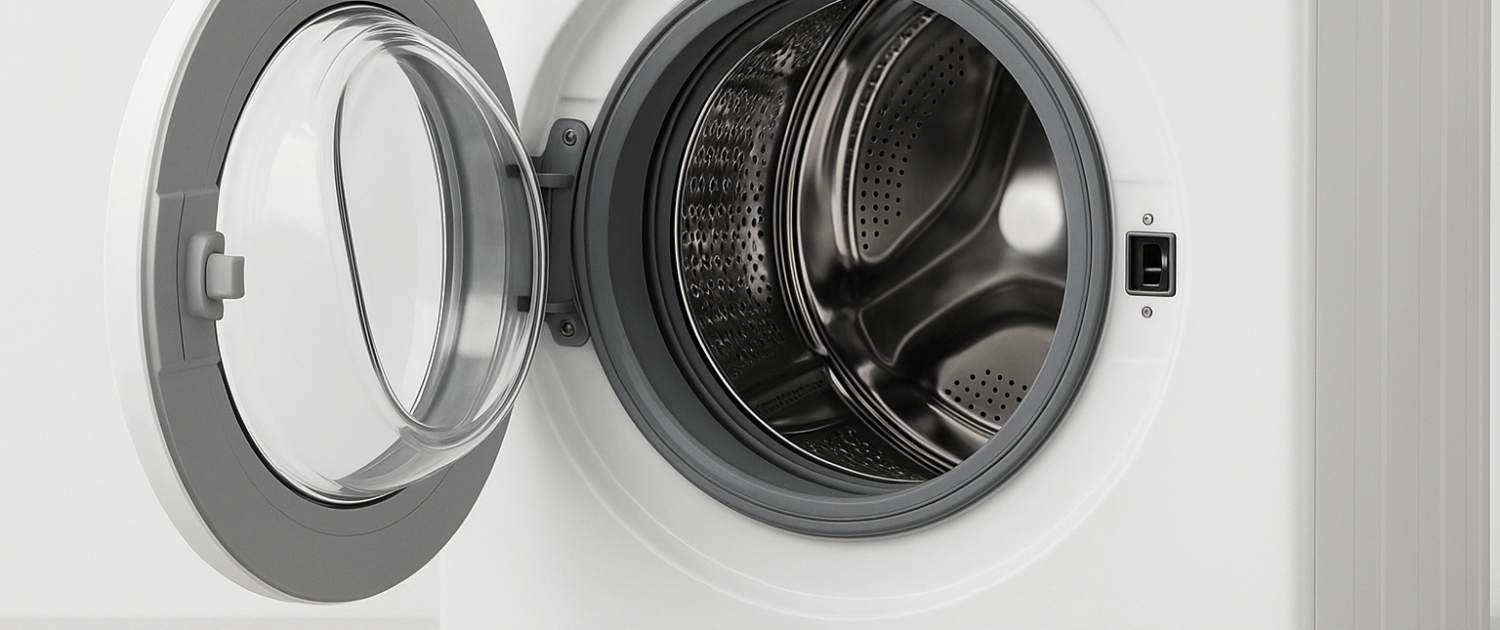
If your Frigidaire front load washer won’t start, keeps pausing mid-cycle, or shows a door lock error, the door lock assembly might be the problem. Part number 131763202 controls the locking mechanism that keeps the door shut during a wash. When it malfunctions, your washer may not run at all. The good news is that replacing the door lock assembly is a doable repair that just takes a bit of time and a screwdriver. In this guide, we’ll walk you through how to remove the old lock and install the new one so your washer works like it should. Let’s get started.

Watch here: How to replace a door lock assembly on a front load washer
The information in this article may not apply to your specific appliance model. We recommend consulting your manufacturer’s documentation or contact us with any questions.
Tools and Materials Needed
Gather the following tools and supplies before beginning this repair:
- Door lock assembly #131763202– Take your model number to AppliancePartsPros.com to locate the correct part for your unit.
- Philips head screwdriver
- Needle nose pliers (optional)
Safety First
When working on any appliance, always keep safety first to avoid personal injury or damage to the appliance or parts. Here are some safety tips to keep in mind:
- Always power off and unplug your appliance or switch off the circuit breaker before you attempt any maintenance or replacement work. This keeps you safe by preventing any risk of electric shock.
- If the appliance has recently been used, give it plenty of time to cool down before working on it.
- Take your time while working to prevent accidents and personal injuries. Rushing is the enemy of precision.
- Work in a well-lit area so you can clearly see and access appliance parts.
- Keep your workspace free of clutter and other obstacles. Keep children and pets away from the work area.
- Never work on internal parts with wet hands. Make sure the work area is completely dry.
- Check the user manual to see if there are specific installation or safety instructions related to your appliance or replacement part.
- Be gentle when handling or removing parts. Excessive force might damage the appliance or cause personal injury.
- Wear insulated work gloves to protect your hands from sharp metal parts and debris.
- When working with wires, avoid touching any exposed wires or terminals. If you need to touch a wire, use a non-conductive tool or wear insulating gloves to prevent electrical shock.
- Don’t test live voltage with a multimeter if you’re unfamiliar with how to prevent short-circuiting.
- Consider wearing safety glasses and/or a dust mask when working with chemicals, dust or a large amount of debris to prevent irritation or injury.
- Turn off the water supply at the outlet before beginning repairs. Keep towels ready to catch any residual water in the system when removing parts.
Replacement Steps
Step 1: Access the Door Lock Assembly Behind the Gasket
- Unplug the washer or turn off power at the circuit breaker to prevent electrical shock.
- Open the washer door fully to expose the rubber door gasket (also known as the door boot).
- Starting at the top of the door opening, gently pull up on the edge of the gasket to release it from the grooved retaining channel in the front panel.
- Carefully peel the gasket away from the panel just far enough to access the area behind it on the latch side.
Note: You do not need to remove the entire gasket—just enough to reach the door lock assembly.
Step 2: Remove the Existing Door Lock Assembly
- Use a Phillips screwdriver to remove the two screws located on the front of the washer that secure the door lock to the cabinet.
- Pull the loosened door gasket aside to access inside the cabinet.
- Reach through the opening and carefully pull out the door lock assembly from behind the front panel.
- Disconnect the wire harnesses attached to the door lock. These may include multiple connectors—press the release tabs and gently pull them free.
- Set the old door lock assembly aside.
Step 3: Install the New Door Lock Assembly
- Pull back the door seal again, if needed, for full access.
- Orient the new door lock assembly to match the shape and position of the old one.
- Reconnect the electrical wire harnesses to the corresponding terminals on the new lock. Ensure each connection clicks into place securely.
- Align the new door lock with the mounting holes inside the cabinet.
- While holding the assembly in place from behind, thread in and tighten the two Phillips screws from the front of the panel to secure the new part.
Step 4: Reinstall the Door Gasket and Test the Repair
- Carefully press the door gasket back into its retaining groove, starting at the bottom and working your way up toward the top.
- Be sure the gasket is seated evenly all around and is not twisted, pinched, or left with gaps, which could cause water to leak during operation.
- Close the washer door securely.
- Restore power to the washer by plugging it in or switching on the breaker.
- Run a short wash or rinse cycle to test the installation and confirm that the door locks properly and the machine operates as expected.
More information
Thanks for reading! We hope this guide helped you replace the door lock assembly in your Frigidaire front load washer.
If you still need some replacement parts, grab your model number and head over to AppliancePartsPros.com. We offer over two million parts and most orders arrive in two business days. If you need some help with finding the right part or placing an order, you can contact our team at 1 (877) 477-7278.
While you’re waiting for your new part to arrive, you can explore our DIY blog and watch thousands of video tutorials on our YouTube channel.
Be sure to follow us on Facebook, Twitter and Instagram to see our latest repair guides!
 https://www.appliancepartspros.com/b/wp-content/uploads/2025/04/APP-blog-square-98.jpg
1080
1080
Steven E
https://www.appliancepartspros.com/b/wp-content/uploads/2020/11/app-logo-std.png
Steven E2025-04-16 10:36:282025-04-16 10:36:37How to Determine Washer Outlet Box Height in Your Laundry Room
https://www.appliancepartspros.com/b/wp-content/uploads/2025/04/APP-blog-square-98.jpg
1080
1080
Steven E
https://www.appliancepartspros.com/b/wp-content/uploads/2020/11/app-logo-std.png
Steven E2025-04-16 10:36:282025-04-16 10:36:37How to Determine Washer Outlet Box Height in Your Laundry Room https://www.appliancepartspros.com/b/wp-content/uploads/2025/04/APP-blog-square-96.jpg
1080
1080
Steven E
https://www.appliancepartspros.com/b/wp-content/uploads/2020/11/app-logo-std.png
Steven E2025-04-16 08:32:202025-04-16 08:32:30How to Drain a Washing Machine With Standing Water
https://www.appliancepartspros.com/b/wp-content/uploads/2025/04/APP-blog-square-96.jpg
1080
1080
Steven E
https://www.appliancepartspros.com/b/wp-content/uploads/2020/11/app-logo-std.png
Steven E2025-04-16 08:32:202025-04-16 08:32:30How to Drain a Washing Machine With Standing Water https://www.appliancepartspros.com/b/wp-content/uploads/2025/04/APP-blog-square-95.jpg
1080
1080
Steven E
https://www.appliancepartspros.com/b/wp-content/uploads/2020/11/app-logo-std.png
Steven E2025-04-16 08:00:042025-04-16 08:00:12How to Fix Frozen Washing Machine Pipes
https://www.appliancepartspros.com/b/wp-content/uploads/2025/04/APP-blog-square-95.jpg
1080
1080
Steven E
https://www.appliancepartspros.com/b/wp-content/uploads/2020/11/app-logo-std.png
Steven E2025-04-16 08:00:042025-04-16 08:00:12How to Fix Frozen Washing Machine PipesWith nearly a decade of experience in providing top-notch customer service regarding appliance parts and repair, Steven enjoys sharing practical advice, troubleshooting tips, and interesting information to help readers stay informed.