How to Fix Low or No Pressure in Your Reverse Osmosis System
Steven E / Tuesday May 6, 2025
If your reverse osmosis (RO) system has low pressure or no water flow, don’t panic. This is one of the most common issues with reverse osmosis units, and the good news is it’s often easy to fix with a little DIY know-how.
We’ll help you troubleshoot your RO system step by step. You’ll learn the most likely causes for low water pressure or no water from your RO faucet and how to get everything flowing smoothly again.
If you find out that you need any replacement parts for your appliance while you’re troubleshooting, you can enter your model number at AppliancePartsPros.com to order them. Most orders arrive in just two business days, and we have thousands of free guides to show you how to install your new parts.
The information in this article may not apply to your specific appliance model. We recommend consulting your manufacturer’s documentation or contact us with any questions.

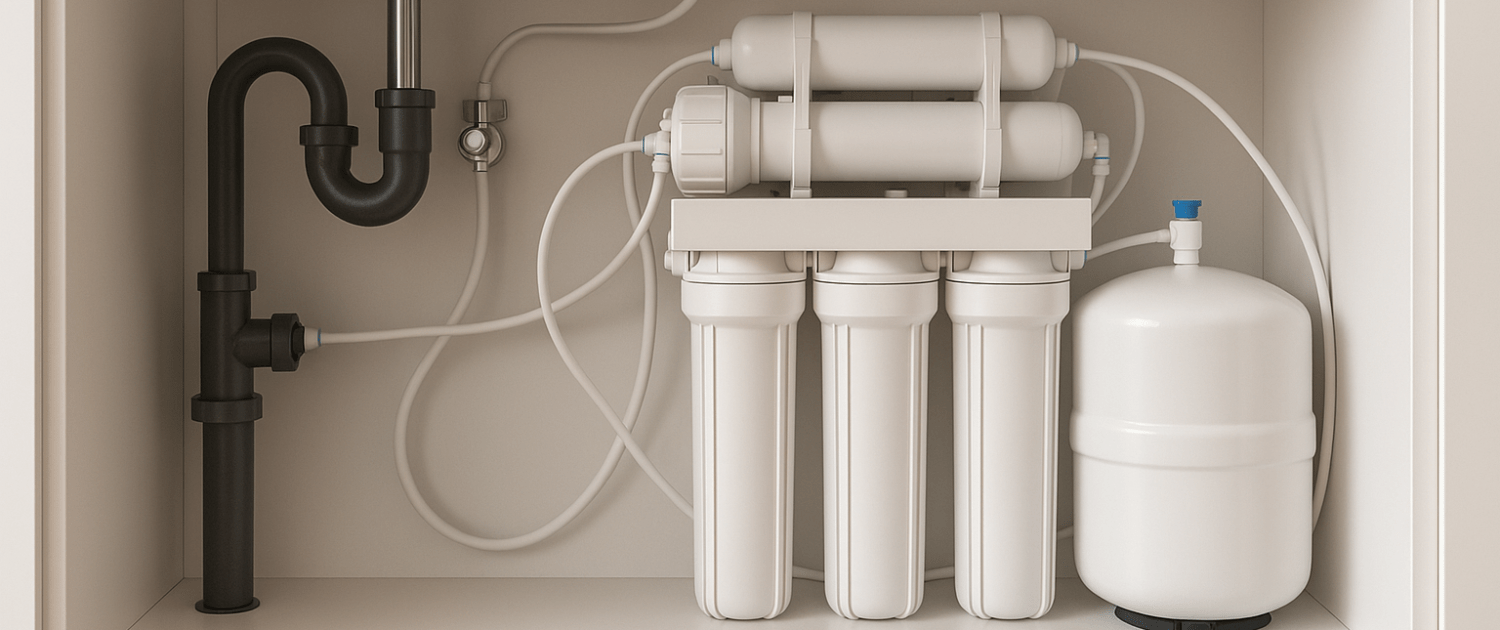
Step 1: Understand How Your RO System Works
Before you start unscrewing anything, it helps to understand how an RO system delivers water.
Here’s a super simple breakdown:
- Tap water enters the system and goes through pre-filters (sediment + carbon).
- It passes through the RO membrane, where the actual purification happens.
- Clean water flows into a pressurized storage tank.
- When you open your RO faucet, the water flows from the tank through a post-filter and out the tap.
If you have low flow or no water, something is blocking, slowing, or disrupting this cycle.
Step 2: Check the Tank Pressure
One of the most common causes of low flow from an RO system is improper pressure in the storage tank.
Inside the tank is a bladder filled with air. This air pressure helps push water out when you open the faucet. If the air pressure is too low (or too high), you’ll get weak or no water flow.
How to check it:
- Turn off the feed water to the RO system.
- Shut off the tank’s valve.
- Open the RO faucet to drain all the water from the tank.
- Once drained, use a tire pressure gauge to check the air valve (usually on the bottom of the tank, under a plastic cap).
- The pressure should be around 6–8 psi when the tank is empty.
If it’s too low, add air using a bicycle pump or small air compressor. If it’s too high, release air until it hits the right level.
Don’t skip this step, it’s easy and often the fix.
Step 3: Is the Tank Full or Empty?
Sometimes, you’re not getting water because the tank isn’t filling in the first place.
Here’s how to check:
- Gently lift the tank. If it’s very light, it’s likely empty.
- If it feels heavy, it could be full but not dispensing, again, often due to incorrect pressure.
If your tank is empty and not filling, the issue may be further upstream, such as the membrane, clogged filters, or a valve problem.
Step 4: Inspect the Feed Water Line and Valve
If your tank isn’t filling at all, check that water is reaching the system in the first place.
What to do:
- Locate the feed valve (usually a small saddle valve connected to your cold water line).
- Make sure it’s fully open.
- If it’s a self-piercing valve (a type that pokes a hole in the pipe), they can sometimes clog or fail. You might need to replace it with a ball valve.
Also check the tubing from the valve to the first filter. Kinks, debris, or blockages here will stop water from ever reaching the RO membrane.
Step 5: Replace Your Filters (If It’s Been a While)
Filters are the most overlooked cause of pressure problems in RO systems. Over time, sediment and carbon filters can become clogged with debris, reducing flow to a trickle.
How often to replace:
- Sediment filter: every 6–12 months
- Carbon pre-filter: every 6–12 months
- Carbon post-filter: every 6–12 months
- RO membrane: every 2–3 years
Signs it’s time:
- Slow water flow
- Filters look brown or dirty
- You haven’t changed them in over a year
Start with replacing the sediment and carbon pre-filters, as these are the most likely culprits for blocking water flow into the RO membrane.
Step 6: Check the RO Membrane
If your pre-filters are clean and the tank still isn’t filling, the issue could be with the RO membrane itself.
Signs the membrane is clogged or worn:
- Tank doesn’t fill
- TDS (total dissolved solids) level is high
- No water from the RO faucet
If your membrane is older than 2–3 years, or if you use hard water without a softener, it may be clogged or fouled.
To fix it:
- Replace the RO membrane with a new one (match your brand/model).
- Flush the system thoroughly afterward.
RO membranes are easy to replace and usually located in a cylindrical housing connected by clips or screws.
Step 7: Inspect the Flow Restrictor
The flow restrictor controls how fast wastewater exits the system. If it’s clogged or stuck, it can mess up pressure balance and reduce clean water flow.
Where to find it:
- It’s usually inside the drain line tubing or connected to the membrane housing.
- It may look like a small plastic or metal insert.
What to do:
- Remove and inspect the flow restrictor.
- Clean out debris or scale buildup.
- Replace if it looks damaged or blocked.
This part is tiny but plays a big role in keeping water flowing correctly through the system.
Step 8: Look for Kinks or Airlocks in the Tubing
Low water pressure could also be caused by something as simple as a kinked tube or an airlock.
Walk through your system and look for:
- Crimped or bent tubing
- Loose push fittings
- Air bubbles in clear tubing
Straighten out any tight bends, re-seat fittings, and run a few gallons of water through the system to flush out air.
Step 9: Check the Auto Shut-Off Valve (ASO)
The auto shut-off valve is a small square or round piece, usually mounted on the RO bracket. It senses when the tank is full and stops water from going to the membrane.
If this valve fails or gets stuck, it may prevent the tank from filling, even when it’s empty.
How to test:
- Shut off the tank valve.
- Open the RO faucet.
- Listen for water running through the system.
- Then turn the tank valve back on. If the water flow doesn’t stop when the tank is full, your ASO may be stuck.
You can buy a replacement ASO valve for under $20 and swap it out yourself in a few minutes.
Step 10: Flush the System
After replacing filters, membranes, or valves, it’s important to flush your RO system thoroughly before using it.
How to flush:
- Open the feed water valve.
- Open the RO faucet.
- Let the system run until the storage tank is empty.
- Close the faucet and let the tank refill.
- Repeat 1–2 times for best results.
This clears out air, debris, and any leftover carbon dust or cleaning solution.
Still No Water? Here’s What Else to Check
If you’ve gone through all the steps above and still have no water, here are a few less-common culprits:
Clogged RO Faucet
- Remove the spout and aerator and check for debris or calcium deposits.
Check Valves in Wrong Position
- If you recently reinstalled your system or changed filters, double-check the direction of flow on check valves and fittings.
Air Gap Drain Backflow
- Some RO systems use an air gap faucet that can clog with gunk. Clean out the air gap port under the faucet or tubing to prevent pressure buildup.
Additional information
Thanks for reading! If you need replacement parts for any of your appliances, check out AppliancePartsPros.com, where you can enter your model number to find exactly what you’re looking for. Most orders arrive in two business days, and we have thousands of free resources to show you how to install your new parts.
You can also reach our award-winning customer service team at 1-877-477-7278, chat with a pro on our website and watch thousands of free video tutorials on our YouTube channel.
 https://www.appliancepartspros.com/b/wp-content/uploads/2025/05/20250522_1036_Farmhouse-Laundry-Morning_simple_compose_01jvw6myt0evjvwmpyr6scj75v.png
1024
1536
Steven E
https://www.appliancepartspros.com/b/wp-content/uploads/2020/11/app-logo-std.png
Steven E2025-05-29 08:04:472025-05-29 08:04:58How to Test and Replace a Samsung Dryer Drum Roller
https://www.appliancepartspros.com/b/wp-content/uploads/2025/05/20250522_1036_Farmhouse-Laundry-Morning_simple_compose_01jvw6myt0evjvwmpyr6scj75v.png
1024
1536
Steven E
https://www.appliancepartspros.com/b/wp-content/uploads/2020/11/app-logo-std.png
Steven E2025-05-29 08:04:472025-05-29 08:04:58How to Test and Replace a Samsung Dryer Drum Roller https://www.appliancepartspros.com/b/wp-content/uploads/2025/05/20250421_1326_Modern-Earth-Toned-Laundry_simple_compose_01jscp4ezze289p0v71ntybn00.png
1024
1536
Steven E
https://www.appliancepartspros.com/b/wp-content/uploads/2020/11/app-logo-std.png
Steven E2025-05-29 07:58:182025-05-29 07:58:29How to Test and Replace the Idler Pulley on a Samsung Dryer
https://www.appliancepartspros.com/b/wp-content/uploads/2025/05/20250421_1326_Modern-Earth-Toned-Laundry_simple_compose_01jscp4ezze289p0v71ntybn00.png
1024
1536
Steven E
https://www.appliancepartspros.com/b/wp-content/uploads/2020/11/app-logo-std.png
Steven E2025-05-29 07:58:182025-05-29 07:58:29How to Test and Replace the Idler Pulley on a Samsung Dryer https://www.appliancepartspros.com/b/wp-content/uploads/2025/05/20250424_0847_Modern-Laundry-Space_simple_compose_01jskx9c5rev7aqdre2g4hh9jy.png
1024
1536
Steven E
https://www.appliancepartspros.com/b/wp-content/uploads/2020/11/app-logo-std.png
Steven E2025-05-29 07:45:312025-05-29 07:45:40How to Test and Replace the Thermal Limiter on a Samsung Dryer
https://www.appliancepartspros.com/b/wp-content/uploads/2025/05/20250424_0847_Modern-Laundry-Space_simple_compose_01jskx9c5rev7aqdre2g4hh9jy.png
1024
1536
Steven E
https://www.appliancepartspros.com/b/wp-content/uploads/2020/11/app-logo-std.png
Steven E2025-05-29 07:45:312025-05-29 07:45:40How to Test and Replace the Thermal Limiter on a Samsung DryerWith nearly a decade of experience in providing top-notch customer service regarding appliance parts and repair, Steven enjoys sharing practical advice, troubleshooting tips, and interesting information to help readers stay informed.