How to Install Whirlpool Freezer Door Gasket WPW10436253
Steven E / Wednesday June 18, 2025
Is your freezer not working as efficiently as it should? A leaky or worn-out door gasket might be the culprit, causing temperature imbalances and frost build-up. Fortunately, replacing the gasket is easier than you think, and our step-by-step video guide below shows you how to tackle this simple DIY fix, saving both energy and money.
Looking for the right part? Enter your appliance model number below to find the exact match and get your appliance running like new again!
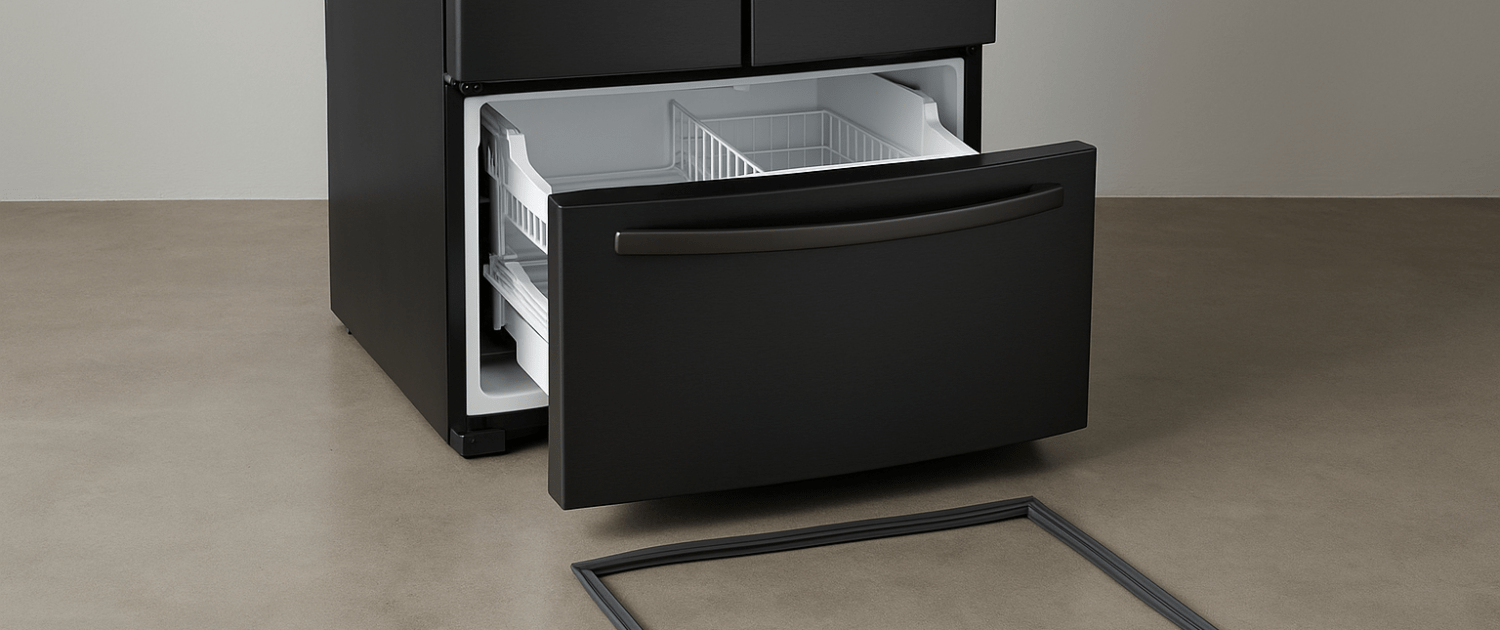
Noticing frost buildup or your freezer running more than usual? A worn out or leaky freezer door gasket could be the reason. This flexible seal, part WPW10436253, helps keep cold air in and warm air out so your freezer runs efficiently. If the gasket is cracked, stiff, or not sealing properly, it’s time for a replacement. The good news is that swapping it out is a simple DIY fix that can make a big difference in performance and energy use. In this guide, we’ll walk you through how to replace the gasket step by step. Let’s get started!

Watch here: How to replace a freezer door gasket in a refrigerator
The information in this article may not apply to your specific appliance model. We recommend consulting your manufacturer’s documentation or contact us with any questions.
Tools and materials
Gather the following tools and parts before starting this repair:
- Freezer door gasket part #WPW10436253– Take your model number to AppliancePartsPros.com to locate the correct part for your unit.
- Heat gun or hair dryer
- Clean rag
Safety first
When working on any appliance, remember to keep safety first. Here are some tips to keep in mind:
- Always power off and unplug your appliance or switch off the circuit breaker before you attempt any maintenance or replacement work. This keeps you safe by preventing any risk of electric shock.
- Take your time while working to prevent accidents and personal injuries. Rushing is the enemy of precision.
- Work in a well-lit area so you can clearly see and access appliance parts.
- Keep your workspace free of clutter and other obstacles. Keep children and pets away from the work area.
- Check the user manual to see if there are specific installation or safety instructions related to your appliance or replacement part.
- Be gentle when handling or removing parts. Excessive force might damage the appliance or cause personal injury.
- Wear insulated work gloves to protect your hands from sharp metal parts and debris.
- Consider wearing safety glasses and/or a dust mask when working with chemicals, dust or a large amount of debris to prevent irritation or injury.
Replacement Steps
- Unplug the refrigerator or turn off the circuit breaker to prevent electric shock.
- Open the freezer door fully to access the gasket.
- The gasket is secured by being pressed into a retaining channel around the perimeter of the door.
- Starting at one corner, gently pull the gasket out of the channel.
- Once one section is released, continue pulling around the door until the entire gasket is removed.
- Remove the old gasket from the door completely and set it aside.
- Unpack the new freezer door gasket.
- Gaskets can arrive folded or kinked from shipping. To restore its shape:
- Lay the gasket out in a warm room for several hours.
- OR place it in hot water for 10–15 minutes to soften the material.
- OR use a hair dryer on low heat to gently warm and relax the creases.
- Refer to the manufacturer’s instruction sheet, included in the packaging, for any model-specific notes.
- Begin by aligning one corner of the new gasket with the top corner of the freezer door.
- Stretch the gasket over the edges of the door, fitting the gasket lip into the retaining channel.
- Work your way around the entire perimeter of the door, pressing the rib firmly into the channel as you go.
- Ensure the gasket is fully seated and evenly installed all the way around.
- Once the gasket is in place, check for any remaining creases or gaps.
- Use a hair dryer on low heat to gently warm the gasket and help it conform to the door shape.
- Keep the dryer a few inches away from the rubber to avoid melting it.
- Lightly massage or press the gasket into place as it softens.
- Once the gasket is smooth and sealed, proceed to the final steps.
- Close the freezer door and inspect the seal.
- The door should close easily, and there should be no visible gaps between the gasket and the frame.
- Plug the refrigerator back in or restore power at the breaker.
- Let the unit cool and monitor over the next few hours to ensure proper sealing and performance.
More information
Thanks for reading! We hope this guide helped you replace the freezer door gasket in your Whrilpool refrigerator.
If you still need some replacement parts, grab your model number and head over to AppliancePartsPros.com. We offer over two million parts and most orders arrive in two business days. If you need some help with finding the right part or placing an order, you can contact our team at 1 (877) 477-7278.
While you’re waiting for your new part to arrive, you can explore our DIY blog and watch thousands of video tutorials on our YouTube channel.
Be sure to follow us on Facebook, Twitter and Instagram to see our latest repair guides!
 https://www.appliancepartspros.com/b/wp-content/uploads/2024/04/Copy-of-Copy-of-Copy-of-Copy-of-Copy-of-Copy-of-Copy-of-Copy-of-Copy-of-Copy-of-Copy-of-Copy-of-Copy-of-Copy-of-IMAGE-TEMPLATE-FOR-BLOG-5.jpg
1080
1920
Steven E
https://www.appliancepartspros.com/b/wp-content/uploads/2020/11/app-logo-std.png
Steven E2024-04-23 13:41:042025-07-30 10:37:48How to replace Samsung refrigerator evaporator fan motor DA97-12815B
https://www.appliancepartspros.com/b/wp-content/uploads/2024/04/Copy-of-Copy-of-Copy-of-Copy-of-Copy-of-Copy-of-Copy-of-Copy-of-Copy-of-Copy-of-Copy-of-Copy-of-Copy-of-Copy-of-IMAGE-TEMPLATE-FOR-BLOG-5.jpg
1080
1920
Steven E
https://www.appliancepartspros.com/b/wp-content/uploads/2020/11/app-logo-std.png
Steven E2024-04-23 13:41:042025-07-30 10:37:48How to replace Samsung refrigerator evaporator fan motor DA97-12815B https://www.appliancepartspros.com/b/wp-content/uploads/2024/04/Copy-of-Copy-of-Copy-of-Copy-of-Copy-of-Copy-of-Copy-of-Copy-of-Copy-of-Copy-of-Copy-of-Copy-of-Copy-of-Copy-of-IMAGE-TEMPLATE-FOR-BLOG-26.jpg
1080
1920
Steven E
https://www.appliancepartspros.com/b/wp-content/uploads/2020/11/app-logo-std.png
Steven E2024-04-23 12:39:112025-07-30 10:21:55How to replace Samsung refrigerator temperature sensor holder DA61-03683A
https://www.appliancepartspros.com/b/wp-content/uploads/2024/04/Copy-of-Copy-of-Copy-of-Copy-of-Copy-of-Copy-of-Copy-of-Copy-of-Copy-of-Copy-of-Copy-of-Copy-of-Copy-of-Copy-of-IMAGE-TEMPLATE-FOR-BLOG-26.jpg
1080
1920
Steven E
https://www.appliancepartspros.com/b/wp-content/uploads/2020/11/app-logo-std.png
Steven E2024-04-23 12:39:112025-07-30 10:21:55How to replace Samsung refrigerator temperature sensor holder DA61-03683A https://www.appliancepartspros.com/b/wp-content/uploads/2024/04/Copy-of-Copy-of-Copy-of-Copy-of-Copy-of-Copy-of-Copy-of-Copy-of-Copy-of-Copy-of-Copy-of-Copy-of-Copy-of-Copy-of-IMAGE-TEMPLATE-FOR-BLOG-27.jpg
1080
1920
Steven E
https://www.appliancepartspros.com/b/wp-content/uploads/2020/11/app-logo-std.png
Steven E2024-04-23 12:21:232025-07-30 10:15:06How to replace Whirlpool fridge start device WPW10194431
https://www.appliancepartspros.com/b/wp-content/uploads/2024/04/Copy-of-Copy-of-Copy-of-Copy-of-Copy-of-Copy-of-Copy-of-Copy-of-Copy-of-Copy-of-Copy-of-Copy-of-Copy-of-Copy-of-IMAGE-TEMPLATE-FOR-BLOG-27.jpg
1080
1920
Steven E
https://www.appliancepartspros.com/b/wp-content/uploads/2020/11/app-logo-std.png
Steven E2024-04-23 12:21:232025-07-30 10:15:06How to replace Whirlpool fridge start device WPW10194431With nearly a decade of experience in providing top-notch customer service regarding appliance parts and repair, Steven enjoys sharing practical advice, troubleshooting tips, and interesting information to help readers stay informed.