How To Replace A Refrigerator Evaporator Motor Mounting Seal (With Video!)
APP Expert / Friday August 5, 2022
Is your refrigerator not cooling like it used to and the airflow feels weak? The culprit might be your evaporator motor mounting seal! Don’t worry – it’s a quick and easy fix you can do yourself. Plus, we’ve got you covered with a step-by-step how-to video just below to guide you through the entire process.
Need a replacement evaporator motor mounting seal for your refrigerator? Search below using your fridge model number to identify the exact part needed:
If your refrigerator is running warm and there’s weak airflow coming from the ducts, you may need to replace the evaporator motor mounting seal. Fortunately, replacing the evaporator motor mounting seal is a simple repair. You’ll only need a few minutes to replace it and get your fridge back to the right temperature.
To help you out, our experts at AppliancePartsPros.com have put together this step-by-step guide to replace your evaporator motor mounting seal in no time.


How to buy the correct evaporator motor mounting seal
For today’s repair, we’ll be installing the GE Refrigerator Evaporator Motor Mounting Seal. However, you can find the mounting seal part you need for your specific refrigerator on AppliancePartsPros.com. Just type in your refrigerator’s part number or model number to get the correct one.
If you can’t find the exact part number in your operator’s manual, remember that AppliancePartsPros.com has full diagrams for popular appliances. With only the refrigerator model number, you can:
- Type in your model number into the search bar.
- Find your part on the easy-to-read diagram.
- Match it to the numbered parts listed below.
- Click on the item for photos and a repair video.
- Click “Add to Cart,” purchase the item and receive it within 1-2 business days!
If you prefer, you can also browse around in our refrigerator parts section to discover what you’re looking for. Take advantage of the filters on the left-hand side to narrow down your options.
What you’ll need to replace your evaporator motor mounting seal
Time: 15 minutes or less
Parts
- GE Refrigerator Evaporator Motor Mounting Seal WR24X27948 or the correct mounting seal for your refrigerator
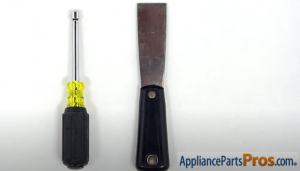
Tools
- Putty knife
- 1/4 nut driver
How to replace your evaporator motor mounting seal
Warning: Unplug your refrigerator
You can prevent the risk of electrocution by unplugging your refrigerator and/or turning off the circuit breakers as you replace your evaporator motor mounting seal.
Interested in a video guide to this repair? Check out our how-to video for replacing the evaporator motor mounting seal from our experts at AppliancePartsPros.com.
Part 1: Disassemble your refrigerator to get to the evaporator motor
1. Open up your evaporator motor mounting seal kit

The evaporator motor mounting seal is located in the fresh foods section. It wraps around the evaporator motor, sealing the space surrounding it.
If you notice weak airflow from the ducts in the fresh foods section, causing the temperature inside the compartment to rise, check and replace the evaporator motor mounting seal as needed.
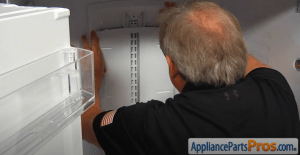
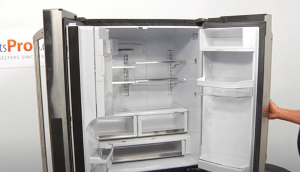
2. Remove the drawers, shelves and frame from your refrigerator
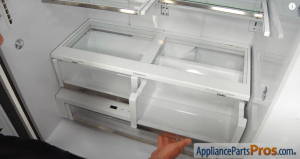
Start by opening both fresh food doors and removing the two drawers located on the left and right. They should simply pull out.
Now take out the four glass shelves at the top. To do this, lift the front before disengaging the back.

At this point, you can remove the central drawer cover frame. Lift it up and slide it out. You may need to slightly tilt it to the side in order to maneuver it out.
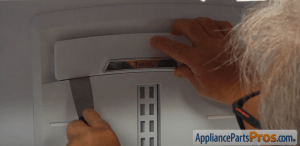
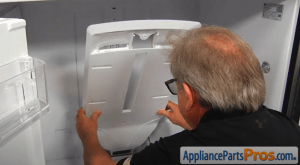
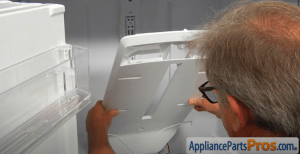
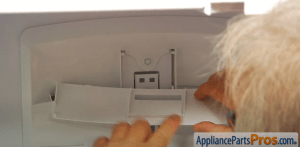
3. Take out the air duct cover
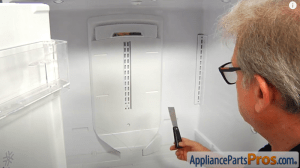
Next, you need to take out the air duct cover. Go ahead and remove the plug cover in the lower right-hand corner. Use your putty knife to pry open the tab. From here, you can take off the cover.
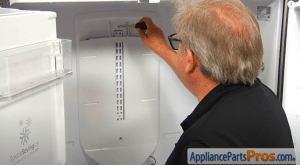
Next, remove the top bar using the same putty knife. Pry it from the lower left-hand and right-hand corners where there are clips holding it in.
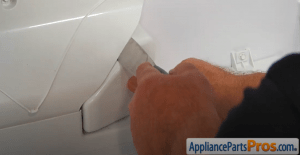
Now you can remove the two screws located at the top and bottom of the cover. Use a 1/4 nut driver to take them out.
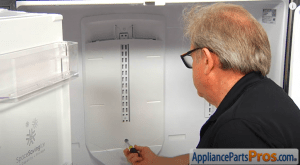
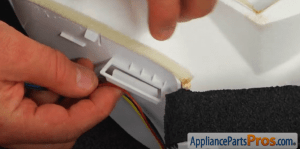
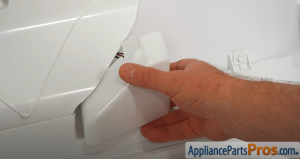
Next, you need to undo the clips along the side of the cover. Leverage a putty knife to pry it up while pulling on the cover slightly. Start at the top and work your way down the entire side.
You should repeat this process for the opposite side, as well as the bottom of the cover.
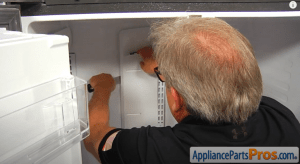
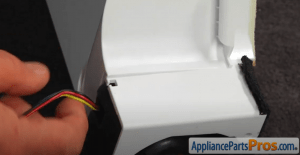
Next, go ahead and disconnect the side plug. Squeeze the side tabs to unplug it.
At this point, you can pull out the full cover and place it on a workable surface.
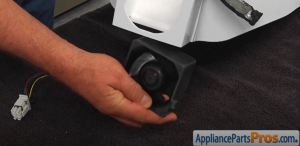
4. Remove the motor from the cover
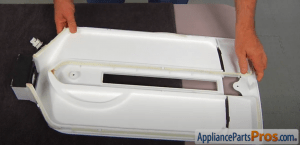
Once you’ve placed the cover on a workable surface, it’s time to remove the evaporator motor. This motor is located at the base of the cover and you’ll need to take it out in order to make the repair.
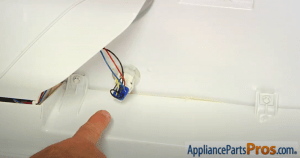
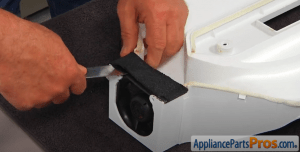
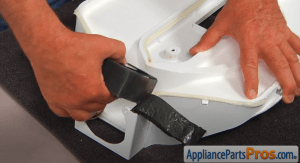
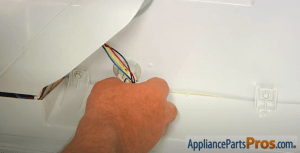
Start by removing the installation strip. Pry it up using the putty knife. From here, you can flip it over and let it hang on the side. During this process, try not to damage the strip, because you’ll need to reinstall it later on.
Next step is to free the wires from the harness, so you can fully remove the motor. You can take them out by slipping them out of the bracket. Pull them out wire by wire.
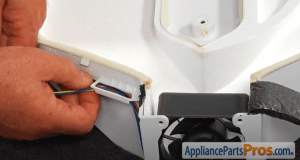
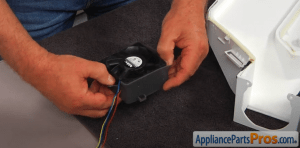
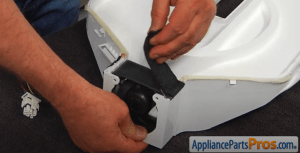
At this point, you can remove the motor from the cover. Simply maneuver it out. You should also thread out the wiring, so that it’s completely free of the unit.
Part 2: Replace the evaporator motor mounting seal
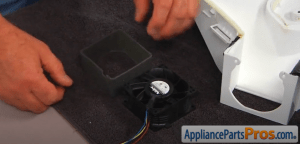
1. Remove the old evaporator motor mounting seal
To remove the old mounting seal, slide it off the sides of the motor.
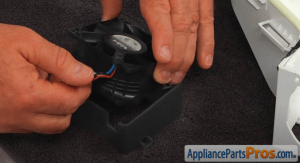
Pro tip: Keep in mind how the mounting seal is installed on the motor. The edge with the groove should go under the wiring harness. In addition, there are two small tabs on the front left and right of the seal, which correspond to the tabs on the motor.
2. Install the new mounting seal around the motor
Now it’s time to replace the mounting seal. The best way to do this is to set the motor inside the new seal. Be sure to line up the motor correctly with the groove and tabs that we mentioned above.
Fit the seal over the motor so that it falls into place. Check that the seal is set over the side tabs and is correctly aligned all around the part.
Part 3: Reassemble your refrigerator for use
1. Set the evaporator motor back into the cover
Align the motor with the back towards you and the wiring harness to the bottom left. In this position, the tabs should be located on the bottom left and right.
The easiest way to install the motor is by lifting the cover up and sliding it over the motor until it’s positioned correctly.
As a final step, replace the installation strip over the top of the motor. The glue on the strip should still hold the motor in place.
2. Reinstall the wiring harness
Once the motor is completely in, turn the cover over and install the wiring harness. First, the wiring should fit into the small slot at the bottom of the cover.
Next, thread the wire up and into the bracket. Do this one by one until all wires are fully secured in the bracket.
3. Set the air duct cover back into the refrigerator
The cover is now ready to be installed back into your fridge. Start by sliding the motor into the opening at the bottom and push the cover up into place. Ensure that the holes for the screws are properly aligned.
Next, press down the sides so that they snap into place. Start at the top and move all the way down the cover. Ensure it’s fully secured by all the clips.
Now you can plug in the wire harness in the lower right-hand corner.
Next, secure the panel with two 1/4 screws, located on the top and bottom of the cover. Use the 1/4 nut driver to complete this task.
At this point, you can clip on the top plate. Be sure that the hinges and hooks align with the openings on the cover. Place on the top hooks first and then lower the plate down. Press down so that it locks into place.
Finally, install the plug cover in the lower right-hand corner. Simply push it in and it should click into place.
4. Put the drawers, shelves and frame back into your refrigerator
Start with the drawer cover frame. Slide it on and make sure it fits all the way in. Be careful not to break the glass as you reinstall it.
Next, install the four glass shelves at the top. Set the back hooks into the slots on the fridge.
At this point, you can slide the two drawers back in, located on the left and right. Make sure the drawers fit onto the rollers before pushing them in.
You’ve now finished this repair and can close the door to your refrigerator!
Keep your refrigerator in good order with AppliancePartsPros.com
Great job, you’ve now successfully replaced your evaporator motor mounting seal! At this point, you can plug in your refrigerator and check that it’s cooling properly. During these hot summer months, you should also make sure to do general maintenance on your refrigerator. Some regular tasks you should perform include checking the door seals, cleaning the condenser coils and wiping down the inside of the fridge.
If you need to make other refrigerator repairs, you can purchase any parts you require on AppliancePartsPros.com. And don’t forget to look at more repair guides on our website, YouTube, Facebook and Twitter channels!
Evaporator motor mounting seal FAQs
How do I know if my evaporator motor mounting seal needs to be replaced?
The first sign that your evaporator motor mounting seal may have worn down or broken is a warmer refrigerator temperature than usual. If your refrigerator is running warm, check the air ducts. A weak airflow may also indicate that the mounting seal should be replaced.
How can I be sure to buy the correct evaporator motor mounting seal?
AppliancePartsPros.com makes it easy to buy replacement parts – whether a evaporator motor mounting seal or something else. Simply type in your part number or model number to find what you’re looking for. Our website includes in-depth diagrams so you can search for the exact part number by checking your appliance’s model diagram.
Why is it important to buy a genuine mounting seal replacement?
To replace the evaporator motor mounting seal for a GE brand refrigerator, it’s a good idea to buy a genuine GE replacement part. That’s because genuine parts are specifically made for your model and have a guarantee, so you can be sure that your repair involves a high-quality part that works perfectly with your model.
If your refrigerator is a different brand, look for the genuine replacement part that corresponds to your unit. Just head to AppliancePartsPros.com to search for the mounting seal part that you require.
 https://www.appliancepartspros.com/b/wp-content/uploads/2025/06/20250613_1359_Amish-Coastal-Kitchen_simple_compose_01jxn718jpeefrphhvr32s85j9.png
1024
1536
Steven E
https://www.appliancepartspros.com/b/wp-content/uploads/2020/11/app-logo-std.png
Steven E2025-06-16 06:35:262025-08-19 08:03:04How to Fix a Samsung Fridge Freezer Door Switch DA34-10120E
https://www.appliancepartspros.com/b/wp-content/uploads/2025/06/20250613_1359_Amish-Coastal-Kitchen_simple_compose_01jxn718jpeefrphhvr32s85j9.png
1024
1536
Steven E
https://www.appliancepartspros.com/b/wp-content/uploads/2020/11/app-logo-std.png
Steven E2025-06-16 06:35:262025-08-19 08:03:04How to Fix a Samsung Fridge Freezer Door Switch DA34-10120E https://www.appliancepartspros.com/b/wp-content/uploads/2025/06/20250613_1330_Refrigerator-Puddle-in-Kitchen_simple_compose_01jxn5axk1f9rstmsen7f6vbjp.png
1024
1536
Steven E
https://www.appliancepartspros.com/b/wp-content/uploads/2020/11/app-logo-std.png
Steven E2025-06-16 06:30:212025-08-19 07:45:50Fix No Water Issue: Replace LG Refrigerator Valve AJU73753101
https://www.appliancepartspros.com/b/wp-content/uploads/2025/06/20250613_1330_Refrigerator-Puddle-in-Kitchen_simple_compose_01jxn5axk1f9rstmsen7f6vbjp.png
1024
1536
Steven E
https://www.appliancepartspros.com/b/wp-content/uploads/2020/11/app-logo-std.png
Steven E2025-06-16 06:30:212025-08-19 07:45:50Fix No Water Issue: Replace LG Refrigerator Valve AJU73753101 https://www.appliancepartspros.com/b/wp-content/uploads/2025/06/20250613_1330_Refrigerator-Puddle-in-Kitchen_simple_compose_01jxn5axk4fe7a9ra95sgf8v7s.png
1024
1536
Steven E
https://www.appliancepartspros.com/b/wp-content/uploads/2020/11/app-logo-std.png
Steven E2025-06-16 06:28:592025-08-19 06:49:00Is Your GE Fridge Leaking? Install a New Drain Tube WR02X11848
https://www.appliancepartspros.com/b/wp-content/uploads/2025/06/20250613_1330_Refrigerator-Puddle-in-Kitchen_simple_compose_01jxn5axk4fe7a9ra95sgf8v7s.png
1024
1536
Steven E
https://www.appliancepartspros.com/b/wp-content/uploads/2020/11/app-logo-std.png
Steven E2025-06-16 06:28:592025-08-19 06:49:00Is Your GE Fridge Leaking? Install a New Drain Tube WR02X11848Hi! I’m Matt H., and I’m thrilled to be your guide through the world of appliance repair with over 25 years of invaluable experience in the industry.
From the early days of my career, I have been deeply passionate about appliances and their inner workings. Over the years, I’ve seen it all – from vintage models to the latest cutting-edge technology – and I’ve dedicated myself to mastering the art of repair. With a toolbox in one hand and a wealth of knowledge in the other, I’ve tackled every challenge that has come my way, learning and growing with each repair.
Join me as we dive into the intricacies of appliance repair. From step-by-step repair guides to explanations of common problems and their solutions, I’ll be here to simplify the repair process and empower you with the knowledge you need to keep your appliances running smoothly.
Feel free to explore our blog, ask questions, and leave comments – this platform is a space for learning, sharing, and growing together. Let’s work together to ensure that your appliances continue to serve you for years to come.
Thank you for joining me on this journey, and I look forward to being your go-to resource for all things related to appliance repair!