How to replace GE dryer lower drum felt seal WE09X27634
Steven E / Tuesday April 9, 2024
Are your favorite clothes snagging in the dryer? This frustrating problem is likely due to a worn-out lower drum felt seal, which can lead to damaged laundry over time. Fear not—our step-by-step guide and included how-to video will walk you through replacing the seal and bringing your dryer back to peak performance.
Need a part? Search below using your appliance model number to find exactly what you need:
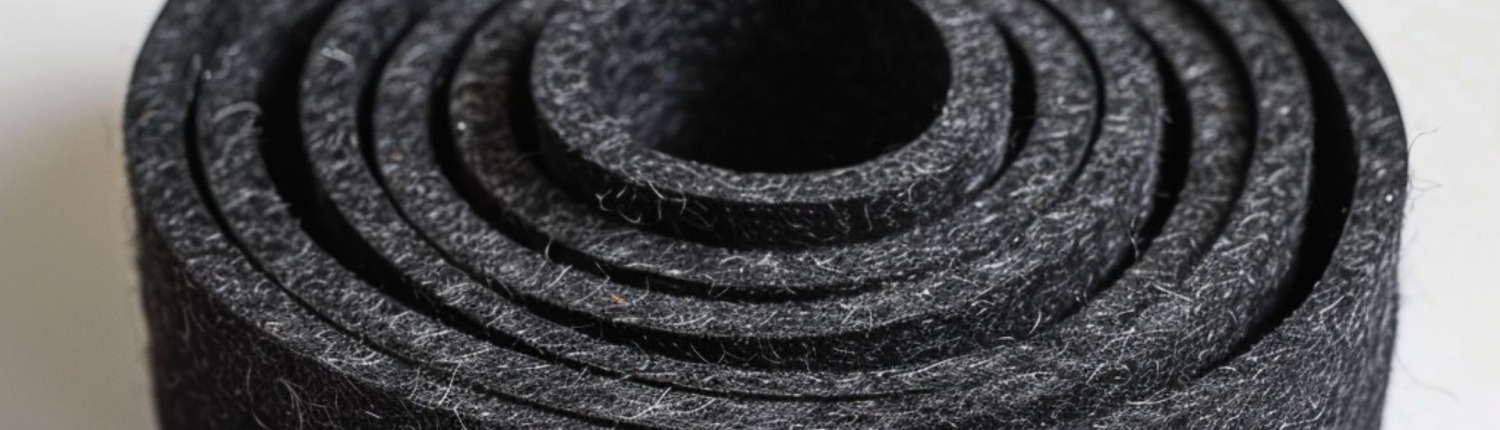
Is your laundry getting caught on the inside of your dryer? This can be an annoying issue that can cause damage to your laundry over time. If the material keeps getting caught on the bottom edge of the drum, then the lower drum felt seal likely needs to be replaced.

Let’s unpack the process so you can swap out the worn seal for a new one.
You can find a replacement lower drum felt seal WE09X27634 here. If you need other replacement parts for your GE dryer, just enter your model number at AppliancePartsPros.com to find them. It’s that easy! Most orders arrive in just two business days, and we have thousands of guides to show you how to install your new parts.
What you need
- Phillips and flat-blade screwdrivers
- 1/4-inch nut driver
- Side cutters
- 2 small zip ties
- Replacement lower drum felt seal (make sure it’s compatible with your specific model before installing)
READ MORE: Electric Dryer Leaving Black Marks On Clothes: Top 5 Problems and Fixes
Safety tips
When working on any appliance, remember to keep safety first. Here are some tips to keep in mind:
- Always power off and unplug your appliance or switch off the circuit breaker before you attempt any maintenance or replacement work. This keeps you safe by preventing any risk of electric shock.
- If the appliance has recently been used, give it plenty of time to cool down before working on it.
- Take your time while working to prevent accidents and personal injuries. Rushing is the enemy of precision.
- Work in a well-lit area so you can clearly see and access appliance parts.
- Keep your workspace free of clutter and other obstacles. Keep children and pets away from the work area.
- Check the user manual to see if there are specific installation or safety instructions related to your appliance or replacement part.
- Be gentle when handling or removing parts. Excessive force might damage the appliance or cause personal injury.
- Wear insulated work gloves to protect your hands from sharp metal parts and debris.
- When working with wires, avoid touching any exposed wires or terminals. If you need to touch a wire, use a non-conductive tool or wear insulating gloves to prevent electrical shock.
How to replace the lower drum felt seal
Step 1: Remove the panels
- Make sure the dryer is turned off and unplugged from the power supply.
- Open the dryer door.
- Use a Phillips screwdriver to remove the screws in the upper corners of the top panel.
- Close the door and move to the back of the dryer.
- Remove the three screws across the top edge of the control panel.
- Carefully tilt the control panel forward, slide it to the left and pull it out. Set it aside.
- Lift the dryer top panel and slide it back to remove it. Set the panel aside.
- With the top panel removed, find the two 1/4-inch screws, one in each upper corner of the front panel. Use a 1/4-inch nut driver to remove them.
- Remove the front panel by lifting it slightly on the dryer drum. This will allow you to pull the bottom of the front panel away from the drum.
- Tilt the panel forward and lift it off the bottom hinges.
- Turn and maneuver the panel out of the way.
Step 2: Disconnect the door switch wires
- Note how the door switch wires are connected. You can take a photo so it’s easier to reconnect them later.
- Use a flat-blade screwdriver to detach the door switch wires.
READ MORE: 9 Ways To Improve Your Dryer’s Performance
Step 3: Remove the old lower drum felt seal
- Use side cutters to snip off the two zip ties – one on each side – that secure the felt seal wrap.
- Use a flat-blade screwdriver to pry off the front drum support.
- Note how the felt loops around the drum. Unwrap the felt by twisting and pulling it.
- After you remove the entire felt strip, discard it.
- Clean and dry the area before installing the new seal.
Step 4: Install the new seal
- Slide one end of the replacement lower drum felt seal under the clip on the drum support.
- Bend the seal to match the length of the old one for a tight fit.
- Feed the end through the slit in the drum support rim under the first tab.
- Wrap the rest of the seal around the drum support. Press it flat into the seal groove.
- Use a new zip tie on each side to secure the new felt seal.
- Tighten the zip ties and trim off any excess seal.
Step 5: Reassemble the dryer
- Reattach the front drum support by lining up the tabs and pressing it into place.
- Lift the front panel and connect the door switch wires to their original terminals. Make sure they’re securely attached.
- Reinstall the front panel by matching up the three bottom slots with the corresponding tabs on the dryer frame.
- Lift the drum slightly to slide the panel in place. The side tabs should align.
- Replace the two 1/4-inch screws in the top corners.
- Slide the rear edge of the top panel first to insert the tabs into their slots. Push down to lock it into place.
- Open the door so you can insert and tighten the two Phillips screws.
- Line up the bottom tabs on the control panel and slide it toward the right to lock it in.
- Secure the control panel with three Phillips screws along the top edge.
Final steps
- Plug the dryer back into the outlet.
- Turn on the dryer and run a short test cycle to make sure it’s working correctly.
READ MORE: How to Clean a Dryer Vent
More information
Thanks for reading! If you have any other appliance repair needs or projects, you can find more resources including our DIY blog at AppliancePartsPros.com. There, you can enter your model number to order the exact parts you need. Most orders arrive in two business days.
You can also reach our award-winning customer service team at 1-877-477-7278, chat with a pro on our website and watch thousands of free video tutorials on our YouTube channel. We can also help you troubleshoot common dryer problems here.
 https://www.appliancepartspros.com/b/wp-content/uploads/2025/06/20250605_0929_Mediterranean-Laundry-Room_simple_compose_01jx04d801e6ga31sszrevy5na.png
1024
1536
Steven E
https://www.appliancepartspros.com/b/wp-content/uploads/2020/11/app-logo-std.png
Steven E2025-06-18 06:32:312025-08-20 07:41:20How To Replace Door Assembly WE10X26855 On a GE Dryer
https://www.appliancepartspros.com/b/wp-content/uploads/2025/06/20250605_0929_Mediterranean-Laundry-Room_simple_compose_01jx04d801e6ga31sszrevy5na.png
1024
1536
Steven E
https://www.appliancepartspros.com/b/wp-content/uploads/2020/11/app-logo-std.png
Steven E2025-06-18 06:32:312025-08-20 07:41:20How To Replace Door Assembly WE10X26855 On a GE Dryer https://www.appliancepartspros.com/b/wp-content/uploads/2025/06/20250529_1255_Amish-Laundry-Room_simple_compose_01jwefcqj6fwpvffxwphnng3yq.png
1024
1536
Steven E
https://www.appliancepartspros.com/b/wp-content/uploads/2020/11/app-logo-std.png
Steven E2025-06-18 06:28:062025-08-20 06:58:46How to Replace Moisture Sensor 279366 in a Whirlpool Dryer
https://www.appliancepartspros.com/b/wp-content/uploads/2025/06/20250529_1255_Amish-Laundry-Room_simple_compose_01jwefcqj6fwpvffxwphnng3yq.png
1024
1536
Steven E
https://www.appliancepartspros.com/b/wp-content/uploads/2020/11/app-logo-std.png
Steven E2025-06-18 06:28:062025-08-20 06:58:46How to Replace Moisture Sensor 279366 in a Whirlpool Dryer https://www.appliancepartspros.com/b/wp-content/uploads/2025/06/20250617_1116_Compact-Laundry-Setup_simple_compose_01jxz795d7een9268sp4z42sbw.png
1024
1536
Steven E
https://www.appliancepartspros.com/b/wp-content/uploads/2020/11/app-logo-std.png
Steven E2025-06-18 06:19:362025-08-20 07:19:48How to Replace the Door Handle WP3405184 on a Whirlpool Dryer
https://www.appliancepartspros.com/b/wp-content/uploads/2025/06/20250617_1116_Compact-Laundry-Setup_simple_compose_01jxz795d7een9268sp4z42sbw.png
1024
1536
Steven E
https://www.appliancepartspros.com/b/wp-content/uploads/2020/11/app-logo-std.png
Steven E2025-06-18 06:19:362025-08-20 07:19:48How to Replace the Door Handle WP3405184 on a Whirlpool DryerWith nearly a decade of experience in providing top-notch customer service regarding appliance parts and repair, Steven enjoys sharing practical advice, troubleshooting tips, and interesting information to help readers stay informed.