How To Replace Samsung Washer Water Inlet Valve DC62-00214M
Steven E / Tuesday May 27, 2025
Are you tired of dealing with a Samsung washer that just won’t fill properly or is causing water leaks all over your laundry room? The culprit might just be the water valve, and tackling this issue yourself can save you time and money. Dive into our step-by-step guide and discover how to replace the valve like a pro — plus, don’t miss the handy how-to video we’ve included below to walk you through the process with ease!
Looking for the right part? Enter your appliance model number below to find the exact match and get your appliance running like new again!
Is your Samsung washer not filling with water or taking forever to start a cycle? The problem might be a faulty water inlet valve, part #DC62-00214M. This valve controls the flow of hot and cold water into your machine and when it fails, your washer can’t do its job. The good news? Swapping it out is a fast and easy repair you can do yourself with a few basic tools. Let’s walk through what to expect and how to fix it.

Watch: How to install washer inlet valve
The information in this article may not apply to your specific appliance model. We recommend consulting your manufacturer’s documentation or contact us with any questions.
What is the washer inlet valve?
The water inlet valve is typically located at the back of the washing machine. It has a solenoid that operates when the washer control board sends the signal. When activated, the solenoid opens the valve to allow cold water to flow into the various dispensers and tub. If the inlet valve is clogged or the solenoid is worn out, problems will occur.
Some common symptoms of a failing water inlet valve on a Samsung washer include:
- Leaking water from the valve or dispenser hose connections
- Washer not filling fully or filling slowly
- Soap or fabric softener not dispensing into the wash load
- An error code on the display related to water flow issues
Replacing the valve yourself can save the cost of a service call. With minimal tools and the ability to shut off the hoses and power, it’s a repair the average DIYer can tackle.
Safety precautions
Safety should always be a priority when working on any appliance. Here are a few practical tips to help you stay safe:
- Turn off the power to the appliance by unplugging it or switching off the circuit breaker before starting any maintenance or repairs. This protects you from the risk of electric shock.
- Wear insulated gloves to shield your hands from sharp edges, pinching hazards, or debris.
- Work at a steady pace and take your time to avoid accidents or injuries.
- Make sure your workspace is well-lit so you can clearly see and access the parts you’re working on.
- Keep the area clear of clutter, and ensure children and pets stay out of the workspace.
- Never handle internal parts with wet hands. Check that both your hands and the work area are completely dry.
- Refer to your appliance’s user manual for any specific instructions or safety guidelines related to the part or repair.
- Handle parts gently to avoid damage to the appliance or potential injuries from applying too much force.
- Use safety glasses when dealing with chemicals, dust, or large debris to protect your eyes from harm.
- If the appliance was recently used, give it enough time to cool down before working on any heated components.
- Take photos or notes of wiring connections and terminals before disconnecting anything to make reassembly easier.
- Avoid touching exposed wires or terminals. If you must handle wires, use non-conductive tools or wear insulated gloves to minimize the risk of electrical shock.
Access and Removal
- The first step is to disconnect the washer from both the power and water sources. This helps make sure of safety during the repair.
- Turn off the hot and cold water taps that supply water to the washer. These are usually located behind the machine. Make sure the taps are completely closed.
- Unplug the Samsung washing machine from the electrical outlet. Alternatively, you can switch off the circuit breaker that controls the electrical supply to the washer.
- The water inlet valve is located underneath the top panel of the washer. Removing this panel provides the needed access.
- Start by using a Phillips head screwdriver to remove the two screws on the back of the top panel. These are located near the corners.
- Once unscrewed, gently slide the top panel back a few inches. Then lift up to detach it completely. Set the top panel aside in a safe place while you work.
- With the top cabinet panel removed, you’ll see the water inlet valve towards the back. It will have several hoses and electrical connectors attached to it.
- Label each hose with tape to identify where it was originally connected. This makes re-assembly easier.
- Use pliers to loosen the hose clamps and detach each hose from the valve. Have towels ready to catch any water still in the hoses.
- Disconnect electrical connectors using a flat head screwdriver. Note where each one attached.
- Also take photos of the existing connections to use for reference when re-connecting the new valve.
- With all hoses and electrical lines detached, the valve can now be removed.
- Use a Phillips screwdriver to remove the two screws that secure the inlet valve to the washer cabinet.
- Carefully pull the valve away from the washer and set it aside.
- Inspect the openings in the washer where the hoses were connected. Make sure there is no debris clogging them before connecting the new part.
Install New Valve
- Position the new valve in the correct spot and insert and tighten the mounting screws.
- Refer to your labels and photos and reconnect each of the water inlet hoses to the proper valve connections. Make sure the gaskets are seated correctly before tightening the clamps with pliers.
- Match the wire harness color connectors to the proper terminals on the valve. This is where photos are handy. Push the connectors on securely.
- Double check that all hose clamps are tightened and wires are connected securely.
- Replace the top panel on the washer cabinet. Slide it forward to lock the tabs into place.
- Insert and tighten the two screws in the rear of the top panel.
- Turn the water supply back on slowly and check for leaks at hose connections. Tighten if any seepage appears.
- Plug the washer back in or turn the circuit breaker back on to restore power.
- Run the washer through a full cycle test, checking for proper fill, dispensing, and no error codes.
More Information
Thanks for reading! We hope this article helped you replace the water valve in your Samsung washer.
If you still need some replacement parts, grab your model number and head over to AppliancePartsPros.com. We offer over 2 million parts and most orders arrive in 2-3 business days. If you need some help with finding the right part or placing an order, you can contact our team at 1 (877) 477-7278.
While you’re waiting for your new part to arrive, you can explore our DIY blog and watch thousands of video tutorials on our YouTube channel.
Be sure to follow us on Facebook, Twitter and Instagram to see our latest repair guides!
 https://www.appliancepartspros.com/b/wp-content/uploads/2025/04/APP-blog-square-1-15.jpg
1080
1080
Steven E
https://www.appliancepartspros.com/b/wp-content/uploads/2020/11/app-logo-std.png
Steven E2025-04-23 05:43:342025-08-11 07:32:00How to replace the vent hose on an LG washer
https://www.appliancepartspros.com/b/wp-content/uploads/2025/04/APP-blog-square-1-15.jpg
1080
1080
Steven E
https://www.appliancepartspros.com/b/wp-content/uploads/2020/11/app-logo-std.png
Steven E2025-04-23 05:43:342025-08-11 07:32:00How to replace the vent hose on an LG washer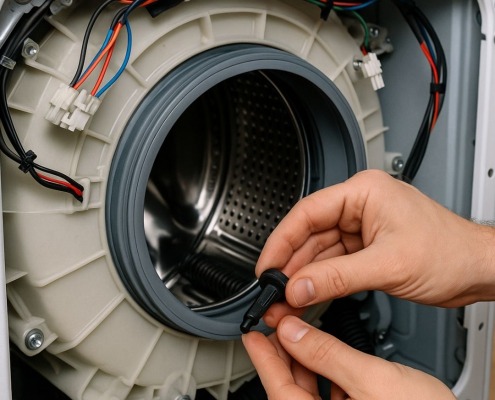 https://www.appliancepartspros.com/b/wp-content/uploads/2025/04/APP-blog-square-4-2.jpg
1080
1080
Steven E
https://www.appliancepartspros.com/b/wp-content/uploads/2020/11/app-logo-std.png
Steven E2025-04-23 05:41:132025-08-11 07:29:58How to replace the thermistor seal on an LG washing machine
https://www.appliancepartspros.com/b/wp-content/uploads/2025/04/APP-blog-square-4-2.jpg
1080
1080
Steven E
https://www.appliancepartspros.com/b/wp-content/uploads/2020/11/app-logo-std.png
Steven E2025-04-23 05:41:132025-08-11 07:29:58How to replace the thermistor seal on an LG washing machine https://www.appliancepartspros.com/b/wp-content/uploads/2025/04/APP-blog-square-118.jpg
1080
1080
Steven E
https://www.appliancepartspros.com/b/wp-content/uploads/2020/11/app-logo-std.png
Steven E2025-04-22 10:00:172025-08-08 13:18:49How to replace the suspension spring on an LG washer
https://www.appliancepartspros.com/b/wp-content/uploads/2025/04/APP-blog-square-118.jpg
1080
1080
Steven E
https://www.appliancepartspros.com/b/wp-content/uploads/2020/11/app-logo-std.png
Steven E2025-04-22 10:00:172025-08-08 13:18:49How to replace the suspension spring on an LG washerWith nearly a decade of experience in providing top-notch customer service regarding appliance parts and repair, Steven enjoys sharing practical advice, troubleshooting tips, and interesting information to help readers stay informed.