How to Spot and Fix Corrosion in Bathroom Exhaust Fan Parts
Steven E / Wednesday June 25, 2025
Your bathroom fan might not be the flashiest fixture in your home, but it plays a crucial role. It pulls out excess humidity, clears out odors, and helps prevent mold and mildew. But with all that steamy air rushing through, it’s no surprise that corrosion can become a problem over time.
If your fan is making strange noises, smelling metallic, or looks a bit worse for wear, there’s a good chance corrosion is creeping in. The good news? You don’t have to rush out and buy a brand-new fan. In many cases, you can spot, clean, and fix corrosion yourself with just a few basic tools and a little elbow grease.
Let’s break down exactly how to find corrosion in your bathroom fan and how to clean it up like a DIY pro.
Tools and Materials You’ll Need
Before you dive into repair mode, gather these items:

- Screwdriver (usually Phillips)
- Wire brush or steel wool
- White vinegar or baking soda (for cleaning)
- Sandpaper (medium grit)
- Rust converter (optional)
- Rust-resistant primer and paint (optional)
- Replacement fan parts (if needed)
- Safety goggles and gloves
- Small container or bowl
- Clean cloths or paper towels
- Shop vacuum or handheld vacuum
- Step ladder or stool
Step 1: Turn off the Power (Safety First)
Before you touch anything, head to your breaker box and turn off power to the bathroom fan. Flipping the wall switch off isn’t enough, cutting power at the source is the only way to guarantee your safety.
Once that’s done, test the fan switch to make sure nothing happens when you flip it. Safe? Let’s move on.
Step 2: Remove the Fan Cover and Take a Look
Most bathroom fan covers are easy to remove. Here’s how:
- Climb up on your step ladder or stool.
- Gently pull down on the cover.
- If it’s held with spring clips, squeeze and unhook them from the housing.
- If it’s screwed in, use your screwdriver to remove the screws.
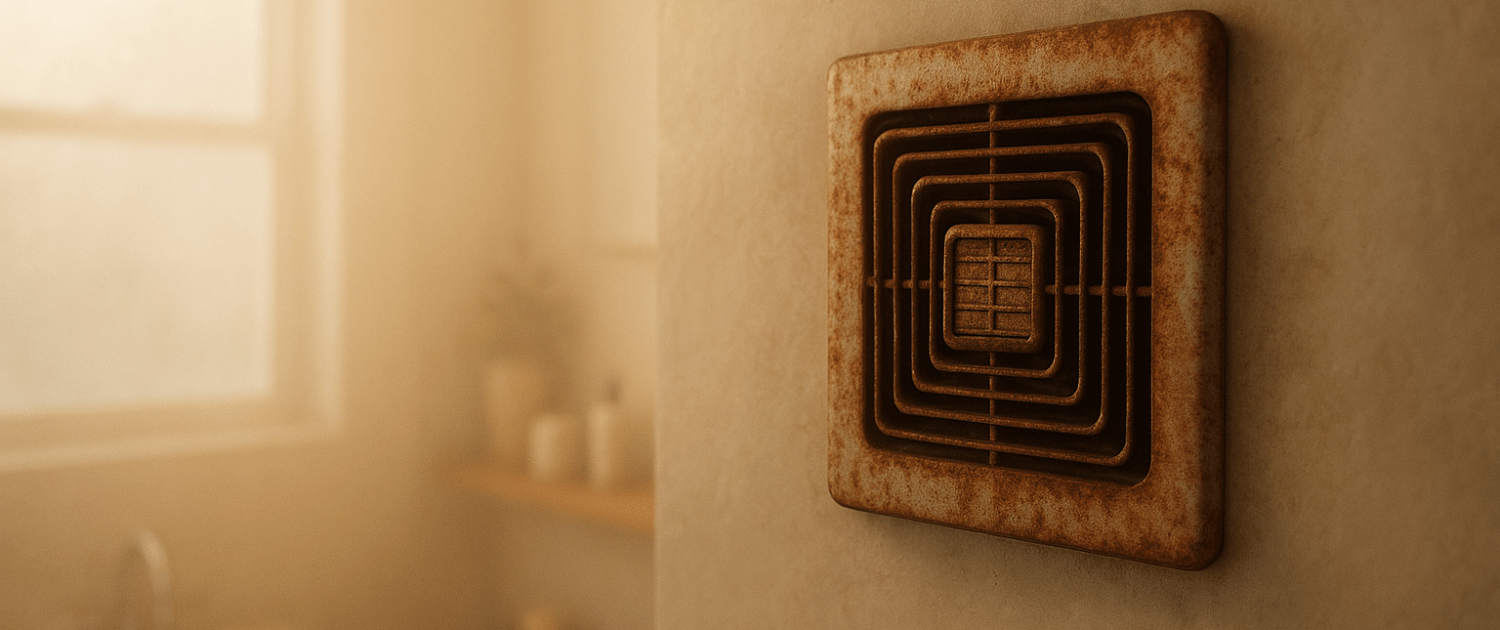
Once the cover is off, give it a good look. If you see brownish-red spots, flaking metal, or a powdery white buildup (on aluminum), you’re dealing with corrosion.
Set the cover aside. If it’s metal and corroded, you’ll clean it later. If it’s plastic, inspect for damage or brittleness caused by moisture.
Step 3: Inspect the Fan Blade, Motor, and Housing
Next up: a full inspection of the interior components. Turn on your flashlight and look closely at:
- Fan blade or impeller – Is it rusted or covered in grime?
- Motor shaft or casing – Any rust around the mounting brackets, screws, or terminals?
- Metal housing/frame – Look for bubbling paint, rust flakes, or discoloration.
- Screws and mounts – Are they rusted, loose, or missing entirely?
Tip: If your fan looks rusty but still runs well, a thorough cleaning may extend its life. If the motor casing is deeply rusted or you smell burnt wiring, it might be time for a replacement.
Step 4: Disassemble Corroded Parts
To clean or replace affected parts, you’ll need to remove them.
- Disconnect the fan motor and blade from the housing, most are mounted with 2–4 screws.
- Unplug any electrical connectors. If wires are hardwired, note their colors and locations before disconnecting.
- Place removed parts on a towel or work surface.
Take a good look at what you’ve got. Some parts may be worth saving with a little TLC, while others might need to be replaced entirely.
Step 5: Clean Off Surface Corrosion
Let’s get scrubbing! For surface rust or light corrosion:
Option 1: White Vinegar Method
- Soak a cloth in white vinegar.
- Apply it to the corroded area and let it sit for 15–30 minutes.
- Use a wire brush or steel wool to scrub the rust away.
- Rinse with clean water and dry thoroughly.
Option 2: Baking Soda Paste
- Mix baking soda with water to form a paste.
- Apply to the rusted areas and let it sit 30 minutes.
- Scrub with a brush or steel wool.
- Rinse and dry.
If there’s more stubborn rust:
- Use medium-grit sandpaper to remove the worst spots.
- For deep rust on brackets or motor casings, consider applying a rust converter, which chemically stops rust and prepares the surface for painting.
Step 6: Paint and Protect (Optional but Smart)
If you’ve removed rust and want to keep it gone, applying a protective coating is a great move.
- Wipe the part down to remove dust or residue.
- Spray or brush on a rust-resistant primer. Let it dry.
- Follow with a coat of rust-resistant enamel paint, especially helpful for metal fan covers or housings.
Choose a flat or semi-gloss finish to match your original fan parts.
Step 7: Replace Any Badly Damaged Parts
If any part, like the fan blade, screws, or motor bracket, is too far gone, swap it out.
- Fan blades are usually inexpensive and snap or screw onto the motor shaft.
- Screws and brackets can be replaced with stainless steel versions to resist future corrosion.
- If the motor is rusted beyond recovery or isn’t spinning properly, look up your fan’s model number (usually inside the housing) and order a compatible replacement motor online.
Step 8: Reassemble and Test
- Reconnect the motor and blade to the housing.
- Plug in wires or reattach them using wire nuts.
- Mount the fan assembly back into the ceiling housing.
- Reattach the cover once all parts are secure.
- Flip the breaker back on and test the fan.
Listen for normal operation. No grinding, buzzing, or squeaking? Great! Put a tissue up to the grille, if it sticks, airflow is working properly.
Step 9: Prevent Future Corrosion
Now that your fan’s fresh and rust-free, take a few easy steps to keep it that way:
- Run the fan longer after showers – Use a timer switch to keep it on for 10–15 minutes post-shower.
- Wipe down the cover periodically – Especially if you see moisture buildup.
- Clean the fan blade every 6 months – Prevents dust from attracting moisture.
- Use a dehumidifier if your bathroom lacks windows or gets especially damp.
- Paint exposed metal parts with a rust-preventative coating if you haven’t already.
Final Thoughts
Corrosion in your bathroom fan isn’t just an eyesore, it can lead to motor failure, poor ventilation, or even electrical hazards if ignored. But with a few basic tools, some vinegar or baking soda, and a little patience, you can clean, restore, and protect your fan like a pro.
In most cases, surface corrosion is easy to handle and gives you an excuse to do some routine fan maintenance. If parts are too far gone, replacements are usually affordable and available online. Either way, restoring your fan is a smart weekend project that’ll leave your bathroom fresher, drier, and safer.
Where To Find Us
If you need any replacement parts for your appliances, you can enter your model number at AppliancePartsPros.com to locate and order them quickly. Most orders arrive in just two business days, and we have tons of great information in our repair help section and YouTube videos to help you troubleshoot.
Stay connected with the latest DIY tips, tutorial videos, and repair guides by following us on Facebook, Instagram, and Twitter. We love hearing about your repair stories and successes. If you need more help or want personalized guidance, feel free to reach out. We’re ready to help you take on your next project with confidence!
The information in this article may not apply to your specific appliance model. We recommend consulting your manufacturer’s documentation or contact us with any questions.
 https://www.appliancepartspros.com/b/wp-content/uploads/2025/06/20250602_1023_Farmhouse-Bathroom-Ambiance_simple_compose_01jwrgcmdwed3a8y1qd0615p1y.png
1024
1536
Steven E
https://www.appliancepartspros.com/b/wp-content/uploads/2020/11/app-logo-std.png
Steven E2025-06-02 07:26:272025-06-02 07:26:37How to DIY Replace Broan Bath Fan Light Receptacle S99270981
https://www.appliancepartspros.com/b/wp-content/uploads/2025/06/20250602_1023_Farmhouse-Bathroom-Ambiance_simple_compose_01jwrgcmdwed3a8y1qd0615p1y.png
1024
1536
Steven E
https://www.appliancepartspros.com/b/wp-content/uploads/2020/11/app-logo-std.png
Steven E2025-06-02 07:26:272025-06-02 07:26:37How to DIY Replace Broan Bath Fan Light Receptacle S99270981 https://www.appliancepartspros.com/b/wp-content/uploads/2025/06/20250602_1019_Farmhouse-Bathroom-Illumination_simple_compose_01jwrg3s2ffh2r896mqtr4yj2y.png
1024
1536
Steven E
https://www.appliancepartspros.com/b/wp-content/uploads/2020/11/app-logo-std.png
Steven E2025-06-02 07:21:222025-06-02 07:21:34Replacing Heater Blower Wheel S99020290 in a Broan Bath Fan
https://www.appliancepartspros.com/b/wp-content/uploads/2025/06/20250602_1019_Farmhouse-Bathroom-Illumination_simple_compose_01jwrg3s2ffh2r896mqtr4yj2y.png
1024
1536
Steven E
https://www.appliancepartspros.com/b/wp-content/uploads/2020/11/app-logo-std.png
Steven E2025-06-02 07:21:222025-06-02 07:21:34Replacing Heater Blower Wheel S99020290 in a Broan Bath Fan https://www.appliancepartspros.com/b/wp-content/uploads/2025/06/20250602_0958_Bathroom-Fan-in-Farmhouse_simple_compose_01jwrez52yevgaqdp0t5rja4s1.png
1024
1536
Steven E
https://www.appliancepartspros.com/b/wp-content/uploads/2020/11/app-logo-std.png
Steven E2025-06-02 07:17:552025-06-02 07:18:05Thermal Fuse S97011810 Replacement on a Broan Bath Fan
https://www.appliancepartspros.com/b/wp-content/uploads/2025/06/20250602_0958_Bathroom-Fan-in-Farmhouse_simple_compose_01jwrez52yevgaqdp0t5rja4s1.png
1024
1536
Steven E
https://www.appliancepartspros.com/b/wp-content/uploads/2020/11/app-logo-std.png
Steven E2025-06-02 07:17:552025-06-02 07:18:05Thermal Fuse S97011810 Replacement on a Broan Bath FanWith nearly a decade of experience in providing top-notch customer service regarding appliance parts and repair, Steven enjoys sharing practical advice, troubleshooting tips, and interesting information to help readers stay informed.