How to Troubleshoot Error Code F121 on a Bosch Oven
Steven E / Tuesday May 13, 2025
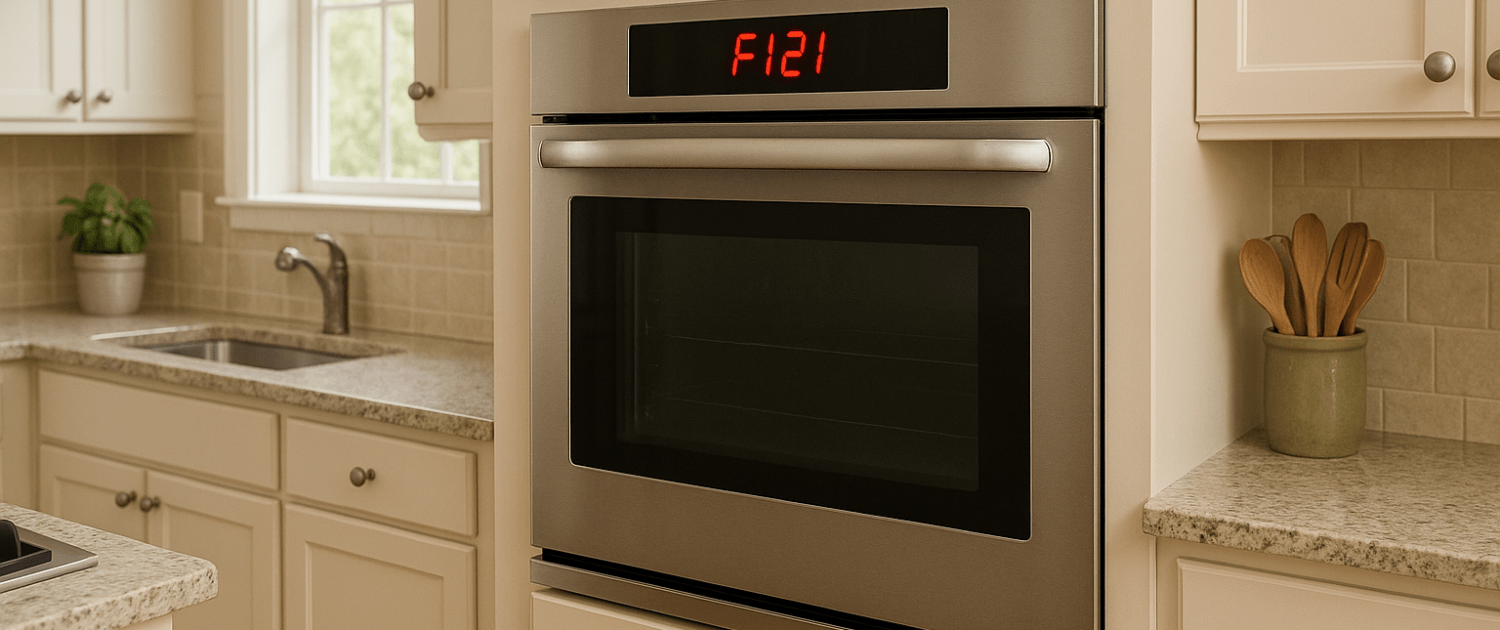
Got an F121 error flashing on your Bosch oven? Don’t sweat it, you can troubleshoot the issue yourself with a few simple checks. We’ll explain what the F121 error means, what causes it, and how to get your oven back in working order without calling in a repair tech.
If you find out that you need any replacement parts for your appliance while you’re troubleshooting, you can enter your model number at AppliancePartsPros.com to order them. Most orders arrive in just two business days, and we have thousands of free guides to show you how to install your new parts.
The information in this article may not apply to your specific appliance model. We recommend consulting your manufacturer’s documentation or contact us with any questions.
Understanding what error code F121 means
On Bosch oven control panels, pressing the various touchpad buttons sends input signals to the electronic control board. This lets you select cooking modes, set temperatures, start cycles, and so forth.

The F121 error simply means one of these keypad buttons is continuously sending a closed circuit signal, even when not pressed.
From the control board’s perspective, it’s as if someone is holding down a button indefinitely, which prevents regular operation.
Some common causes of F121 stuck button faults include:
- Physical damage, puncture, or deformation of the button membrane
- Dried food, grease, or dirt under a button
- Failed touchpad switch contacts
- Faulty wiring connection between keypad and control board
Until this stuck key signal is corrected, your oven will be non-operational. So let’s look at how to diagnose and fix F121 errors properly.
Safety precautions
When working on any appliance, remember to keep safety first. Here are some tips to keep in mind:
- Always power off and unplug your appliance or switch off the circuit breaker before attempting any maintenance or replacement work. This keeps you safe by preventing any risk of injury from electric shock.
- Wear insulated work gloves to protect your hands from sharp metal parts, pinching hazards and debris.
- Take your time and don’t rush while working to prevent accidents and personal injuries.
- Work in a well-lit area so you can clearly see and access the interior parts.
- Clear your workspace of clutter and other obstacles. Keep children and pets away from the work area.
- Never work on internal parts with bare wet hands. Make sure the work area is completely dry.
- Check your user manual to see if there are specific installation or safety instructions for your part or appliance.
- Be gentle when handling or removing parts. Excessive force might damage the appliance or cause injury.
- Wear safety glasses when working with chemicals, dust or cleaning large debris to prevent injury.
- If the appliance has recently been used, give it plenty of time for any heating parts to cool down before working on it.
- Take pictures or make a note of wiring terminals or other connections before disconnecting to prevent any problems with reassembly.
- When working with wires, avoid touching any exposed wires or terminals. If you need to touch a wire, use a non-conductive tool or wear insulating gloves to prevent electrical shock.
Troubleshooting steps
Tracking down the cause of a tricky F121 oven fault takes patience and diligence. Let’s go through a troubleshooting guide:
Step 1: Inspection of keypad wiring
Since wiring faults often mimic stuck buttons, our first step is to inspect the membrane ribbon cable and connections comprehensively:
- Remove the wiring harness from P5 on the display board and examine both sides for bent or broken pins, oxidation, grime buildup, or any issues that could cause faulty connections.
- Visually inspect every wire for damage or cracks in insulation that could lead to shorts.
- Perform a “wiggle test” on each wire while monitoring for intermittent continuity. This can reveal broken conductor strands inside the insulation.
- Verify each wire terminates at the correct pin on P5 by cross-referencing the oven wiring diagram. Gently tug wires to confirm good insertion tension.
- Remove and reseat wire connections to scrape away corrosion on contact surfaces.
A thorough inspection of keypad wiring is critical, as subtle shorts or high resistance can mimic a stuck key signal.
Step 2: Examination of the keypad membrane
Next, examine the membrane keypad assembly:
- Look for any signs of physical damage like punctures, tears, or deformation around the buttons that could cause sticking.
- Use a magnifying glass to inspect switch contacts for pitting or corrosion. Clean with electrical contact cleaner.
- Press each button while feeling/listening for smooth, consistent actuation without sticking.
- Flex keypad areas while monitoring for intermittent connections. Faulty circuits may open/close as the membrane is manipulated.
- Remove any debris around the edges and spray with compressed air to dislodge trapped contaminants.
Take your time validating membrane integrity – subtle issues here are a frequent contributor to phantom stuck key signals.
Step 3: Testing and replacement
If wiring and membrane check out electrically, test control system components:
- Power up the oven and monitor the keypad ribbon connector while pressing each button individually to isolate the stuck circuit.
- Replace the display board and retest. Faulty logic circuits often misinterpret membrane switch closures.
- If the issue persists, obtain and install an entire new membrane keypad assembly. Internal switch faults can cause random stuck keys.
- At each step, perform thorough testing of all oven functions to verify proper keypad performance.
Additional information
Thank you for reading! We hope this guide helped you get your oven working again.
If you have any other appliance repair needs or projects, don’t hesitate to explore our other troubleshooting guides and videos.
If you need replacement parts or some extra help with ordering them, grab your model number and head over to AppliancePartsPros.com, where you can chat with a pro, read our DIY blog and more.
Don’t forget to subscribe to us on YouTube and follow us on Facebook, Twitter and Instagram!
 https://www.appliancepartspros.com/b/wp-content/uploads/2023/11/f11-error-code-on-a-Frigidaire-Oven-illustration.png
559
993
Samantha Bullington
https://www.appliancepartspros.com/b/wp-content/uploads/2020/11/app-logo-std.png
Samantha Bullington2023-11-06 13:16:182025-07-23 11:51:27How to clear an F11 error on an electric Frigidaire range
https://www.appliancepartspros.com/b/wp-content/uploads/2023/11/f11-error-code-on-a-Frigidaire-Oven-illustration.png
559
993
Samantha Bullington
https://www.appliancepartspros.com/b/wp-content/uploads/2020/11/app-logo-std.png
Samantha Bullington2023-11-06 13:16:182025-07-23 11:51:27How to clear an F11 error on an electric Frigidaire range https://www.appliancepartspros.com/b/wp-content/uploads/2023/11/error-code-E22-on-a-dishwasher-illustration.png
564
1003
Steven E
https://www.appliancepartspros.com/b/wp-content/uploads/2020/11/app-logo-std.png
Steven E2023-11-06 11:25:202024-05-17 08:24:50How to resolve the E22 error on a Bosch dishwasher
https://www.appliancepartspros.com/b/wp-content/uploads/2023/11/error-code-E22-on-a-dishwasher-illustration.png
564
1003
Steven E
https://www.appliancepartspros.com/b/wp-content/uploads/2020/11/app-logo-std.png
Steven E2023-11-06 11:25:202024-05-17 08:24:50How to resolve the E22 error on a Bosch dishwasher https://www.appliancepartspros.com/b/wp-content/uploads/2023/10/25544.png
644
1131
Steven E
https://www.appliancepartspros.com/b/wp-content/uploads/2020/11/app-logo-std.png
Steven E2023-10-27 14:08:342023-10-27 14:09:12Bosch Dryer E13 Error Code DIY Troubleshooting Guide
https://www.appliancepartspros.com/b/wp-content/uploads/2023/10/25544.png
644
1131
Steven E
https://www.appliancepartspros.com/b/wp-content/uploads/2020/11/app-logo-std.png
Steven E2023-10-27 14:08:342023-10-27 14:09:12Bosch Dryer E13 Error Code DIY Troubleshooting GuideWith nearly a decade of experience in providing top-notch customer service regarding appliance parts and repair, Steven enjoys sharing practical advice, troubleshooting tips, and interesting information to help readers stay informed.