Parts in a Washing Machine and What They Do
Steven E / Friday April 11, 2025
Most of us toss our dirty laundry in the washer, hit “start,” and walk away without giving it a second thought. But have you ever stopped to think about how your washing machine works? It’s not magic (though it feels that way on laundry day). It’s a carefully designed combo of moving parts, sensors, and tech that all work together to get your clothes clean.
Whether you’re just curious, trying to fix a machine that’s acting up, or you’re about to invest in a new washer, it helps to understand the basics. So let’s break it down, all the major parts of a washing machine and what they do.
Why It’s Good to Know
So, why bother learning about washing machine parts if you’re not a repair tech?
- You’ll understand what’s happening inside your washer (and stop blaming it when it’s actually user error).
- You’ll be able to troubleshoot small issues before calling a pro.
- You might save money by fixing minor problems yourself.
- You’ll be more confident when it’s time to replace or upgrade your machine.
The next time your washer starts acting up or just doesn’t seem to be cleaning like it used to, you’ll have a pretty solid idea of what might be going on.

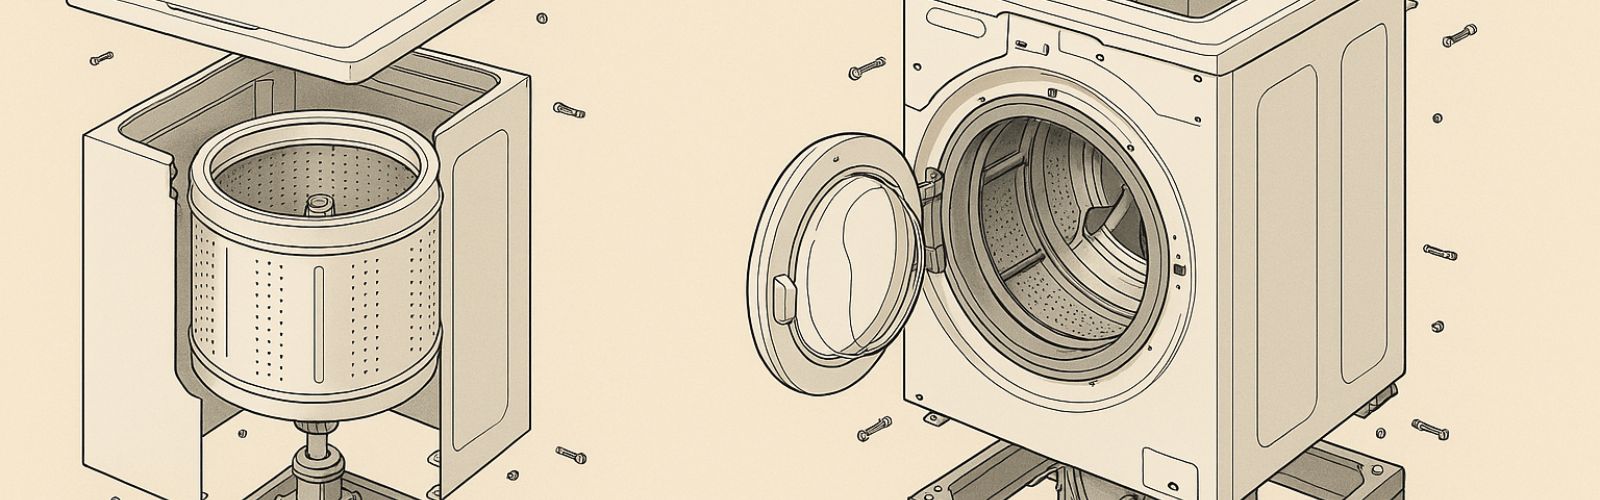
1. The Drum
Let’s start with the most obvious part, the drum. This is the big metal tub where your clothes go.There are two drums in every washing machine:
- Inner Drum: This is the one you see when you open the door. It has holes in it to let water in and out during cycles.
- Outer Drum: You don’t see this one, it surrounds the inner drum and holds the water during the wash and rinse cycles so your laundry room doesn’t turn into a swimming pool.
Together, they handle all the agitating, spinning, and soaking your clothes need to come out clean.
2. Water Inlet Valve
Ever wonder how water actually gets into your washer? That’s where the water inlet valve comes in.
This little valve connects to your home’s hot and cold water supply. When you start a wash cycle, the washer tells the valve to open up and let water flow in. The machine decides how much water and what temperature is needed depending on your selected settings.
Why it matters: If this valve is broken or clogged, your washer might not fill properly, or at all.
3. Control Panel
This is the part you interact with, the buttons, dials, or touch screen where you select your settings. Behind that user-friendly surface is a circuit board that tells the machine what to do, when to do it, and for how long.
Whether you’re washing delicates or doing a heavy-duty cycle, the control panel communicates with all the machine’s parts to make sure they’re working together.
4. Agitator or Impeller
In top-load washers, you’ll likely see one of two things inside the drum:
- An agitator: The tall post in the center with fins. It moves back and forth to scrub clothes against each other.
- An impeller: A low-profile cone or disc at the bottom that uses gentle spinning to create water currents.
Both are designed to move clothes around so the detergent can do its job. The agitator is a bit more aggressive, while the impeller is gentler and uses less water.
In front-load washers, the drum spins on its side and uses gravity to tumble clothes instead of an agitator or impeller.
5. Detergent Dispenser
No more guessing games with when to add detergent, your washer has a built-in dispenser for that. Most models have separate compartments for:
- Detergent
- Fabric softener
- Bleach
The machine automatically flushes the right product into the wash cycle at just the right time. Some high-tech models even have auto-dosing dispensers that measure and use just the right amount of soap for each load.
6. Drain Pump
Once the rinse cycle is done, all that dirty water needs to go somewhere. The drain pump pumps the used water out of the washer and into the drain hose, which leads to your home’s plumbing. If your washer ever leaves a puddle at the bottom or doesn’t drain completely, this pump could be the culprit.
Pro tip: Socks, coins, and random debris can clog the drain pump filter, so check and clean it every few months if your model has one.
7. Drain Hose
The drain hose is the tube that carries wastewater from the washer to the plumbing. It’s usually located at the back of the machine.
It’s not super complicated, but if it’s kinked, clogged, or loose, you’re in for a mess.
8. Drive Motor
The drive motor is what makes the drum spin. Depending on your machine, it either drives the belt that turns the drum or is direct-drive, meaning it’s connected directly to the drum.
Either way, the motor controls the wash, rinse, and spin cycles. A loud humming, grinding, or failure to spin can all point to motor issues.
9. Belt
In many top-load washers, the drive belt connects the motor to the drum and helps it spin. Think of it like a bike chain for your washing machine.
Newer front-load models may use a direct-drive system instead, which eliminates the belt altogether, but many washers still use belts because they’re simple and easy to replace.
10. Clutch or Transmission
These parts work with the motor to shift between spinning and agitating. Think of them like the gears in a car.
When they start to fail, your washer might struggle to shift modes, or stop spinning altogether.
11. Thermostat & Heating Element (Only in Some Models)
Some washers, especially in Europe or front-loaders, come with a built-in heating element to warm up the water inside the machine itself.
There’s also a thermostat to monitor and control the water temperature.
In basic models, most washers just rely on your home’s hot water supply, but a heating element allows for sanitizing cycles and hotter washes when needed.
12. Door Lock or Lid Switch
When the wash cycle starts, the door (on front-loaders) or lid (on top-loaders) locks shut, so you can’t open it mid-cycle.
The lid switch or door lock mechanism keeps things safe, and if it breaks, your washer won’t start at all. It’s a super common and affordable DIY repair.
13. Sensors
Modern washing machines are filled with sensors that help them adjust cycles automatically. These include:
- Water level sensors: These adjust how much water is used.
- Load sensors: These balance out uneven loads.
- Temperature sensors: These ensure proper heating or rinsing.
Thanks to these little parts, your washer can use less water, clean more efficiently, and protect your clothes from over-agitating.
14. Shock Absorbers & Suspension
Especially in front-load washers, these parts help minimize vibrations and keep the washer from walking across the floor during the spin cycle.
If your washer starts thumping like a rock concert every time it spins, the shock absorbers, springs, or suspension rods might need some love.
Want To Learn More?
Stay connected with the latest DIY tips, tutorial videos, and repair guides by following us on Facebook, Instagram, and Twitter. We love hearing about your repair stories and successes. Feel free to reach out if you need more help. We’re ready to help you take on your next project with confidence!
If you need any replacement parts for your appliances, you can enter your model number at AppliancePartsPros.com to locate and order them quickly. Most orders arrive in just two business days, and we have tons of great information in our repair help section and YouTube videos to help you troubleshoot.
The information in this article may not apply to your specific appliance model. We recommend consulting your manufacturer’s documentation or contact us with any questions.
 https://www.appliancepartspros.com/b/wp-content/uploads/2025/09/20250421_1332_Modern-Pastel-Laundry-Room_simple_compose_01jscpej8gevtvbykm5a3nd1kz.png
1024
1536
Steven E
https://www.appliancepartspros.com/b/wp-content/uploads/2020/11/app-logo-std.png
Steven E2025-09-16 13:02:232025-09-16 13:02:33Diagnose and Repair Your GE Top Load Washer’s Drain Pump in Minutes
https://www.appliancepartspros.com/b/wp-content/uploads/2025/09/20250421_1332_Modern-Pastel-Laundry-Room_simple_compose_01jscpej8gevtvbykm5a3nd1kz.png
1024
1536
Steven E
https://www.appliancepartspros.com/b/wp-content/uploads/2020/11/app-logo-std.png
Steven E2025-09-16 13:02:232025-09-16 13:02:33Diagnose and Repair Your GE Top Load Washer’s Drain Pump in Minutes https://www.appliancepartspros.com/b/wp-content/uploads/2025/06/20250618_1421_Colonial-Laundry-Room-Scene_simple_compose_01jy2489zkepn95a5gddh78fw4.png
1024
1536
Steven E
https://www.appliancepartspros.com/b/wp-content/uploads/2020/11/app-logo-std.png
Steven E2025-06-20 05:36:112025-06-20 05:36:19LG Front Load Washer Leaking? Find and Fix the Cause Yourself
https://www.appliancepartspros.com/b/wp-content/uploads/2025/06/20250618_1421_Colonial-Laundry-Room-Scene_simple_compose_01jy2489zkepn95a5gddh78fw4.png
1024
1536
Steven E
https://www.appliancepartspros.com/b/wp-content/uploads/2020/11/app-logo-std.png
Steven E2025-06-20 05:36:112025-06-20 05:36:19LG Front Load Washer Leaking? Find and Fix the Cause Yourself https://www.appliancepartspros.com/b/wp-content/uploads/2025/06/20250618_1408_Colonial-Laundry-Room-Scene_simple_compose_01jy23fzmmetraxehbwqa2pq0d.png
1024
1536
Steven E
https://www.appliancepartspros.com/b/wp-content/uploads/2020/11/app-logo-std.png
Steven E2025-06-20 05:29:392025-06-20 05:29:46How To Check And Replace the Drain Hose On An LG Washer
https://www.appliancepartspros.com/b/wp-content/uploads/2025/06/20250618_1408_Colonial-Laundry-Room-Scene_simple_compose_01jy23fzmmetraxehbwqa2pq0d.png
1024
1536
Steven E
https://www.appliancepartspros.com/b/wp-content/uploads/2020/11/app-logo-std.png
Steven E2025-06-20 05:29:392025-06-20 05:29:46How To Check And Replace the Drain Hose On An LG WasherWith nearly a decade of experience in providing top-notch customer service regarding appliance parts and repair, Steven enjoys sharing practical advice, troubleshooting tips, and interesting information to help readers stay informed.