Washing Machine Won’t Stop Filling With Water: Top 5 Problems and Fixes for Top-Loading and Side-Loading Washers (With Video!)
APP Expert / Friday July 23, 2021
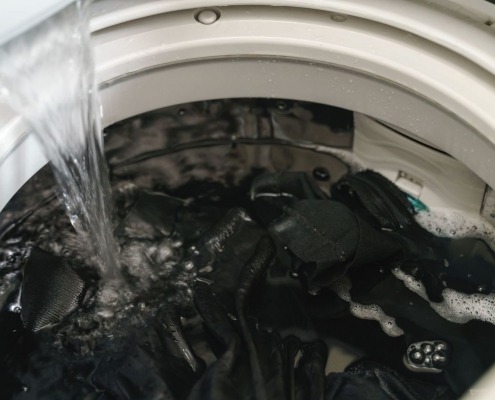
Is your washing machine turning into a perpetual waterfall, refusing to stop filling with water? A malfunctioning component might be the culprit, but fear not—our step-by-step guide will demystify the process of identifying and rectifying this common household problem. And for those who prefer a visual approach, check out the handy how-to video just below to get your appliance back on track in no time!
When a washing machine does not stop filling with water, one of the components in the machine may have gone bad. Troubleshooting to find out what part is having issues can give you insight into what the next steps should be. It’s essential to be sure that you are safe during the process. Make sure that the washing machine is either unplugged from the wall or the circuit breaker is off. The hot and cold water systems should also be turned off. Once your washing machine is safe to work with, proceed with this easy guide to assess which washing machine part is causing the problem.
When you have identified the part needed for your washer, search below using your specific fridge model number to identify the exact part needed:

1. Water Pressure
The first thing that can lead to a washer that won’t stop filling with water is the water pressure. A specific amount of pressure is needed in any washer to get clothing clean. If there isn’t enough water pressure coming into the washer, it may cause the water inlet valve to stay open and continue filling the washer after it should have stopped.
Prior to checking the water pressure, check to make sure the filter screens and inlet valve are both clean. Since different washers are made in unique ways, take a look at the user manual for your washer to determine how much water pressure the machine needs. If you don’t have the means to test the water pressure on your own but think it may be low, a plumber can come out to test it for you.

2. Water Inlet Valve
The water inlet valve is a component in a washer that controls the hot and cold water that comes into the tub when running a load of laundry. It has solenoids inside of it that open and close to let the water go into the tub. If noise is noticed during filling, this could mean that the water inlet valve is no longer working correctly. In some cases, this can result in the washer filling with water without stopping. In other cases, it won’t fill at all or the water might be the wrong temperature.
A clogged valve, a damaged coil, or a jammed plunger can cause this problem in the washing machine. Like some other components for washing machines, the water inlet valve is typically sold only as the entire component rather than being able to purchase the parts it is composed of individually. Because of this, replacing the whole part is the only option. However, in some cases, the screens can be cleaned to assist. This is done using a mixture of water and vinegar.
3. Water Level Switch
Next, you want to see if the water level switch is working correctly if your washer won’t stop filling up with water. This part controls precisely how much water is placed in the washer tub. It’s a pressure switch and it turns the water off as soon as it hits the requested level. Then it sends power to the engine and the wash cycle can start. The water level switch has two sets of contacts and one provides power to the inlet valve while the washer is filling. The other gives power to the tub after the water level is where it should be.
The water level switch is found on the control panel in a top-loading washing machine, while it will be mounted onto the upper cabinet frame on a front-loading washer. If the washer is overflowing with water, the contacts that send out power to the water inlet and motor may no longer be working correctly. Sometimes this will bring up an error code that you can look up in the user manual for additional troubleshooting tips.
If you have a top-loading machine without an error reading, you will need to test the switch using a multimeter. Make sure the tool is set to continuity and look at your wiring diagram to find the correct wires that need to be tested. Take the switch out of the washer and remove the wires from the wiring harness. Next, place the probes to the motor and power terminals and you should have no continuity. Blow into the switch hose fitting and it should gain continuity. If not, the switch will need to be replaced.
4. Water Level Switch Pressure Hose
Once you’ve inspected and tested the water level switch, it’s time to look at the pressure hose connected to it. This component uses air pressure to determine when the washer tub is filled with water. This is a length of hose that connects the pressure switch to the outer tub. When more water goes into the tub, more air pressure is created. When it reaches the right level, the power to the valve and water are turned off.
The water level switch pressure hose can be found in between the air domes on the outer tub and routed upward to the water level switch. If your washing machine doesn’t stop filling, it could be because the hose is clogged, has fallen off, or has a puncture in it. This drops the pressure and makes it impossible for the washer to know the water level.
Take a look at each end of the hose to be sure that it’s connected securely to the washer. Assuming it is, the next step is to inspect the entire hose for kinks, clogs, or holes. The air dome should also be visually inspected for any clogs. If it has a clog, that will need to be cleaned out. If it’s damaged, the component will need to be replaced.
5. Main Control Board
The last thing to check if your washing machine is overfilling is the main control board since it controls the various washer functions once you choose the settings for a load of laundry. It gets information from the switches, interface control board, sensors, and other controls. The main control board also initiates and monitors all of the functions of a washing machine.
If the main control board isn’t working the way it should be, it can cause the washing machine to overfill. The location of the main control board will depend on the model and manufacturer of the washing machine. In some washers, it’s in the control panel, and in others, it can be underneath the washer top. If this part fails, the interface can still sometimes light up and respond to what you do, but it often cannot drain or may not start up.
Once you find the location of the main control board, you should then check the wiring harnesses to be sure all of them are connected securely. There also may be an error code on the screen, which can be used to look into the user’s manual to find additional troubleshooting steps you can try. If it turns out that the main control board on the washer isn’t working, it will need to be replaced.
Where To Find Us
If you need any replacement parts for your appliances, you can enter your model number at AppliancePartsPros.com to locate and order them quickly. Most orders arrive in just two business days, and we have tons of great information in our repair help section and YouTube videos to help you troubleshoot.
Stay connected with the latest DIY tips, tutorial videos, and repair guides by following us on Facebook, Instagram, and Twitter. We love hearing about your repair stories and successes. If you need more help or want personalized guidance, feel free to reach out. We’re ready to help you take on your next project with confidence!
 https://www.appliancepartspros.com/b/wp-content/uploads/2023/09/Copy-of-Copy-of-Copy-of-Copy-of-Copy-of-Copy-of-Copy-of-Untitled-Design.jpg
1073
1610
Steven E
https://www.appliancepartspros.com/b/wp-content/uploads/2020/11/app-logo-std.png
Steven E2023-09-08 13:18:452024-05-16 12:47:12How to fix an nF error on a Samsung washer
https://www.appliancepartspros.com/b/wp-content/uploads/2023/09/Copy-of-Copy-of-Copy-of-Copy-of-Copy-of-Copy-of-Copy-of-Untitled-Design.jpg
1073
1610
Steven E
https://www.appliancepartspros.com/b/wp-content/uploads/2020/11/app-logo-std.png
Steven E2023-09-08 13:18:452024-05-16 12:47:12How to fix an nF error on a Samsung washer https://www.appliancepartspros.com/b/wp-content/uploads/2023/08/E09-Bosch-Washer-Error-Code.png
609
1087
Steven E
https://www.appliancepartspros.com/b/wp-content/uploads/2020/11/app-logo-std.png
Steven E2023-08-31 07:20:382023-08-31 07:38:07E09 Bosch Washer Error Code Troubleshooting Guide
https://www.appliancepartspros.com/b/wp-content/uploads/2023/08/E09-Bosch-Washer-Error-Code.png
609
1087
Steven E
https://www.appliancepartspros.com/b/wp-content/uploads/2020/11/app-logo-std.png
Steven E2023-08-31 07:20:382023-08-31 07:38:07E09 Bosch Washer Error Code Troubleshooting Guide https://www.appliancepartspros.com/b/wp-content/uploads/2023/08/Copy-of-Copy-of-Copy-of-Untitled-Design-2.jpg
1080
1920
Steven E
https://www.appliancepartspros.com/b/wp-content/uploads/2020/11/app-logo-std.png
Steven E2023-08-29 09:53:122023-08-29 11:30:22TE Error Code on a Samsung Washer: A Troubleshooting Guide
https://www.appliancepartspros.com/b/wp-content/uploads/2023/08/Copy-of-Copy-of-Copy-of-Untitled-Design-2.jpg
1080
1920
Steven E
https://www.appliancepartspros.com/b/wp-content/uploads/2020/11/app-logo-std.png
Steven E2023-08-29 09:53:122023-08-29 11:30:22TE Error Code on a Samsung Washer: A Troubleshooting GuideHi! I’m Matt H., and I’m thrilled to be your guide through the world of appliance repair with over 25 years of invaluable experience in the industry.
From the early days of my career, I have been deeply passionate about appliances and their inner workings. Over the years, I’ve seen it all – from vintage models to the latest cutting-edge technology – and I’ve dedicated myself to mastering the art of repair. With a toolbox in one hand and a wealth of knowledge in the other, I’ve tackled every challenge that has come my way, learning and growing with each repair.
Join me as we dive into the intricacies of appliance repair. From step-by-step repair guides to explanations of common problems and their solutions, I’ll be here to simplify the repair process and empower you with the knowledge you need to keep your appliances running smoothly.
Feel free to explore our blog, ask questions, and leave comments – this platform is a space for learning, sharing, and growing together. Let’s work together to ensure that your appliances continue to serve you for years to come.
Thank you for joining me on this journey, and I look forward to being your go-to resource for all things related to appliance repair!