Whirlpool Refrigerator Icemaker WPW10251076 Replacement
Steven E / Wednesday May 21, 2025
Is your refrigerator leaving you high and dry without ice? Don’t worry; a faulty icemaker assembly might be the culprit, and you’re just a few easy steps away from a solution. Discover how to bring the chill factor back to your kitchen with our comprehensive guide and accompanying how-to video just below.
Looking for the right part? Enter your appliance model number below to find the exact match and get your appliance running like new again!
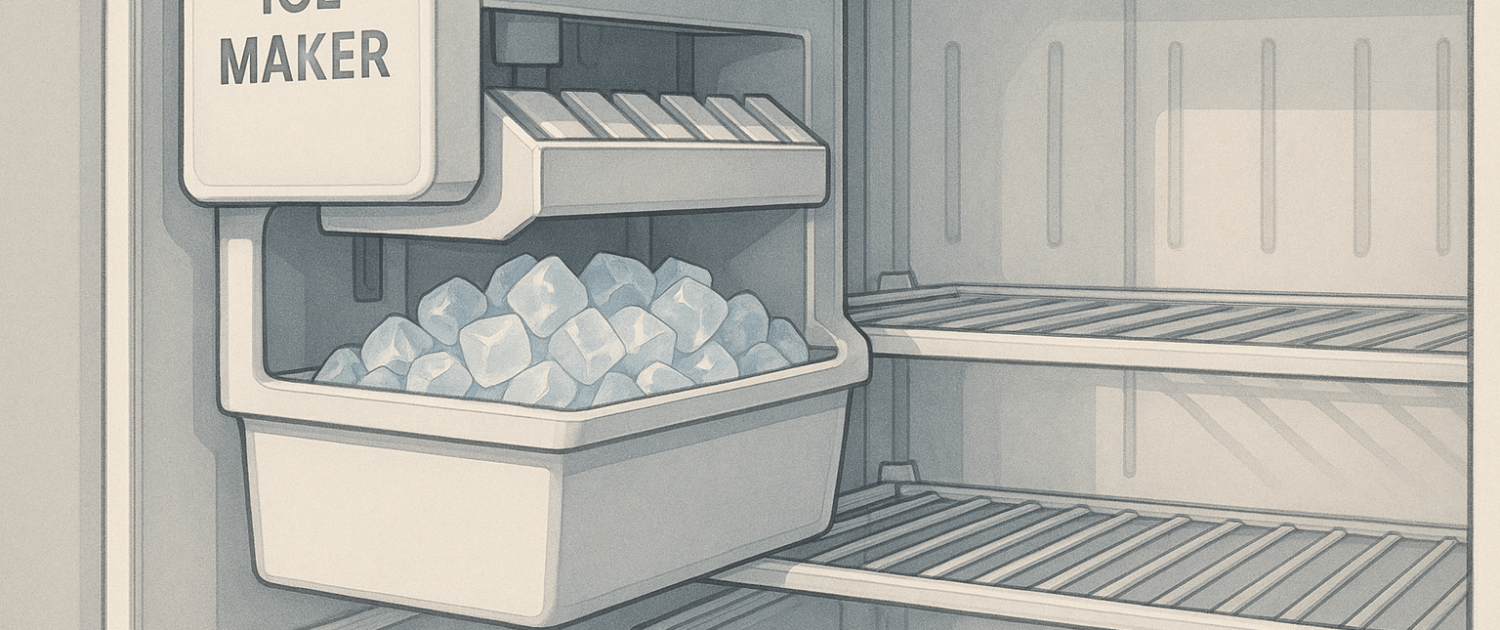
If you find your Whirlpool, KitchenAid, or Maytag refrigerator is not making ice, the issue likely lies with the icemaker assembly. This component contains the mold, heating element, motor, and controls that produce ice cubes. Over time, the icemaker can fail and stop making ice altogether. Replacing the assembly yourself is an easy and inexpensive fix.

The information in this article may not apply to your specific appliance model. We recommend consulting your manufacturer’s documentation or contact us with any questions.
How it works?
The icemaker assembly mounts inside the freezer compartment, typically on the top or side wall. It contains a mold with articulated arms to eject the ice cubes. A small motor, heating element, thermostat, and control module run the ice-making process.
If your refrigerator suddenly stops producing ice, the issue is likely with the icemaker itself. Some common problems include:
- Jammed or bent ice mold arms
- Burned-out motor or heater
- Faulty temperature sensors or control module
- Mineral buildup or ice cube clumping
When any of these issues occur, the easiest fix is to replace the entire icemaker assembly. Before getting started, make sure to unplug your refrigerator. You’ll also want to switch off the water supply line connected to the appliance. Now let’s go over the tools and parts you’ll need.
Materials required
Gather the following tools before starting this repair:
- Phillips screwdriver
- Flat blade screwdriver
- 1/4″ nut driver or socket
- Replacement icemaker assembly (WPW10251076)
Safety precautions
Safety should always be a priority when working on any appliance. Here are a few practical tips to help you stay safe:
- Turn off the power to the appliance by unplugging it or switching off the circuit breaker before starting any maintenance or repairs. This protects you from the risk of electric shock.
- Wear insulated gloves to shield your hands from sharp edges, pinching hazards, or debris.
- Work at a steady pace and take your time to avoid accidents or injuries.
- Make sure your workspace is well-lit so you can clearly see and access the parts you’re working on.
- Keep the area clear of clutter, and ensure children and pets stay out of the workspace.
- Never handle internal parts with wet hands. Check that both your hands and the work area are completely dry.
- Refer to your appliance’s user manual for any specific instructions or safety guidelines related to the part or repair.
- Handle parts gently to avoid damage to the appliance or potential injuries from applying too much force.
- Use safety glasses when dealing with chemicals, dust, or large debris to protect your eyes from harm.
- If the appliance was recently used, give it enough time to cool down before working on any heated components.
- Take photos or notes of wiring connections and terminals before disconnecting anything to make reassembly easier.
- Avoid touching exposed wires or terminals. If you must handle wires, use non-conductive tools or wear insulated gloves to minimize the risk of electrical shock.
Removing the ice bin or tray
The first step is accessing the icemaker by removing the ice bin or tray that sits below it:
- Open the freezer door completely to expose the ice bin or tray.
- Locate the release knob, arm, or lever at the front of the ice bin.
- Press down on the release mechanism while gently pulling the ice bin outward.
- Once loosened, lift the ice bin up and out. The bin may have vertical tabs that align with slots on the shelf.
- Set the bin safely aside and out of your work area.
With the bin removed, you now have access to the icemaker housing. Next, we’ll remove the cover.
Taking off the access cover
A removable plastic cover fits over most icemakers. Taking it off requires removing a few small screws:
- Locate the seam or perimeter of the cover. Look for two Phillips-head screws along the bottom edge.
- Use a Phillips screwdriver to back out these screws. Make sure not to lose them!
- With the screws out, slide or lift off the plastic cover.
- Set the cover safely aside and be careful not to stress any attached wiring.
Once removed, this will expose the icemaker assembly underneath. Now focus on detaching it from the refrigerator.
Detaching the icemaker
With the cover off, you’ll see the icemaker supported on a bracket or housing:
- Use a 1/4″ nut driver to remove the mounting screws at the base of the icemaker assembly.
- Look for a coiled water inlet tube running into the back or bottom.
- Remove this tube by releasing any retaining clips.
- At the back, pull up on any tabs or hooks securing the unit while sliding the icemaker outward.
- Maneuver the assembly forward and down to remove it.
- Be careful not to kink or stress the water inlet tube.
Now that the icemaker is detached, we just need to disconnect the power and ground wires.
Disconnecting the wiring
Before fully removing the old icemaker, disconnect the attached wiring harness:
- Look for a multi-pin connector joining the wires from the icemaker to those running inside the fridge.
- Depress any locking tab to release the plug and separate the two sides.
- Free the connector from any clips or holders. Note where the harness runs to later guide the new one back into place.
- You can now fully remove the old icemaker and set it aside.
Installing the new icemaker
Follow these tips when installing your new Whirlpool, KitchenAid, or Maytag icemaker assembly:
- Make sure the new part matches the original, checking that the wiring plugs and mountings align.
- Seat the back of the icemaker on its rear bracket or tabs first, then pivot it downward into place.
- Replace any screws under the base that secure it to the freezer wall. Don’t over-tighten.
- Reconnect the multi-pin plug to the wiring harness. Listen for a click as they engage.
- Guide all wiring back into channels or holders to avoid pinching or tangling.
- Push the water inlet tube fully onto its outlet port until it clicks and locks.
- Double-check all connectors and mounts to ensure the icemaker is secure.
Now we’re ready to reassemble the appliance.
Reassembling and finishing
Finish the repair by replacing all removable parts in reverse order:
- Set the access cover back over the icemaker assembly, aligning any guide tabs.
- Replace the small Phillips screws along the bottom edge of the cover.
- Carefully insert the ice bin or tray back into the shelf, making sure it sits flat.
- Engage any locking levers or sliding mechanisms until the bin clicks into place.
- Give the icemaker a light push to make sure nothing is loose or rattling.
- Plug your fridge back in and open the water supply valve to finish the repair
More information
Thanks for reading! If you have any other appliance repair needs or projects, you can find more resources including our DIY blog at AppliancePartsPros.com. There, you can enter your model number to order the exact parts you need. Most orders arrive in two business days.
You can also reach our award-winning customer service team at 1-877-477-7278, chat with a pro on our website and watch thousands of free video tutorials on our YouTube channel.
 https://www.appliancepartspros.com/b/wp-content/uploads/2025/04/APP-blog-square-150.jpg
1080
1080
Steven E
https://www.appliancepartspros.com/b/wp-content/uploads/2020/11/app-logo-std.png
Steven E2025-04-25 07:36:382025-08-11 07:56:22How to replace ice dispenser door link on an LG refrigerator
https://www.appliancepartspros.com/b/wp-content/uploads/2025/04/APP-blog-square-150.jpg
1080
1080
Steven E
https://www.appliancepartspros.com/b/wp-content/uploads/2020/11/app-logo-std.png
Steven E2025-04-25 07:36:382025-08-11 07:56:22How to replace ice dispenser door link on an LG refrigerator https://www.appliancepartspros.com/b/wp-content/uploads/2025/04/APP-blog-square-141.jpg
1080
1080
Steven E
https://www.appliancepartspros.com/b/wp-content/uploads/2020/11/app-logo-std.png
Steven E2025-04-21 12:38:192025-04-21 12:38:29Troubleshooting slow water flow from a refrigerator dispenser
https://www.appliancepartspros.com/b/wp-content/uploads/2025/04/APP-blog-square-141.jpg
1080
1080
Steven E
https://www.appliancepartspros.com/b/wp-content/uploads/2020/11/app-logo-std.png
Steven E2025-04-21 12:38:192025-04-21 12:38:29Troubleshooting slow water flow from a refrigerator dispenser https://www.appliancepartspros.com/b/wp-content/uploads/2025/04/APP-blog-square-142.jpg
1080
1080
Steven E
https://www.appliancepartspros.com/b/wp-content/uploads/2020/11/app-logo-std.png
Steven E2025-04-21 12:27:212025-04-21 12:27:31What are GE refrigerator Turbocool and Turbofreeze settings?
https://www.appliancepartspros.com/b/wp-content/uploads/2025/04/APP-blog-square-142.jpg
1080
1080
Steven E
https://www.appliancepartspros.com/b/wp-content/uploads/2020/11/app-logo-std.png
Steven E2025-04-21 12:27:212025-04-21 12:27:31What are GE refrigerator Turbocool and Turbofreeze settings?With nearly a decade of experience in providing top-notch customer service regarding appliance parts and repair, Steven enjoys sharing practical advice, troubleshooting tips, and interesting information to help readers stay informed.