Your Homeowner’s Guide to Replacing a Central AC Blower Motor
Steven E / Tuesday July 1, 2025
If your central air conditioning system is running but no air is coming out of the vents, or the airflow is unusually weak, it might be time to look at the blower motor. The blower motor is the part of your HVAC system that pushes cooled air through the ductwork and into your living spaces. Without it, your system simply can’t do its job.
The good news? If you’re comfortable using basic tools and following safety steps, replacing a central AC blower motor is a DIY task that many homeowners can handle. This guide will walk you through how to identify a bad blower motor, test the part, and replace it with confidence.
The information in this article may not apply to your specific appliance model. We recommend consulting your manufacturer’s documentation or contact us with any questions.
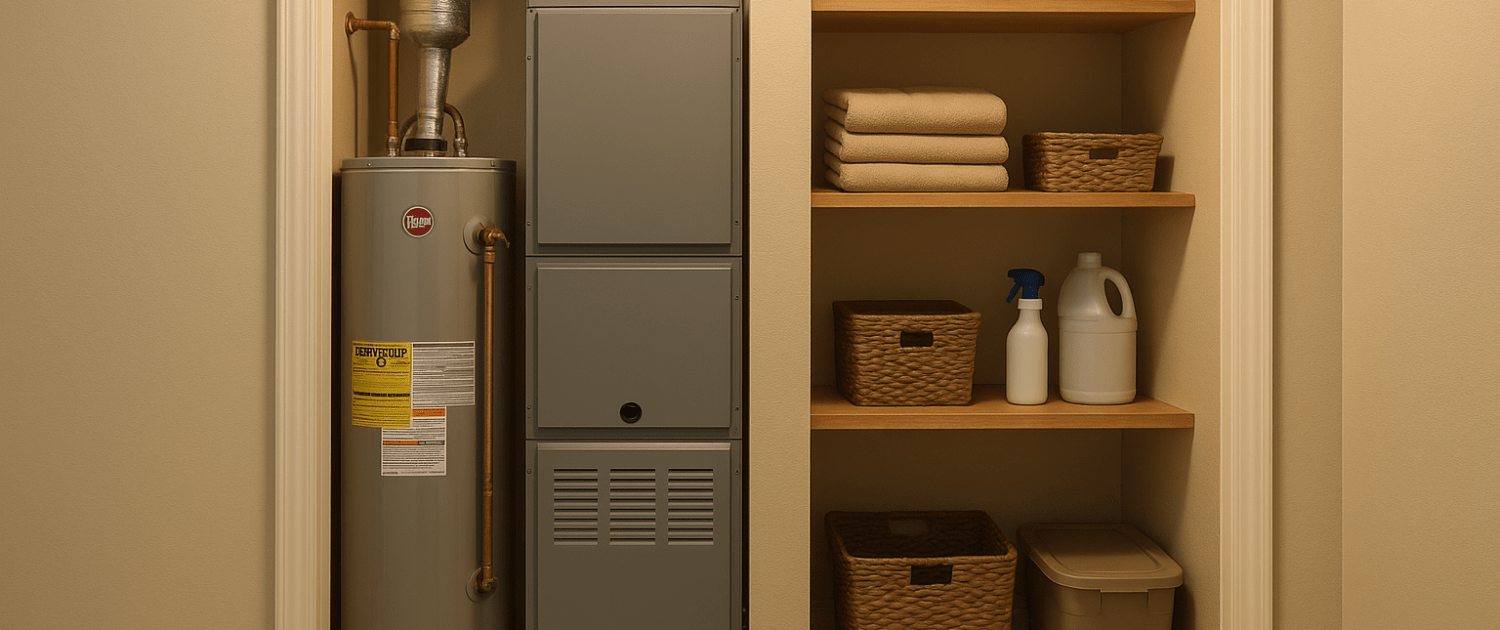
What the Blower Motor Does
The blower motor lives inside your air handler or furnace and powers a fan (usually a squirrel cage or blower wheel) that pushes air through your ducts. When your thermostat calls for cooling, the blower motor kicks on and keeps air circulating over your evaporator coil and into your home.

There are two common types:
- PSC (Permanent Split Capacitor) motors – Found in many older or standard-efficiency systems. These motors typically run at a single speed.
- ECM (Electronically Commutated Motors) – Found in newer or higher-efficiency systems. These are variable-speed and more efficient, but they require a matching control module and wiring.
Knowing which type you have will help you order the correct replacement.
Signs of a Failing Blower Motor
Before diving into removal and replacement, it’s important to confirm that the blower motor is the source of your airflow issue. Common signs of failure include:
- AC runs, but no air comes out of the vents
- Weak or inconsistent airflow
- Humming, rattling, or buzzing sounds from the air handler
- Motor or fan doesn’t spin
- Burning smell when system is on
- Frequent cycling or tripping of the breaker
If any of these symptoms describe your system, it’s time to test the motor and capacitor.
Tools and Supplies You’ll Need
Make sure you have the following on hand before getting started:
- Screwdrivers (flathead and Phillips)
- Nut drivers or socket set
- Needle-nose pliers or wire strippers
- Multimeter (with continuity and capacitance settings)
- Permanent marker or masking tape (for labeling wires)
- Electrical tape or wire connectors
- Vacuum or brush to clean housing
- Replacement blower motor (how to find your appliance’s model number)
- New capacitor (recommended)
Safety First
Before doing anything, turn off all power to your HVAC system at the main breaker panel. Even if the thermostat is off, the system can still carry voltage. Use a multimeter or non-contact voltage tester to confirm there’s no live power in the unit before continuing.
Access the Blower Assembly
- Open the air handler or furnace panel using a screwdriver or nut driver.
- Locate the blower assembly. It will look like a metal drum with a fan inside (called a blower wheel) and the motor mounted on it.
- Take a picture or make a diagram of the wiring connections for reference.
- Disconnect the motor wires carefully. Use tape and a marker to label them if needed.
Test the Capacitor
Many blower issues come from a bad capacitor, not the motor itself. The capacitor gives the motor the boost it needs to start. To test:
- Discharge the capacitor by bridging the terminals with an insulated screwdriver.
- Remove the wires.
- Set your multimeter to measure capacitance (µF).
- Compare the reading to the value listed on the side of the capacitor.
- If it’s more than 10% off, replace it.
Even if the capacitor seems fine, it’s a good idea to replace it whenever you replace the motor.
Remove the Blower Motor
- Unscrew or unbolt the blower assembly from the housing.
- Slide it out carefully, support the weight as you move it.
- Find the set screw or mounting clamp on the motor shaft and loosen it.
- Detach the motor from the blower wheel and housing.
Take your time with this step. The blower wheel is often made of lightweight metal or plastic and can bend easily.
Install the New Motor
- Insert the new motor shaft into the blower wheel hub.
- Align the shaft properly and tighten the set screw.
- Mount the motor back to the housing or support bracket.
- Ensure the blower wheel spins freely without rubbing.
- Reconnect all wires using your reference photo or labels.
Use new wire connectors if needed and ensure all connections are snug and properly insulated.
Reassemble and Test
- Slide the blower assembly back into the air handler.
- Secure all mounting screws.
- Reconnect any disconnected wires or control plugs.
- Replace the service panel.
- Restore power at the breaker.
- Set the thermostat to “Fan On” to test airflow.
Listen for unusual noises, and check that the fan starts smoothly and airflow is strong. If everything runs normally, your replacement was a success.
Where To Find Us
If you need any replacement parts for your appliances, you can enter your model number at AppliancePartsPros.com to locate and order them quickly. Most orders arrive in just two business days, and we have tons of great information in our repair help section and YouTube videos to help you troubleshoot.
Stay connected with the latest DIY tips, tutorial videos, and repair guides by following us on Facebook, Instagram, and Twitter. We love hearing about your repair stories and successes. If you need more help or want personalized guidance, feel free to reach out. We’re ready to help you take on your next project with confidence!
 https://www.appliancepartspros.com/b/wp-content/uploads/2022/04/shutterstock_561895921.jpg
1000
1500
APP Expert
https://www.appliancepartspros.com/b/wp-content/uploads/2020/11/app-logo-std.png
APP Expert2022-04-15 12:46:042025-07-18 11:06:32What is a Ductless Mini-Split Air Conditioner And How Does it Work?
https://www.appliancepartspros.com/b/wp-content/uploads/2022/04/shutterstock_561895921.jpg
1000
1500
APP Expert
https://www.appliancepartspros.com/b/wp-content/uploads/2020/11/app-logo-std.png
APP Expert2022-04-15 12:46:042025-07-18 11:06:32What is a Ductless Mini-Split Air Conditioner And How Does it Work? https://www.appliancepartspros.com/b/wp-content/uploads/2022/03/Untitled-design5-6.png
846
1495
Steven E
https://www.appliancepartspros.com/b/wp-content/uploads/2020/11/app-logo-std.png
Steven E2022-03-23 16:55:002025-07-18 09:53:20How to install a 3rd generation MRCOOL ductless mini split AC
https://www.appliancepartspros.com/b/wp-content/uploads/2022/03/Untitled-design5-6.png
846
1495
Steven E
https://www.appliancepartspros.com/b/wp-content/uploads/2020/11/app-logo-std.png
Steven E2022-03-23 16:55:002025-07-18 09:53:20How to install a 3rd generation MRCOOL ductless mini split ACWith nearly a decade of experience in providing top-notch customer service regarding appliance parts and repair, Steven enjoys sharing practical advice, troubleshooting tips, and interesting information to help readers stay informed.