GE Dishwasher Error Codes F48 and F49: Troubleshoot and Fix
Steven E / Tuesday May 20, 2025

If your GE dishwasher is giving you trouble with error codes F48 or F49, it can be a little tricky to figure out what’s wrong. But don’t worry – we’ve got you covered! In this guide, we’ll walk you through the steps to troubleshoot and fix these errors, so your dishwasher will be back to working like new. Let’s dive into the troubleshooting and get your dishwasher up and running!
If you find out that you need any replacement parts for your appliance while you’re troubleshooting, you can enter your model number at AppliancePartsPros.com to order them. Most orders arrive in just two business days, and we have thousands of free guides to show you how to install your new parts.
The information in this article may not apply to your specific appliance model. We recommend consulting your manufacturer’s documentation or contact us with any questions.
What causes F48 and F49 codes?
When the dishwasher control board is unable to properly interpret input from the turbidity sensor, it will display fault codes:

F48 – Turbidity sensor high
This code indicates the sensor is detecting very cloudy or soiled water conditions when it should not be. The control board senses the input as abnormally high turbidity readings.
Potential causes include:
- Debris, film buildup, or scratches on the sensor lenses obstruct light transmission and reception.
- Electrical noise interference leads to false readings.
- Damaged wiring connections between the sensor and control board.
- Failed LED transmitter or light receptor resulting in bad output signals.
F49 – Turbidity sensor low
This code is the inverse of the F48, with the control board sensing very clear water when it should be detecting some soil content.
Causes can include:
- Sensor lenses are too clean, resulting in insufficient light refraction.
- The buildup of film mutes the LED transmitter light output.
- Damaged wiring or connections providing low voltage.
- Failed LED or light receptor components cause low output.
The role of the turbidity sensor
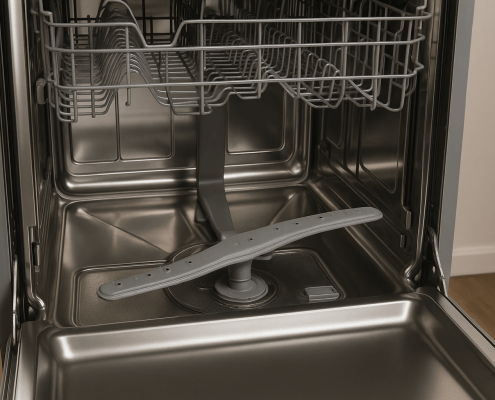
The turbidity sensor is located at the bottom of the dishwasher tub. It has a small LED transmitter and a light receptor. During operation, the condition of the wash water passing through the sump is measured.
Based on light refracted back to the receptor from suspended soil particles, the turbidity sensor can determine the relative soil levels and water clarity. The dishwasher control board interprets these readings.
If high soil content is detected early in a cycle, the control board knows it can skip certain prewash phases and shorten overall cycle times. This saves water and energy. As soil content diminishes, cycle phases proceed adaptively to ensure dishes come out clean.
Safety recommendations
When working on any appliance, remember to keep safety first. Here are some tips to keep in mind:
- Always power off and unplug your appliance or switch off the circuit breaker before attempting any maintenance or replacement work. This keeps you safe by preventing any risk of injury from electric shock.
- Wear insulated work gloves to protect your hands from sharp metal parts, pinching hazards and debris.
- Take your time and don’t rush while working to prevent accidents and personal injuries.
- Work in a well-lit area so you can clearly see and access the interior parts.
- Clear your workspace of clutter and other obstacles. Keep children and pets away from the work area.
- Never work on internal parts with bare wet hands. Make sure the work area is completely dry.
- Check your user manual to see if there are specific installation or safety instructions for your part or appliance.
- Be gentle when handling or removing parts. Excessive force might damage the appliance or cause injury.
- Wear safety glasses when working with chemicals, dust or cleaning large debris to prevent injury.
- If the appliance has recently been used, give it plenty of time for any heating parts to cool down before working on it.
- Take pictures or make a note of wiring terminals or other connections before disconnecting to prevent any problems with reassembly.
- When working with wires, avoid touching any exposed wires or terminals. If you need to touch a wire, use a non-conductive tool or wear insulating gloves to prevent electrical shock.
Troubleshooting steps
Step 1: Inspect sensor connections and wiring
Since F48/F49 codes often indicate electrical malfunctions versus actual water clarity issues, inspect sensor wiring first:
- Remove power to the dishwasher before servicing.
- Gain access to the turbidity sensor mounted in the bottom of the washtub sump.
- Disconnect the sensor’s wiring harness connector. Inspect for any damage to the harness or connector.
- Ensure wires are securely fastened to connector terminals. Check for broken or loose internal connections.
- Additionally, test the sensor with a multimeter. The sensor should measure around 10k ohms.
- Restore any loose wire connections and replace damaged wiring as needed.
- Reconnect harness to sensor and retest operation.
Step 2: Clean the turbidity sensor lenses
If the wiring checks out fine, next clean the sensor lenses:
- Wipe down the round inner faces of the sensor gently using a soft cloth or cotton swab.
- Use distilled white vinegar or glass cleaner to dissolve any debris or mineral deposits. Avoid abrasive cleaners.
- Take care not to scratch the plastic lens surfaces, as this can impair light transmission.
- Rinse lenses thoroughly with water afterward and let them dry completely before reinstalling the sensor.
Step 3: Replace defective sensor
If you’ve verified the sensor wiring is intact and connections secure, plus cleaned the sensor lenses thoroughly, but are still getting F48 or F49 errors, it’s likely the turbidity sensor itself has failed.
Replacement of the entire sensor assembly will be required. Here are the steps:
- Drain out all water from the dishwasher sump so the sensor area is dry.
- Twist the sensor 1⁄4 and turn counterclockwise to detach it from the sump housing.
- Disconnect the wire harness from the bad sensor.
- Install the new replacement turbidity sensor by firmly pushing and twisting it clockwise into the sump housing.
- Reconnect the wiring harness plug. Make sure it clicks fully into place.
- Run test cycles to verify normal turbidity sensor operation and no more fault codes.
More information
Thank you for reading! We hope you found this information useful to get your dishwasher working again.
If you have any other appliance repair needs or projects, don’t hesitate to explore our thousands of free videos and troubleshooting guides available. If you need replacement parts or some extra help, grab your model number and head over to AppliancePartsPros.com, where you can chat with a pro, order parts, read our DIY blog, and more.
Be sure to subscribe to us on YouTube and follow us on Facebook, Twitter, and Instagram!
 https://www.appliancepartspros.com/b/wp-content/uploads/2025/06/20250618_1135_Open-Dishwasher-Interior_simple_compose_01jy1tspt8frxbw1s0kphty34n.png
1024
1536
Steven E
https://www.appliancepartspros.com/b/wp-content/uploads/2020/11/app-logo-std.png
Steven E2025-06-19 06:08:512025-08-20 10:25:45Whirlpool Dishwasher Lower Spray Arm W10803178 Install Guide
https://www.appliancepartspros.com/b/wp-content/uploads/2025/06/20250618_1135_Open-Dishwasher-Interior_simple_compose_01jy1tspt8frxbw1s0kphty34n.png
1024
1536
Steven E
https://www.appliancepartspros.com/b/wp-content/uploads/2020/11/app-logo-std.png
Steven E2025-06-19 06:08:512025-08-20 10:25:45Whirlpool Dishwasher Lower Spray Arm W10803178 Install Guide https://www.appliancepartspros.com/b/wp-content/uploads/2025/06/20250618_1039_Open-Dishwasher-Latch_simple_compose_01jy1qj818fwfaqxpm29d92q0h.png
1024
1536
Steven E
https://www.appliancepartspros.com/b/wp-content/uploads/2020/11/app-logo-std.png
Steven E2025-06-19 05:37:352025-08-20 09:45:30How to Replace Door Latch 8193830 on a Whirlpool Dishwasher
https://www.appliancepartspros.com/b/wp-content/uploads/2025/06/20250618_1039_Open-Dishwasher-Latch_simple_compose_01jy1qj818fwfaqxpm29d92q0h.png
1024
1536
Steven E
https://www.appliancepartspros.com/b/wp-content/uploads/2020/11/app-logo-std.png
Steven E2025-06-19 05:37:352025-08-20 09:45:30How to Replace Door Latch 8193830 on a Whirlpool Dishwasher https://www.appliancepartspros.com/b/wp-content/uploads/2025/06/20250522_0842_Dishwasher-in-Sunlit-Kitchen_simple_compose_01jvw04ekdeqjtrnj7897hae8j.png
1024
1536
Steven E
https://www.appliancepartspros.com/b/wp-content/uploads/2020/11/app-logo-std.png
Steven E2025-06-19 05:22:312025-08-20 08:45:33DIY Install Door Spring WP8270182 on a Whirlpool Dishwasher
https://www.appliancepartspros.com/b/wp-content/uploads/2025/06/20250522_0842_Dishwasher-in-Sunlit-Kitchen_simple_compose_01jvw04ekdeqjtrnj7897hae8j.png
1024
1536
Steven E
https://www.appliancepartspros.com/b/wp-content/uploads/2020/11/app-logo-std.png
Steven E2025-06-19 05:22:312025-08-20 08:45:33DIY Install Door Spring WP8270182 on a Whirlpool DishwasherWith nearly a decade of experience in providing top-notch customer service regarding appliance parts and repair, Steven enjoys sharing practical advice, troubleshooting tips, and interesting information to help readers stay informed.