Guide to Replacing Icemaker AEQ72909603 on an LG Refrigerator
Steven E / Thursday June 19, 2025
Is your LG refrigerator leaving you high and dry with an empty ice bin? If your ice maker has called it quits, don’t worry—the solution is easier than you think! With our step-by-step guide and handy how-to video just below, you’ll learn how to replace your ice maker and get back to enjoying frosty drinks in no time.
Looking for the right part? Enter your appliance model number below to find the exact match and get your appliance running like new again!
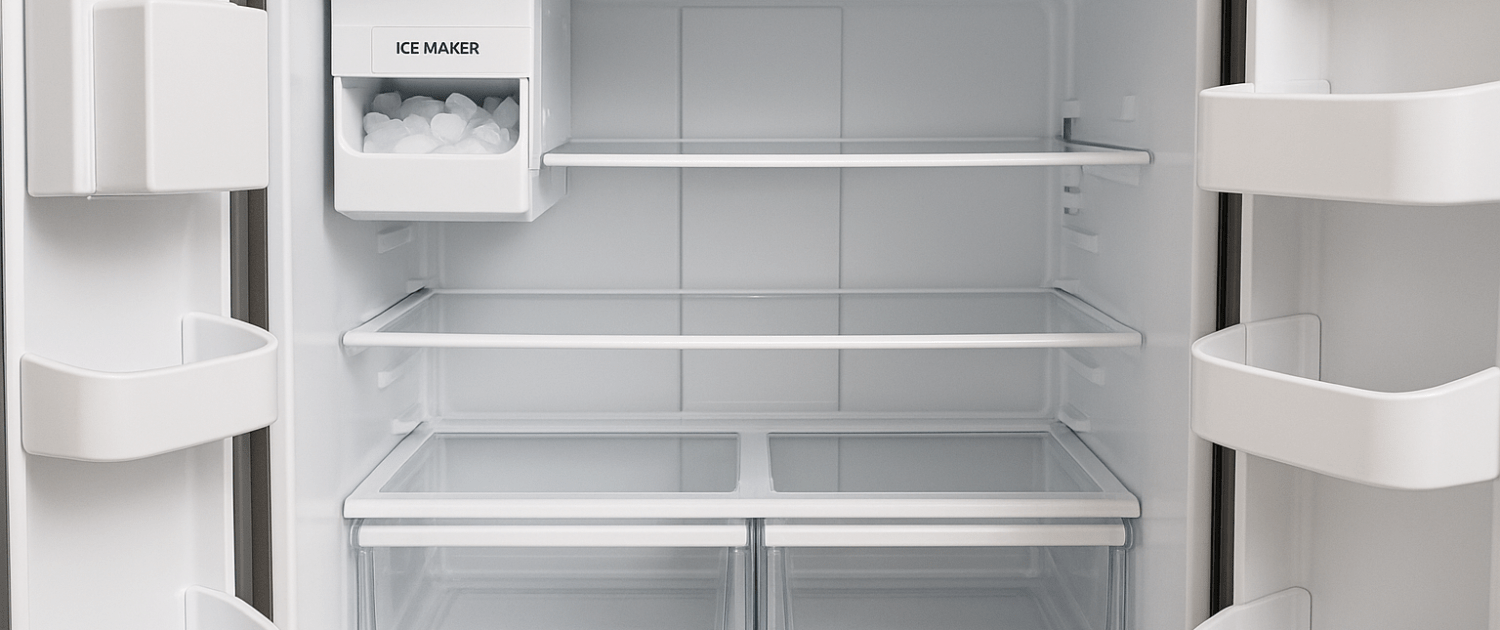
If your LG refrigerator has stopped making ice or the ice maker seems jammed or unresponsive, it might be time for a replacement. The ice maker unit, part number AEQ72909603, is responsible for freezing and dispensing ice into the bin. When it fails, you might notice low ice production or no ice at all. The good news is that swapping it out is a straightforward repair you can tackle yourself with just a few tools. In this guide, we’ll walk you through how to remove the old ice maker and install a new one step by step. Let’s get started.

Watch here: How to replace the ice maker on a refrigerator
The information in this article may not apply to your specific appliance model. We recommend consulting your manufacturer’s documentation or contact us with any questions.
Safety first
When working on any appliance, always keep safety first to avoid personal injury or damage to the appliance or parts. Here are some safety tips to keep in mind:
- If the appliance has recently been used, give it plenty of time to cool down before working on it.
- Take your time while working to prevent accidents and personal injuries. Rushing is the enemy of precision.
- Work in a well-lit area so you can clearly see and access appliance parts.
- Keep your workspace free of clutter and other obstacles. Keep children and pets away from the work area.
- Never work on internal parts with wet hands. Make sure the work area is completely dry.
- Check the user manual to see if there are specific installation or safety instructions related to your appliance or replacement part.
- Be gentle when handling or removing parts. Excessive force might damage the appliance or cause personal injury.
- Wear insulated work gloves to protect your hands from sharp metal parts and debris.
- When working with wires, avoid touching any exposed wires or terminals. If you need to touch a wire, use a non-conductive tool or wear insulating gloves to prevent electrical shock.
- Don’t test live voltage with a multimeter if you’re unfamiliar with how to prevent short-circuiting.
- Consider wearing safety glasses and/or a dust mask when working with chemicals, dust or a large amount of debris to prevent irritation or injury.
- Turn off the water supply at the outlet before beginning repairs. Keep towels ready to catch any residual water in the system when removing parts.
Tools and materials needed
Before we dive into the nitty-gritty details, let’s make sure that you have everything you need to complete this DIY project. First and foremost, you’ll require a few trusty tools:
- Phillips screwdriver
- A flat-blade screwdriver
- Ice maker assembly part #AEQ72909603– Take your model number to AppliancePartsPros.com to locate the correct part for your unit.
Step 1: Prepare the refrigerator
Always power off and unplug your appliance or switch off the circuit breaker before you attempt any maintenance or replacement work. This keeps you safe by preventing any risk of electric shock.
- Open the freezer door.
- Empty the ice bucket and remove it from the freezer compartment. Start by lifting up the front end of the bucket and carefully sliding it out.
- Locate the basket within the freezer compartment, grab it, and lift the back up. Once you’ve done this, you should be able to pull the basket out completely, creating even more space for you to work.
Step 2: Remove the freezer door
- Locate the two Phillips screws, one on each side of the freezer door. Use a Phillips screwdriver to remove those screws.
- Carefully remove the freezer door. It’s important to note that you should avoid grabbing the door by the handle, as this could cause it to break. Instead, support the door on one side, lift it up, and remove it from the refrigerator.
Step 3: Disconnect the ice maker assembly
- Locate the connecting rod and gear that are attached to the rails. Using your flat-blade screwdriver, gently pry out the gear and rod from one side, then pull it out from the opposite side. This will allow you to remove the rod and gear completely.
- Next, you’ll need to remove the two Phillips screws that are securing the ice maker assembly in place. Use your Phillips screwdriver to unscrew these screws, one on each side of the assembly.
- On either side of the ice maker assembly, you’ll notice two clips that are holding it in place. Using your flat-blade screwdriver, carefully insert it into the slot next to each clip and open the tab. This will release the clips, allowing you to disengage the assembly.
- After releasing the clips, you’ll need to pull the ice maker assembly slightly down and forward to disengage the clips at the back. Be gentle during this process, as you don’t want to damage any components.
- Finally, locate the plug that connects the ice maker assembly to the refrigerator’s electrical system. On the top of the plug, you’ll find a locking tab. Push down on this tab, and then you should be able to pull the plug out, completely disconnecting the ice maker assembly.
Step 4: Install the new ice maker assembly
- Locate the on/off switch on the new assembly. Make sure this switch is in the “on” position before proceeding with the installation.
- You may also notice a test switch on the new ice maker assembly. By pressing this switch, you can bypass the normal startup sequence and immediately test if the assembly is functioning correctly.
- Start by connecting the new ice maker assembly to the refrigerator’s electrical system. Locate the plug socket and carefully insert the plug, making sure that it clicks and locks into place.
- Next, you’ll need to insert the new assembly into the rear slots where the old one was situated. Press the assembly into the slots, and then slide it back until the tabs lock into place.
- Using your Phillips screwdriver, secure the ice maker assembly by reinstalling the two screws, one on each side.
- With the assembly in place, it’s time to reconnect the connecting rod and gear. Start by sliding one end of the rod into the gear on the left side of the assembly. Make sure that the rails are pulled out completely, and then align the gear teeth with the cutout on the rail at the bottom. Once aligned, press the gear into the rail.
Step 5: Finish up
- Reinstall the freezer door. Begin by placing the hooks at the back of the door onto the rails. Then, lower the front part of the door onto the rails. Once the door is in position, use your Phillips screwdriver to tighten the screws and secure the door in place.
- Replace the freezer basket. Slide the basket onto the rails, lower the back part, and make sure that it’s securely in place within the freezer compartment.
- Reinstall the ice bucket. To do this, you’ll need to fit the curved part of the bucket into the corresponding curve in the refrigerator. Place the bucket down onto the rails and slide it into position.
- Finally, plug in the refrigerator or turn the circuit breaker back on to restore power and water to the appliance. Allow some time for the refrigerator to cool down, and then check if the new ice maker assembly is functioning correctly and producing fresh ice cubes.
More information
Thanks for reading! We hope this guide helped you replace the ice maker in your LG refrigerator.
If you still need some replacement parts, grab your model number and head over to AppliancePartsPros.com. We offer over two million parts and most orders arrive in two business days. If you need some help with finding the right part or placing an order, you can contact our team at 1 (877) 477-7278.
While you’re waiting for your new part to arrive, you can explore our DIY blog and watch thousands of video tutorials on our YouTube channel.
Be sure to follow us on Facebook, Twitter and Instagram to see our latest repair guides!
 https://www.appliancepartspros.com/b/wp-content/uploads/2024/06/Copy-of-Copy-of-Copy-of-Copy-of-app-blog-square-13.jpg
1080
1080
Steven E
https://www.appliancepartspros.com/b/wp-content/uploads/2020/11/app-logo-std.png
Steven E2024-06-06 10:41:262024-06-20 10:30:31How to move a refrigerator like a pro
https://www.appliancepartspros.com/b/wp-content/uploads/2024/06/Copy-of-Copy-of-Copy-of-Copy-of-app-blog-square-13.jpg
1080
1080
Steven E
https://www.appliancepartspros.com/b/wp-content/uploads/2020/11/app-logo-std.png
Steven E2024-06-06 10:41:262024-06-20 10:30:31How to move a refrigerator like a pro https://www.appliancepartspros.com/b/wp-content/uploads/2024/06/Copy-of-Copy-of-Copy-of-Copy-of-app-blog-square-4.jpg
1080
1080
Samantha Bullington
https://www.appliancepartspros.com/b/wp-content/uploads/2020/11/app-logo-std.png
Samantha Bullington2024-06-05 06:01:032025-07-31 11:51:29How to replace French door housing DA61-04286A on a Samsung refrigerator
https://www.appliancepartspros.com/b/wp-content/uploads/2024/06/Copy-of-Copy-of-Copy-of-Copy-of-app-blog-square-4.jpg
1080
1080
Samantha Bullington
https://www.appliancepartspros.com/b/wp-content/uploads/2020/11/app-logo-std.png
Samantha Bullington2024-06-05 06:01:032025-07-31 11:51:29How to replace French door housing DA61-04286A on a Samsung refrigerator https://www.appliancepartspros.com/b/wp-content/uploads/2024/06/Copy-of-Copy-of-Copy-of-Copy-of-app-blog-square-3.jpg
1080
1080
Samantha Bullington
https://www.appliancepartspros.com/b/wp-content/uploads/2020/11/app-logo-std.png
Samantha Bullington2024-06-05 05:45:592024-06-20 06:51:137 tips for refrigerator storage to keep food fresh & family safe
https://www.appliancepartspros.com/b/wp-content/uploads/2024/06/Copy-of-Copy-of-Copy-of-Copy-of-app-blog-square-3.jpg
1080
1080
Samantha Bullington
https://www.appliancepartspros.com/b/wp-content/uploads/2020/11/app-logo-std.png
Samantha Bullington2024-06-05 05:45:592024-06-20 06:51:137 tips for refrigerator storage to keep food fresh & family safeWith nearly a decade of experience in providing top-notch customer service regarding appliance parts and repair, Steven enjoys sharing practical advice, troubleshooting tips, and interesting information to help readers stay informed.