How to Fix the F1E1 Error Code on Your Maytag Dryer
Steven E / Friday May 9, 2025
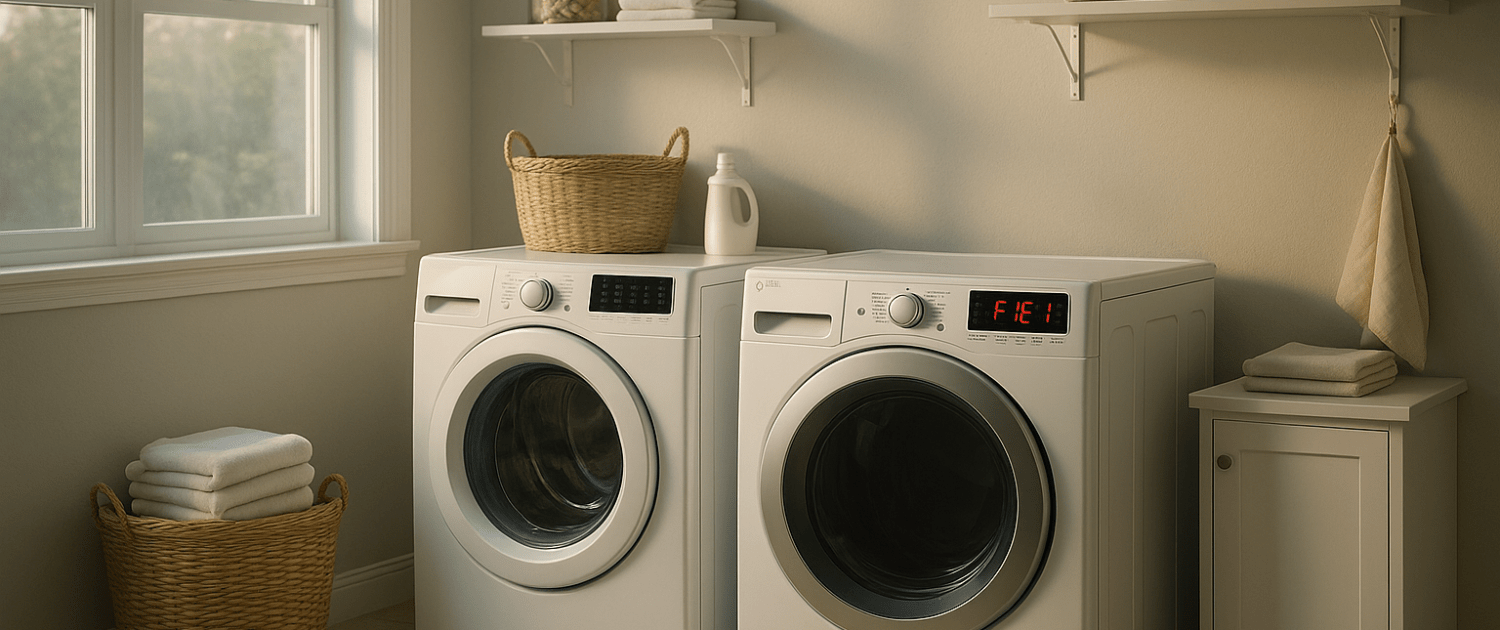
If you own a Whirlpool or Maytag front-load dryer, you may encounter an F1E1 error code at some point. This code can be frustrating, but with the right information, you can troubleshoot the issue and get your dryer running again. In this article, we’ll break down what the F1E1 Maytag dryer error code means, and its common causes, and provide a step-by-step guide to diagnosing and repairing the problem.
The information in this article may not apply to your specific appliance model. We recommend consulting your manufacturer’s documentation or contact us with any questions.
What does the error code mean?
The F1E1 error code appears on the user interface control when it indicates a problem with voltage to the heating system in Whirlpool and Maytag front-load dryers. Specifically, it means no voltage is detected at the heater relay. This relay controls power to the heating elements and is a key component in generating heat.
In electric models, the dryer uses heating elements to warm the air. On gas models, the relay activates the gas valve and ignition system. If the relay isn’t getting voltage, it can’t turn on the heat source.

Without proper voltage to the heating system, the dryer won’t be able to raise the air temperature needed to dry your clothes. The F1E1 code is designed to alert you to this electrical issue before running a cycle.
What causes the error code?
There are a few root causes that can trigger an F1E1 error code:
- Faulty heater relay – The contacts inside the relay may be broken or corroded, preventing voltage from passing through. This relay is responsible for switching power to the heating elements or gas valve.
- Heater element failure – The heating coils or ignitor assembly could be burned out or damaged, causing an open circuit. This prevents voltage from reaching the relay.
- Wiring problems – With electrical dryers, broken or loose wires along the heating circuit can interrupt the power supply. Check wire connections to the heating elements and relay.
- Motor issues – The drive motor has internal windings that heat up when operating. If motor windings are damaged, it can mimic a heating system problem.
- Control board – The appliance control unit or “main control board” oversees the operation. If it’s defective, it may not send voltage to the heating relay.
Essentially, any disruption along the heating circuit or internal failure of its control electronics can prevent voltage from reaching the heater relay, resulting in an F1E1 code.
Safety precautions
When working on any appliance, remember to keep safety first. Here are some tips to keep in mind:
- Always power off and unplug your appliance or switch off the circuit breaker before attempting any maintenance or replacement work. This keeps you safe by preventing any risk of injury from electric shock.
- Wear insulated work gloves to protect your hands from sharp metal parts, pinching hazards and debris.
- Take your time and don’t rush while working to prevent accidents and personal injuries.
- Work in a well-lit area so you can clearly see and access the interior parts.
- Clear your workspace of clutter and other obstacles. Keep children and pets away from the work area.
- Never work on internal parts with bare wet hands. Make sure the work area is completely dry.
- Check your user manual to see if there are specific installation or safety instructions for your part or appliance.
- Be gentle when handling or removing parts. Excessive force might damage the appliance or cause injury.
- Wear safety glasses when working with chemicals, dust or cleaning large debris to prevent injury.
- If the appliance has recently been used, give it plenty of time for any heating parts to cool down before working on it.
- Take pictures or make a note of wiring terminals or other connections before disconnecting to prevent any problems with reassembly.
- When working with wires, avoid touching any exposed wires or terminals. If you need to touch a wire, use a non-conductive tool or wear insulating gloves to prevent electrical shock.
Troubleshooting steps
If your Whirlpool or Maytag dryer is displaying error code F1E1, don’t panic. With some basic DIY troubleshooting, you can often track down the source of the problem. Here is a step-by-step guide:
Before any appliance repair, it’s important to disconnect power from the dryer. Locate the cord or junction box and either turns off the house circuit breaker or unplug the dryer. This prevents electric shock hazards while testing components.
Step 1: Inspect wire connections
- Remove the back panel of the dryer to access the internal components and the dryer terminal block.
- Visually inspect the wire harness connections that run between the control board, heating elements or ignitor, gas valve, and relay.
- Check that the wire connectors are securely attached.
- Gently wiggle them to see if there are any loose power cord connections.
- Look for any damaged, frayed, or burned power cord wiring.
- Even minor breaks in heating system wires can cause an code.
Step 2: Check the heater relay
- The heater relay is responsible for switching voltage to the heating elements or gas valve coil assembly.
- To test the relay, unplug the harness connector.
- Use a multimeter to check continuity across the coil terminals.
- You should get a reading of around 100 ohms. If open, the coil is damaged.
- With the power disconnected, check continuity across the closed contacts.
- There should be zero ohms when the contacts are closed.
- If you get an OL reading, the contacts are stuck open.
- Use a multimeter to check for 120V at the coil terminals during a heated dry cycle.
- If voltage is present but the coil doesn’t energize, the relay is faulty.
- Replace the entire heater relay if any of these conditions fail.
Step 3: Check heating element circuits
- Electric dryers use between 1 and 3 heating elements to produce heat.
- Remove the housing cover to access the elements. Unplug the wire leads at the ceramic terminal blocks.
- Use your multimeter to check resistance across the terminals. Typical readings are 10-25 ohms.
- If the reading is zero or infinite, the heating element coil is burned out and needs replacement.
- Check for continuity to ground, which would indicate shortened element wires.
- Visually inspect the insulation on the element coils for cracks, charring, or melting.
- Replace the element if physical damage is found.
Step 4: Verify motor windings
- The drive motor powers the drum rotation in a dryer.
- Locate the plug connector on the motor body. Use needle probes to contact the winding terminals.
- Take resistance readings between winding pole pairs.
- Consult the service manual for the exact resistance specification.
- Readings differing more than 10% from spec indicate faulty motor windings.
- Replace the motor if the windings are determined to be defective.
Step 5: Test gas valve coils
- Gas dryers rely on a gas valve assembly mounted to the burner housing. When activated, the valve releases natural gas which is ignited by a hot surface ignitor.
- The gas valve uses two internal coils to control the flow of gas. The coils act as electro-magnets to pull the valve open when energized by the control board.
- To test the coils, locate the harness plug on the gas valve. Use a multimeter to check the resistance across the coil poles:
Coil 1 (terminals 1 & 2) – Resistance should be 1400±70 ohms.
Coil 2 (terminals 1 & 3) – Resistance should be 570±28.5 ohms.
Coil 3 (terminals 4 & 5) – Resistance should be 1300±65 ohms.
- If any coil resistance falls outside the acceptable range, the gas valve must be replaced.
- Inspect the plastic coil housing for cracks and moisture, which can short the coils internally.
- Check for continuity between the coil terminals and the valve body. Any reading other than infinite indicates a shorted coil.
Step 6: Confirm control board operation
- If all other components test well, the appliance’s electronic control board may be defective.
- Run diagnostics to check for voltage outputs.
- Replace with the correct electronic control board if voltages are absent. Make sure to get the one for your model.
- Reinstall the dryer’s back panel and plug it in to reconnect power.
- Run a timed high-heat cycle to verify normal operation before using it again.
- The F1E1 code should clear once proper voltage is applied.
Additional information
Thank you for reading! We hope you found this information useful to get your dryer working again.
If you have any other appliance repair needs or projects, don’t hesitate to explore our thousands of free videos and troubleshooting guides available. If you need replacement parts or some extra help, grab your model number and head over to AppliancePartsPros.com, where you can chat with a pro, order parts, read our DIY blog, and more.
Be sure to subscribe to us on YouTube and follow us on Facebook, Twitter, and Instagram!
 https://www.appliancepartspros.com/b/wp-content/uploads/2025/05/20250509_0957_Error-Display-on-Oven_simple_compose_01jttn9dfkevmr61afcdq2md70.png
801
1536
Steven E
https://www.appliancepartspros.com/b/wp-content/uploads/2020/11/app-logo-std.png
Steven E2025-05-13 05:51:312025-05-13 05:51:40F41 and F43 Bosch Oven Error Codes: A Troubleshooting Guide
https://www.appliancepartspros.com/b/wp-content/uploads/2025/05/20250509_0957_Error-Display-on-Oven_simple_compose_01jttn9dfkevmr61afcdq2md70.png
801
1536
Steven E
https://www.appliancepartspros.com/b/wp-content/uploads/2020/11/app-logo-std.png
Steven E2025-05-13 05:51:312025-05-13 05:51:40F41 and F43 Bosch Oven Error Codes: A Troubleshooting Guide https://www.appliancepartspros.com/b/wp-content/uploads/2025/05/20250509_0927_Oven-Error-Display_simple_compose_01jttkgzj5eb6vfk1rv60gnvsa.png
1024
1536
Steven E
https://www.appliancepartspros.com/b/wp-content/uploads/2020/11/app-logo-std.png
Steven E2025-05-13 05:48:462025-05-13 05:48:55How to Fix Bosch Oven Errors F2, F3, F31, F32, F33, and F34
https://www.appliancepartspros.com/b/wp-content/uploads/2025/05/20250509_0927_Oven-Error-Display_simple_compose_01jttkgzj5eb6vfk1rv60gnvsa.png
1024
1536
Steven E
https://www.appliancepartspros.com/b/wp-content/uploads/2020/11/app-logo-std.png
Steven E2025-05-13 05:48:462025-05-13 05:48:55How to Fix Bosch Oven Errors F2, F3, F31, F32, F33, and F34 https://www.appliancepartspros.com/b/wp-content/uploads/2025/05/20250509_0927_Wall-Oven-Error_simple_compose_01jttkj3a7ehda73jgtemjv79z.png
1024
1536
Steven E
https://www.appliancepartspros.com/b/wp-content/uploads/2020/11/app-logo-std.png
Steven E2025-05-13 05:46:202025-05-13 05:46:29How To Troubleshoot And Fix Error Code F1 On a Bosch Oven
https://www.appliancepartspros.com/b/wp-content/uploads/2025/05/20250509_0927_Wall-Oven-Error_simple_compose_01jttkj3a7ehda73jgtemjv79z.png
1024
1536
Steven E
https://www.appliancepartspros.com/b/wp-content/uploads/2020/11/app-logo-std.png
Steven E2025-05-13 05:46:202025-05-13 05:46:29How To Troubleshoot And Fix Error Code F1 On a Bosch OvenWith nearly a decade of experience in providing top-notch customer service regarding appliance parts and repair, Steven enjoys sharing practical advice, troubleshooting tips, and interesting information to help readers stay informed.