How to replace drive belt 661570V in a Whirlpool, Maytag or KitchenAid dryer
Samantha Bullington / Friday February 2, 2024
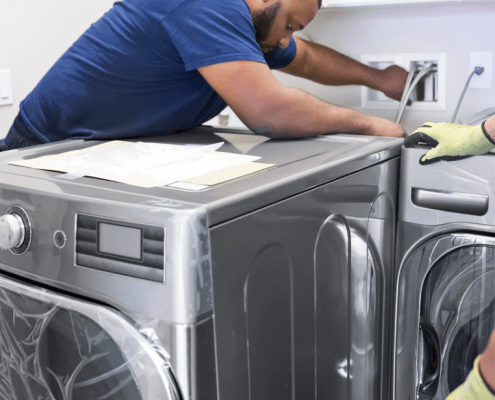
Is your dryer leaving clothes damp and disrupting your laundry routine? If your Whirlpool, KitchenAid, or Maytag dryer drum has stopped turning while the machine still runs, a faulty drive belt could be to blame. Fear not—our step-by-step video tutorial below will guide you through the easy process of replacing it yourself!
When your dryer suddenly stops drying, it can mess up your whole laundry routine. If you’ve noticed that your Whirlpool, KitchenAid or Maytag dryer drum has stopped turning but the machine itself is still running, or if you’ve heard a loud thump, there’s a good chance that the drive belt has either come loose or snapped.
But don’t worry – you’re in the right place! Replacing the drive belt is an easy repair that you can do in just a few minutes.

If you need a new drive belt 661570V, you can order one here. For any other replacement parts, just enter your dryer’s model number at AppliancePartsPros.com to find what you need. Most orders will arrive at your door within two business days, and we have thousands of guides to show you how to install them.
WATCH: How to install a dryer belt
What you need
- New replacement belt (make sure it’s compatible with your dryer model)
- Phillips head screwdriver
- 1/4-inch nut driver
- Small flat-head screwdriver
- Gloves
Keep safety first
When working on any appliance, always keep safety first to avoid personal injury or damage to the appliance or parts. Here are some safety tips to keep in mind:
- Always power off and unplug your dryer or switch off the circuit breaker before you attempt any maintenance or replacement work. This keeps you safe by preventing any risk of electric shock.
- If you have a gas dryer, turn off the gas.
- If the dryer has recently been used, give it plenty of time to cool down before working on it.
- Take your time and don’t rush while working to prevent accidents and personal injuries.
- Work in a well-lit area so you can clearly see and access dryer parts.
- Keep your workspace free of clutter and other obstacles. Keep children and pets away from the work area.
- Never work on internal parts with wet hands. Make sure the work area is completely dry.
- Check the user manual to see if there are specific installation or safety instructions related to your dryer or replacement part.
- Be gentle when handling or removing parts. Excessive force might damage the dryer or cause personal injury.
- Wear insulated work gloves to protect your hands from sharp metal parts and debris.
- When working with wires, avoid touching any exposed wires or terminals. If you need to touch a wire, use a non-conductive tool or wear insulating gloves to prevent electrical shock.
- Consider wearing safety glasses and/or a dust mask when working with chemicals, dust or a large amount of debris to prevent irritation or injury.
READ MORE: Troubleshooting Tips for a Dryer Drum That Does Not Turn

Replacement steps
Step 1 – Remove the top panel
- Use your 1/4-inch nut driver to remove the 3 screws on the back of the panel.
- Pull back on the top and lift it up off the machine.
- Set the top aside.
Step 2 – Remove the console
- Use your 1/4-inch nut driver to remove the 3 screws holding the control board.
- Carefully rotate the panel up; stay aware of the wiring connected to it.
- Use a small screwdriver to press on the locking tabs to remove the ribbon cables from the control board.
- Use your 1/4-inch nut driver to remove the 2 screws holding the console.
- Open the door, then grab the console and flex it towards you so the tabs holding it in will release.
Step 3 – Take out the lint screen and housing
- Take out the lint screen and close the door.
- Use your 1/4-inch nut driver to remove the 2 screws holding the access panel.
- Use your 1/4-inch nut driver to remove the duct by removing the bracket mounting screw and 2 screws on the top and slide it out.
- Use a flat-blade screwdriver to disconnect the moisture sensor wiring harness.
Step 4 – Remove the front panel
- Use a 1/4-inch nut driver to remove the 2 lower and the 2 upper screws.
- Use the 1/4-inch nut driver to loosen up the 2 front screws enough to pull off the front panel.
- Remove the door switch wiring harness. You can use a flat-blade screwdriver to release the tab.
- Flip the control board up and out of the way and remove the front panel.
READ MORE: How to Clean a Dryer Vent
Step 5 – Remove the old belt and install the new one
- Find the idler pulley and pull it back to release the tension on the old belt so you can get it off the motor pulley
- Lift the drum up and slide the old belt out.
- Slide the new belt on the drum. Lift the drum up to make sure you get the belt completely around the drum.
- Once you get the belt a little bit past the center of the tub, you may see a black line where your old belt was riding. Make sure the new belt is right on that same line, the grooves are down and the colored part is up.
- Reach under the drum and thread the belt through the pulleys. Make sure the belt doesn’t get twisted up.
- Rotate the drum to make sure the belt is on correctly.
Step 6 – Reassemble the dryer
- Make sure the drum is on the rollers. You may need to angle it in and lift up on the drum to rest on the rollers.
- Lift the front panel up and hang it on the top mounting screws.
- Replace the screws on the panel.
- Clip the moisture sensor and door switch harness back in.
- Reinstall the duct housing.
- Reinstall the access panel.
- Reinstall the control panel by making sure the tabs go into the openings on each end, then install the screws on the panel.
- Hook up the ribbon cables on the control board and make sure it’s locked into place and secure.
- Rotate the mounting panel over and reinstall the screws.
- Set the top down a little behind the console, then slide it forward under the tabs so it locks into place.
- Replace the screws on the top panel.
- Slide the lint filter back in and shut the door.
READ MORE: 5 Alternate Uses for Extra Dryer Sheets
More information
Thanks for reading! We hope this guide helped you replace the drive belt in your Whirlpool, Maytag or KitchenAid dryer.
If you still need some replacement parts, grab your model number and head over to AppliancePartsPros.com. We offer over two million parts and most orders arrive in two business days. If you need some help with finding the right part or placing an order, you can contact our team at 1 (877) 477-7278. We can also help you troubleshoot common dryer problems here.
While you’re waiting for your new part to arrive, you can explore our DIY blog and watch thousands of video tutorials on our YouTube channel.
Be sure to follow us on Facebook, Twitter and Instagram to see our latest repair guides!
 https://www.appliancepartspros.com/b/wp-content/uploads/2023/06/how-to-install-a-new-dryer.png
616
955
Steven E
https://www.appliancepartspros.com/b/wp-content/uploads/2020/11/app-logo-std.png
Steven E2023-07-24 11:39:052023-07-24 11:39:15E1 and E2 Maytag Dryer Error Code: A Troubleshooting Guide
https://www.appliancepartspros.com/b/wp-content/uploads/2023/06/how-to-install-a-new-dryer.png
616
955
APP Expert
https://www.appliancepartspros.com/b/wp-content/uploads/2020/11/app-logo-std.png
APP Expert2023-07-05 13:45:442023-07-05 13:45:51How To Install A New Dryer: A Step-by-Step Guide
https://www.appliancepartspros.com/b/wp-content/uploads/2023/06/how-to-install-a-new-dryer.png
616
955
Steven E
https://www.appliancepartspros.com/b/wp-content/uploads/2020/11/app-logo-std.png
Steven E2023-07-24 11:39:052023-07-24 11:39:15E1 and E2 Maytag Dryer Error Code: A Troubleshooting Guide
https://www.appliancepartspros.com/b/wp-content/uploads/2023/06/how-to-install-a-new-dryer.png
616
955
APP Expert
https://www.appliancepartspros.com/b/wp-content/uploads/2020/11/app-logo-std.png
APP Expert2023-07-05 13:45:442023-07-05 13:45:51How To Install A New Dryer: A Step-by-Step Guide https://www.appliancepartspros.com/b/wp-content/uploads/2023/06/shutterstock_208307404-scaled.jpg
1707
2560
Steven E
https://www.appliancepartspros.com/b/wp-content/uploads/2020/11/app-logo-std.png
Steven E2023-06-23 07:02:562023-07-21 13:48:40Ideas To Make A Small Laundry Room More Functional
https://www.appliancepartspros.com/b/wp-content/uploads/2023/06/shutterstock_208307404-scaled.jpg
1707
2560
Steven E
https://www.appliancepartspros.com/b/wp-content/uploads/2020/11/app-logo-std.png
Steven E2023-06-23 07:02:562023-07-21 13:48:40Ideas To Make A Small Laundry Room More FunctionalHey there, I’m Samantha and I’m super excited to be a part of the Appliance Parts Pros team! With 9 years of experience, I’ve had the awesome opportunity to assist countless customers in troubleshooting their home appliances and finding DIY repair solutions.